
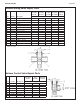
Specifications


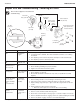

TDB3108, WF3208 Installation
24 1/23/2013 Bradley • 215-1471 Rev. F; ECN 13-00-001
Problem Cause Solution
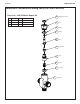
External leaks. Damaged O-rings. Replace O-rings where necessary. For replacement of the
O-rings, contact your Bradley representative and ask for
Repair Kit (part number S65-259).
Improper water
temperature or
temperature
fluctuation.
Thermostat is slowly failing or not working at all. Check the thermostat for proper operation.
1. At room temperature (80° F or less) remove cap
and thermostat.
2. Place thermostat into container with 115° F water.
The pushrod should pop out of the thermostat
approximately 1/10".
3. If thermostat pushrod does not pop out, the
thermostat must be replaced. Contact your Bradley
representative and ask for Repair Kit (part number
S65-259).
Valve temperature is not properly set. Adjust the temperature as shown on page 14, step 6.
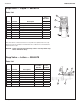
Limited water flow. Dirt and debris have built up in the valve or strainer. Remove and clean strainer. If strainer needs to be
replaced, order Bradley part no. 173-028.
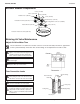
Check the piston for smooth movement.
1. Remove the valve's cap and thermostat.
2. Push down on the piston with your finger (the piston
should move freely). If the movement is not as it
should be, the piston needs to be cleaned. Follow
the method outlined below for cleaning the piston
and valve body:
• Remove the thermostat.
• Lift the piston out with a needle-nose pliers
and remove the spring.
• Any cleaner suitable for brass and stainless
steel may be used (if cleaning with suitable
cleaner is not sufficient to remove debris, a
400-grit sandpaper may be used to polish and
hone the piston and valve body).
• Snap spring into piston (will detent) and
reassemble into the valve body. Retest the
piston.
3. If, after a thorough cleaning, the piston does not
move freely, the piston must be replaced. Contact
your Bradley representative and ask for Repair Kit
(part number S65-259).
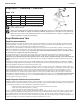
Thermostatic Mixing Valve Troubleshooting
Before attempting to troubleshoot the valve or disassemble the components, check for the following
conditions:
• If stop/check valves are used, make sure that they are fully open.
• Make sure that the hot and cold inlet pipes are connected properly, and that there are no cross-connections
or leaking stop/check valves.
• Check the hot water heater output to make sure that it is at least 20° F above the set temperature.
Be sure to close the appropriate shut-off valves prior to disassembly of the valve and reopen the valves after inspection
and repair is complete.