
Specifications


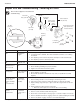
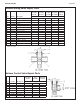

Installation TDB3108, WF3208
Bradley • 215-1471 Rev. F; ECN 13-00-001 1/23/2013 21
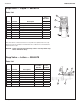
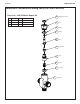
Rubber Diaphragm
(269-665)
Parts Included in
Kit (S65-110)
Repair Kit (S73-054A)
(This repair kit also
includes S65-110)
Plastic Disk
(269-664)
Stainless Steel
Disk (179-082)
Spring
(135-053)
Screw
(160-313)
Lockwasher
(142-002CR)
1/4" Tube
Connector
Valve Seat
(117-036)
Lower Valve
Body (118-183)
Turn off water supplies to the unit before
troubleshooting.
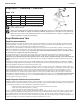
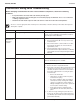
Repair Kits and Troubleshooting – Metering Air Valve
Problem Cause Solution
Valve will not shut
OFF.
Timing
mechanism is
clogged.
Clean and inspect timing mechanism:
1. If compressed air is available, blow water and debris from timer cover of timing
mechanism.
2. Turn adjusting screw out all the way. Clean and inspect screw and valve body.
3. Turn adjusting screw in to desired cycle time.
Valve will not turn
ON.
Water is not being
supplied to unit.
Open all stops on mixing valve.
Timing can not be
adjusted for more
than 5 seconds.
There is an air
leak.
Check the valve assembly:
1. Check all tubing and fittings for proper assembly.
2. Tighten all screws which hold valve together..
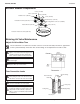
Pushbutton does not
work properly.
Air volume may
not be sufficient to
operate valve.
Check for leaks and lubricate U-cup:
1. Check all fittings for air leaks.
2. Disassemble pushbutton and lubricate U-cup seal (see pushbutton assembly
diagram).
Valve cycles
properly, but water
does not form
streams and drips
from
the streamformer
Debris has
accumulated
in flow control
assembly.
Clean and inspect flow control assembly:
1. Remove tubing and tube connector fittings from metering air valve.
2. Inspect flow control and remove debris that may be clogging the assembly.
3. Replace fittings using teflon tape or pipe sealant. Do not get sealant on the flow
control.
4. Replace tubing by cutting 1/4" from end of tube.
• Make sure end is square, then insert into tube connector fitting.
Water is dripping
from the
streamformers.
Debris has
accumulated
on valve seat or
orifices.
Clean and inspect valve seat:
1. Remove screws and disassemble metering valve.
2. Clean valve seat and inspect for deep gouges or scratches. Replace if necessary.
3. Remove all debris that may be clogging center hole of plastic diaphragm assembly.
4. Remove any debris clogging off-center hole in rubber diaphragm.
Metering
Air Valve
Center
Hole