
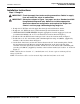
Installation manual

8
Express® Lavatory System SS-Series
SS-2N/IR/STD, SS-2N/IR/WH Installation Instructions
4/16/04 Bradley Corporation • 215-1497 Rev. B; EN 03-808A
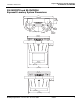
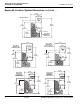
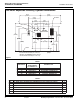
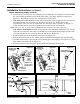
MAIN FRAME
BOWL
3/8" BOLT AND WASHER
(2) PLACES FOR BOWL
MOUNTING
1/4-20 x 1/2" SCREWS AND WASHERS
(2) PLACES BOWL/FRAME MOUNTING
SCUFF BASE FRAME
AND DRAIN ASSEMBLY
NOT SHOWN FOR CLARITY
Figure 4
Installation Instructions
continued . . .
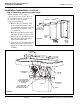
Step 3: Installing bowl assembly
WARNING: To prevent serious injury and/or damage to the bowl, move and
position the bowl with the assistance of another person and always
use appropriate lifting procedures.
NOTE: Refer to Figure 4 below when installing the bowl assembly.
NOTE: The sprayhead body has slotted holes for adjusting the fit-up with the bowl and wall.
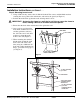
1. With someone to assist you, place the bowl assembly squarely onto the frame.
2. Attach the front underside of the bowl assembly to the frame using the two 1/4"-20 x 1/2" pan-
head screws and washers provided. Do not tighten bolts at this time.
IMPORTANT: When bolting the bowl assembly to the frame and wall, do not
overtighten bolts. Overtightening bolts can damage the Terreon®
material.
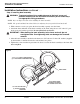
3. After the bowl assembly is attached to the frame, use 3/8" bolts and 1" min. O.D. washers (supplied
by the installer) to bolt the bowl to the wall anchors, two places.
4. Tighten the screws installed in procedure #2 above to secure the bowl assembly to the frame. Do
not overtighten.