
Installation / Operation Instruction Manual

56
Maintenance and service
RTG-L-199/160N/X1 – 6 721 827 274 (2022/06)
Pressure Relief
• Manually open the pressure relief valve to ensure proper
operation.
• Make sure discharge drains away safely.
Inlet Water Filter
• Verify the inlet water filter screen is clean and undamaged.
The inlet water filter is located on the top of the appliance,
at the cold water inlet connection. (See Fig. 29, page 38).
Close the installer supplied water shutoff valve, purge the
water using discharge drains and remove the brass hex cap
holding filter. Remove the filter, clean and/or replace if
damaged.
Descaling
• In areas where the water supply has a high mineral content
(see table 17, Water Quality), the heat exchanger should
be flushed with a descaling solution. Scale build up will
shorten the life of the water heater, and damage resulting
from scale is not covered under warranty. Refer to
section 7.3 for detailed instructions on descaling the heat
exchanger.
Condensate siphon
• Check for debris and clean if needed.
Air Filter
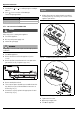
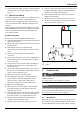
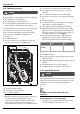
• Verify if the air filter is clean and undamaged.
The air filter is attached to the fan assembly, see fig. 54.
• Air filter must be cleaned or replaced in case it is clogged or
damaged.
How to remove/assembly air filter,
▶ Disconnect the electrical supply from the water heater.
▶ Remove appliance front cover, see page 12.
▶Loosen two philips head screws.
▶ Remove air filter from the fan.
▶ Proceed in the reverse order for assembly.
Fig. 54 Remove/assembly air filter
NOTICE:
Appliance malfunction!
▶ Air filter should not be removed during appliance normal
operation as, it may increase the risk of burner blockage.
NOTICE:
▶ Optional paper filter (part # 8738725270) can be
installed on the air fan for increased protection against
dusty, dirty combustion air or heavy pollen entering the
combustion chamber to reduce the risk of burner blockage.
In areas with high solid particles content in the air it is
recommended to use this filter. Maintenance frequency
might need to be adjusted to keep the filter clean and allow
a good performance of the heater.
7.2 Winterizing for seasonal use
The water heater must not be installed in a location where it
may be exposed to freezing temperatures unless connected to
electrical power. All water must be drained from the heater in
order to avoid damage to the unit from exposure to freezing
temperatures.
NOTICE:
The use of agents such as anti-freeze is not permitted and voids
the warranty, as they may cause damage to the water heater's
internal components.
1. Press ON/OFF switch on the water heater to turn OFF the
heater and unplug power supply cord. The display should
be blank.
2. Shut off the gas supply to the water heater.
3. Shut off the water supply to the water heater using installer
supplied shutoff valve.
4. Open hot water taps to drain and relieve pressure from the
plumbing system. If water continues to flow after 5
minutes, a crossover of the hot and cold water pipes is
present and must be corrected before proceeding.
5. Disconnect inlet and outlet water pipes from the water
heater. Place a small bucket underneath the water heater to
catch residual water remaining inside the water heater.
6. Using an air compressor, blow short bursts of air (100psi
max) through the inlet water connection or inlet water filter
until there is no water present coming through the outlet
water connection of the heater.
7. Empty condensate trap.