
Installation / Operation Instruction Manual


16
Installation instructions
RTG-L-199/160N/X1 – 6 721 827 274 (2022/06)
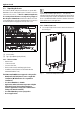
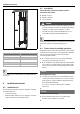
Fig. 6 Side view
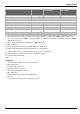
Table 4 Recommended minimum clearances
For servicing access, a 2ft clearance is recommended to the
front cover.
4 Installation instructions
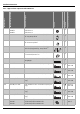
4.1 Installation tools
The following specialized tools may be required if converting
from natural gas to LP:
• Pressure manometer
• Combustion Gas Analyzer (in case of gas type conversion
and/or combustion noise troubleshooting)
4.2 Introduction
Please follow these instructions. Failure to follow
instructions may result in:
▶Damage or injury.
▶Improper operation.
▶ Loss of warranty.
DANGER:
▶ The water heater must be installed by a qualified installer in
accordance with these instructions. If improperly installed,
a hazardous condition such as explosion or carbon
monoxide poisoning could result. Manufacturer is not
responsible for improperly installed appliances.
Common installation practice is to first determine the path and
method of venting, then design the piping layout.
4.3 Proper location for installing your heater
Carefully select the location of the water heater. For your safety
and for proper heater operation, you must provide combustion
air to the heater and properly vent the exhaust gases.
Follow the guidelines below:
▶ 1. Locate the heater where venting, gas and plumbing
connections are feasible and convenient.
▶ 2. The hot water lines should be kept short and insulated to
save energy. It is recommended to locate the water heater
as close as practical to the most frequently used hot water
fixtures.
NOTICE:
Risk of appliance freezing!
▶ The water in this water heater is cold and always remains
cold except for the times the burner is on. In the event of a
power outage in conjunction with freezing temperatures,
the heater should be drained.
See section 7.2, page 56 “Winterizing” for draining
instructions.
NOTICE:
Installation and commissioning
▶ Do not install the water heater in rooms with a high
moisture level (e.g. bathrooms, saunas).
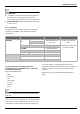
RTG-L-199/160N/X1
TOP (A) 12”
FRONT (B) 1”
BACK 0”
SIDES 1”
FLOOR (C) 12”