
Installation / Operation Instruction Manual


47
Troubleshooting
RTG-K-199/160N/X2 – 6 720 813 642 (2022/06)
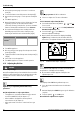
In case of failure in the auto calibration process the error sign
appears.
Verify if:
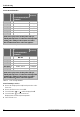
▶ Any error codes appear on the display. See table 25.
▶ Gas type and pressure are correct.
▶ Wind conditions are stable (e.g. wind gusts may be a cause
of failure).
▶ Hot water flow is sufficient and stable (e.g. water from a
well is a potential source of water instability).
In case of positive results for all these actions:
▶ Exit UC menu and repeat the process.
▶ Perform manual adjustment according to chapter 8.11.2
or contact your original installer or a local certified gas
technician for further assistance.
8.11.2 Manual adjust Gas/Air flow
Gas/Air flow adjustment is also possible to perform manually
(only recommended if automatic adjustment can not conclude
successfully).
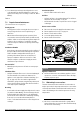
First step - Adjust the maximum power (P1)
▶ Press the button to turn ON.
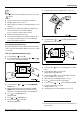
▶ Press and hold simultaneously buttons , and
for 3 seconds, until display reads P4.
Fig. 46
▶ Press the buttons or to select P1 (Maximum
Power) menu.
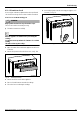
▶ Open hot water faucets when the display shows Tap
Symbol image (1 tub and 2 sinks should be sufficient;
when there is enough water flow the image disappears).
▶ Press to enter P1 adjustment.
Display shows E.
▶ Press or until L1 appears.
▶ Press the button to enter L1.
Display shows L1 value.
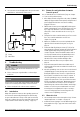
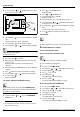
▶ Verify if power bar level is at middle point, see fig. 47.
Fig. 47 Power bar middle point
▶ Press the buttons or to adjust parameter value if
power bar level is out of range.
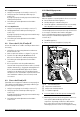
1)
Fig. 48 Gas adjust - L1 parameter
▶ Press the button for 3 seconds and appliance assumes
value.
▶ Press the button to save the value.
Display will be back to P1 menu.
▶ Press the button to enter L1 and verify if power bar
level is at middle point, see fig. 48.
▶ Repeat the process until L1 gas adjust is correct.
▶ Press button to finish the L1 gas adjust.
▶ Press the button or until the display shows "A1".
▶ Press the button to enter A1.
Display shows A1 value.
▶ Verify if power by level is at middle point, see fig. 47.
1) Increasing L1 value will cause an increase in power bar level
and vice-versa.