
Installation / Operation Instruction Manual


16
Vent Pipe Preparation and Joining
Most failures in vent systems result from improper preparation and joining of pipe
and fittings. The guidelines below must be followed when installing the venting
system. If you have any question about the application or installation of the venting
system, contact the vent pipe manufacturer, supplier, or your plumbing professional.
1) Specific cleaners, solvents, primers and cements are available for PVC, CPVC,
and ABS pipe. Be sure these materials match the type of pipe to be installed.
The vent pipe manufacturers joining instructions must be followed in all cases.
Never use all-purpose cements, commercial glues and adhesives or ABS
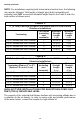
cement to join PVC or CPVC pipe and fittings. Refer to the table at the
beginning of the “Venting” section for approved primers and cements.
a) CLEANERS, SOLVENTS, PRIMERS AND CEMENTS ARE
FLAMMABLE. Do not store or use these materials near heat or open
flame, or in the vicinity of other appliances.
2) Use proper cutting, deburring and applicator tools to ensure proper preparation
and joining of pipe and fittings.
a) Cutting Tools
i) A square cut must be achieved with a miter box saw or pipe cutter to
ensure a proper mating with the female. If a pipe cutter is used, the
burr created at the outer edge of the pipe must be removed.
b) Deburring Tools
i) A file, knife or plastic deburring tool can be used to remove burrs.
Burrs must be removed from the inside and outside edges of the pipe
to ensure a proper seal.
c) Applicator Tools
i) A natural bristle paintbrush or roller may be used to apply cement.
Prompt application of the cement is important due its fast drying
properties.
3) Inspection, Cleaning, Priming and Cementing
a) Inspect the pipe inside and out for dirt, dust, moisture or grease etc. Check
pipe and fittings for splits or cracks and replace if found.
b) Clean pipe and fittings are imperative for proper joining. Following cutting
and deburring, wipe away any foreign material with a clean dry rag. If
wiping fails to thoroughly clean surfaces, chemical cleaning is necessary.
c) Primer must be applied to the pipe surface and fitting socket with a natural
bristle brush. This serves to soften and prepare the pipe for cementing.
d) Cementing must be done quickly to avoid over-drying before joining.
i) Apply one coat to the outside end of the pipe at a width slightly greater
than the depth of the socket.
ii) Apply a coat around the inside of the fitting socket.
iii) Apply a second coat around the end of the pipe.
4) Joining
a) Joints should be made immediately after cement is applied.
b) After fully inserting pipe into fitting socket, hold joint together for about 15
to 20 seconds.
c) Remove excess cement from around pipe and fitting with a clean rag.
d) Cement drying times may vary. Be sure to allow for the recommended
drying time before disturbing joints.
For more specific and detailed information about the above, contact the vent pipe
manufacturer, supplier, or competent professional.