
Installation / Operation Instruction Manual


10
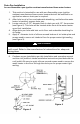
Combustion Air Supply
All combustion air must be supplied from outdoors by one of the following
installation methods and as illustrated in Figure 5. The flow of combustion and
ventilating air must not be obstructed. Adequate air must be supplied for
combustion and ventilation. An insufficient supply of air will cause recirculation
of combustion products resulting in air contamination that may be hazardous to
life. Such a condition often will result in a yellow, luminous burner flame,
causing carboning or sooting of the combustion chamber, burners and flue
tubes with possible damage to the heater.
AIR INTAKE INSTALLATION - 3” (7.6cm) diameter telescoping air intake and
leg enclosure are required to supply fresh air to the water heater. Note: When
a mobile home is tightly skirted, an air inlet opening in the skirting must
be provided. The opening must have a minimum free area of at least 9 in
2
(22.9cm
2
). If the opening is screened or covered with a louver, the total
free area must be at least 9 in
2
(22.9cm
2
). The following steps must be
followed for proper installation of these air supply components: (Refer to Figure
5).
1. After selecting the proper location for the water heater, cut a 4”
(10.2cm)
diameter hole through the floor and all other layers of
flooring and sheathing directly beneath the front center of the water
heater.
2. Insert the air intake into the 4”
(10.2cm)
diameter hole and fasten to
the floor with the screws provided.
3. Adjust the air intake so the lower tube extends below the underside
sheathing and secure with the screws provided. THE BOTTOM OF
THE AIR INTAKE MUST BE AT LEAST 12”
(30.5cm)
ABOVE THE
GROUND LEVEL.
4. Seal the openings around the air intake and underside sheathing to
resist the entrance of rodents.
5. Position the water heater so it is centered above the air intake.
(Note: The water heater should also be centered with the openings
in the roof and ceiling to allow for correct assembly of the roof jack
to the flue tube.)
The water heater is to be secured in place using the supplied sheet metal
strapping and screws. Fasten the base of the water heater to the floor using
the screws provided. The perforated metal strapping must be fastened to the
top of the water heater and to the adjacent walls with the screws provided.
(See Figure 5)