Installation / Operation Instruction Manual
Manuals
Brands
Bradford White Manuals
Residential
Power Direct Vent Gas
11
12
13
14
15
16
17
18
19
20
11
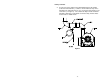
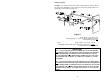
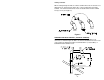
Venting continued-
Figure 2
Vent Assembly Illustration
1
...
...
9
10
11
12
13
...
...
40