
Installation / Operation Instruction Manual

18
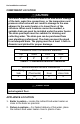
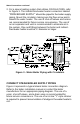
Water Connections continued-
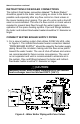
INSTALL TEMPERATURE AND PRESSURE RELIEF
VALVE (if not factory installed)
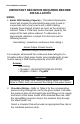
WARNING
Temperature and pressure relief valve discharge piping must
be piped near the floor to eliminate potential of severe burns.
DO NOT pipe in any area where freezing could occur. DO
NOT install any shut-off valves, plugs or caps to the
temperature and pressure relief valve or piping.
INSTRUCTIONS FOR POTABLE CONNECTIONS
1. BEFORE PROCEEDING WITH THE INSTALLATION, CLOSE
THE MAIN WATER SUPPLY VALVE. After shutting off the
main water supply, open a faucet to relieve the water line
pressure to prevent any water from leaking out of the pipes
while making the water connections to the water heater. After
the pressure has been relieved, close the faucet. The COLD
water inlet and HOT water outlet are identified on the top of
the water heater. Make the proper plumbing connections
between the water heater and the plumbing system to the
house. Install a shut-off valve in the cold water supply line.
2. If this water heater is installed in a closed water supply
system, such as one having a back-flow preventer in the cold
water supply, provisions must be made to control thermal
expansion. DO NOT operate this water heater in a closed
system without provisions for controlling thermal expansion.
Warranties do not cover damages from thermal expansions
such as pressure bulges and/or deformities. A properly sized
expansion tank will alleviate most problems. Your water
supplier or local plumbing inspector should be contacted on
how to control this situation.
3. After installation of the water lines, open the main water supply
valve and fill the water heater. While the water heater is filling,
open several hot water faucets to allow air to escape from the
water system. When steady streams of water flow through the
faucets, close them and check all water connections for
possible leaks.
4. NEVER OPERATE THE WATER HEATER WITHOUT FIRST
BEING CERTAIN THAT IT IS FILLED WITH WATER.