Installation / Operation Instruction Manual
Manuals
Brands
Bradford White Manuals
Water boiler
DB-80R3DS
7
8
9
10
11
12
13
14
15
16
11
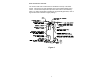
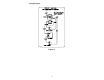
Wiring Diagram
Figure 2
1
...
...
9
10
11
12
13
...
...
16