
Install Instructions

8
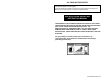
WATER CONNECTIONS
Note: BEFORE PROCEEDING WITH THE INSTALLATION, CLOSE THE MAIN
WATER SUPPLY VALVE.
After shutting off the main water supply, open a faucet to relieve the water line
pressure to prevent any water from leaking out of the pipes while making the water
connections to the water heater. After the pressure has been relieved, close the
faucet. The COLD water inlet and HOT water outlet are identified on the top of the
water heater. The fittings at the cold water inlet and hot water outlet are dielectric
waterway fittings. Make the proper plumbing connections between the water
heater and the plumbing system to the house. Install a shut-off valve in the cold
water supply line.
If this water heater is installed in a closed water supply system, such as the one
having a back-flow preventer in the cold water supply, provisions shall be made to
control thermal expansion. DO NOT operate this water heater in a closed system
without provisions for controlling thermal expansion. Your water supplier or local
plumbing inspector should be contacted on how to control this situation.
After installation of the water lines, open the main water supply valve and fill the
water heater. While the water heater is filling, open several hot water faucets to
allow air to escape from the water system. When a steady stream of water flows
through the faucets, close them and check all water connections for possible
leaks. NEVER OPERATE THE WATER HEATER WITHOUT FIRST BEING
CERTAIN IT IS FILLED WITH WATER.
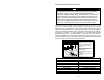
CAUTION
If sweat fitting are to be used, DO NOT apply heat to the nipples on top
of the water heater. Sweat the tubing to the adapter before fitting the
adapter to the water connections. It is imperative that heat is not
applied to the nipples containing a plastic liner.
WARNING
FAILURE TO INSTALL AND MAINTAIN AN APPROPRIATE, LISTED
TEMPERATURE AND PRESSURE RELIEF VALVE WILL RELEASE
THE MANUFACTURER FROM ANY CLAIM, WHICH MIGHT RESULT
FROM EXCESSIVE TEMPERATURE AND PRESSURES.