
Install Instructions


18
T’stat information Continued-
The correct burners and thermostat may be purchased from the same supplier
that provided the water heater to you.
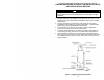
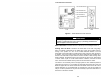
Installing the Burner: It is recommended that the burner be installed so that the
face of the burner head is between 1/8” to 5/8” from the sides of the inside wall of
the combustion chamber (see Figure 5). Note the top and bottom distances may
vary slightly due to the curvature of the
combustion chamber. The
recommended burners are designed so
the burner head will be at its optimal
distance to the combustion chamber.
The position of the burner head can be
checked by viewing it through the peep
hole using a mirror. The burner is
secured to the water heater by three
5/16” nuts.
Figure 5
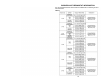
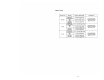
Installing the Thermostat: This water heater comes with the thermostat well
installed in the tank. A Honeywell Aquastat needs to be installed. Refer to Table 1
for appropriate thermostat information.
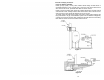
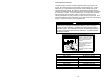
Adjusting the Thermostat: When adjusting the thermostat it should be
remembered that lower temperature settings are more energy efficient. It is
suggested that the starting setting not exceed 120°F as displayed in Figure 6.
Thermostat adjustment instructions are as follows:
Honeywell Mechanical (L8100) thermostat: turn the dial clockwise to decrease
the temperature and counter-clockwise to increase the temperature.
Honeywell Electronic (L7103) thermostat: enter the adjustment mode by pressing
the “UP”, “DOWN”, and “I” buttons (see Figure 4) simultaneously for three
seconds. Press the “I” button until the feature requiring adjustment is displayed
(SET=Setpoint; °F-°C). Then press the “UP” or “DOWN”
buttons to move the
setpoint to the desired value. After 60 seconds, without any button inputs, the
control will automatically return to the READ mode.
CAUTION
Do not operate the burner if it is wet. If
the burner gets wet, have a qualified
technician examine the burner before
putting it back into operation.