
Instruction manual


Home Oxygen Service
Attaching Your Oxygen Regulator to the Cylinder
Step 1: Remove plastic dust cap and plastic washer
from cylinder post.
Step 2: Loosen the T-handle on the regulator.
Step 3: Lower the oxygen regulator over or connect
it to the post of the cylinder.
Step 4: Align the pins in the regulator to the holes in
the cylinder post.
Step 5: Hand-tighten the T-handle until the regulator
is secure.
Using Your Oxygen Regulator
Step 1 Open cylinder with the key provided.
Step 2 Check contents gauge on regulator.
NOTE: Pressure reading of 2200-2000 psi = Full
1000 psi = ½ Full
500 psi = ¼ Full
Step 3 Attach the standard nasal cannula to the
regulator and to your nose and face.
Step 4 Turn the flow selector/rotary selector to the
correct prescription flow setting.
Step 5 Breath normally
Step 6 Consult Cylinder Duration chart for estimated
usage time.
NOTE: cylinder duration is directly related to
pressure reading on the content gauge
Example:
Full E Cylinder @ 2 lpm, lasts approx. 5-7 hours
½ E Cylinder @ 2 lpm, lasts approx. 2.8 hours
Step 7 When you are finished using the oxygen
regulator, turn the cylinder off by using the
key provided and turn the flow selector/rotary
selector to the “O” position
WARNING: To prevent injury from cylinders tipping over,
do not use cannula tubing lengths over 7 feet with small
compressed oxygen cylinders. Unattended cylinders
should be secure in a cylinder stand.
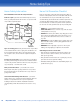
Using Your
Oxygen
Regulator
T-Handle
Contents Gauge
Regulator
Cylinder
Cylinder
Post
Attaching the oxygen conserving
device to the cylinder
Portable Oxygen
»»
Do not leave oxygen equipment on when not in use
»»
Store cylinders in a well–ventilated area, do not store in a closet
»»
Keep cylinders away from heat, for every degree over 70˚ F, the
tank will increase by 5 psi
»»
Keep cylinders secured in a rack or laying down in a safe place
»»
Do not abuse or handle oxygen cylinders roughly
Traveling With Oxygen
»»
Never transport cylinders in the trunk or rear of your vehicle
(backseat is okay)
»»
Always secure cylinders so they do not roll around
»»
When the temp outside is above 70˚ F, please allow for proper
ventilation
»»
If you are planning on making long distance travel, please
contact your oxygen provider as soon as you have made traveling
arrangements
Using Your
Oxygen Regulator
Attaching Your Oxygen Regulator to the Cylinder
Step 1: Remove plastic dust cap and plastic washer
from cylinder post.
Step 2: Loosen the T-handle on the regulator.
Step 3: Lower the oxygen regulator over or connect
it to the post of the cylinder.
Step 4: Align the pins in the regulator to the holes in
the cylinder post.
Step 5: Hand-tighten the T-handle until the regulator
is secure.
Using Your Oxygen Regulator
Step 1 Open cylinder with the key provided.
Step 2 Check contents gauge on regulator.
NOTE: Pressure reading of 2200-2000 psi = Full
1000 psi = ½ Full
500 psi = ¼ Full
Step 3 Attach the standard nasal cannula to the
regulator and to your nose and face.
Step 4 Turn the flow selector/rotary selector to the
correct prescription flow setting.
Step 5 Breath normally
Step 6 Consult Cylinder Duration chart for estimated
usage time.
NOTE: cylinder duration is directly related to
pressure reading on the content gauge
Example:
Full E Cylinder @ 2 lpm, lasts approx. 5-7 hours
½ E Cylinder @ 2 lpm, lasts approx. 2.8 hours
Step 7 When you are finished using the oxygen
regulator, turn the cylinder off by using the
key provided and turn the flow selector/rotary
selector to the “O” position
WARNING: To prevent injury from cylinders tipping over,
do not use cannula tubing lengths over 7 feet with small
compressed oxygen cylinders. Unattended cylinders
should be secure in a cylinder stand.
Using Your
Oxygen
Regulator
T-Handle
Contents Gauge
Regulator
Cylinder
Cylinder
Post
Attaching the oxygen conserving
device to the cylinder
39
Order Toll-Free 888-303-9354 • Fax 507-284-1272 • Prices in blue are generally not covered by insurance