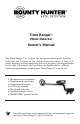
Time Ranger™ Metal Detector Owner’s Manual The Time Ranger™ is a top-of-the line professional metal detector with high-end features for the serious metal detectorist. A large LCD panel displays current operating status at all times during operation in the field. All feaures and functions are highly visible, with no hidden programming, making your Time Ranger™ easy to use.
Contents The Basics of Metal Detecting . . . . . . . . Metal Types . . . . . . . . . . . . . . . . . . . . . . . Discrimination . . . . . . . . . . . . . . . . . . . . . Depth Detection . . . . . . . . . . . . . . . . . . . . Ground Balancing . . . . . . . . . . . . . . . . . . Quick Start . . . . . . . . . . . . . . . . . . . . . . . . . . . . . . . . . . . .............. ............... ............... ............... ............... ............... 1 1 1 2 2 2 Getting Started . . . . . . . . . . . .
Using the Detector in the Field . . . . . . . Coil Movement . . . . . . . . . . . . . . . . . . . Pinpointing the target . . . . . . . . . . . . . . False signals and chatter . . . . . . . . . . . . Ground Balancing . . . . . . . . . . . . . . . . . Resetting the detector . . . . . . . . . . . . . . . . . . . . . . . . . . . . . . . . . . . . . . . 26 . . . . . . . . . . . . . . 26 . . . . . . . . . . . . . . 27 . . . . . . . . . . . . . . 28 . . . . . . . . . . . . . . 29 . . . . . . . . . . . . . .
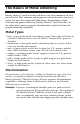
The Basics of Metal Detecting Bounty Hunter™ metal detectors will detect any item composed all or in part of metal. Most common and inexpensive metal detectors also detect metal, but have three important limitations: discrimination, depth detection and ground balancing. Bounty Hunter™ metal detectors, on the other hand, possess superior discrimination, depth detection and ground balancing capabilities.
Depth Detection Depth detection refers to the detector’s ability to detect objects at various depths. The level of depth at which a detector can detect an object depends on the size of the object—the larger the object, the deeper it can be detected. Bounty Hunter™ metal detectors provide excellent depth detection through solid objects. The maximum depth detection capability of a Bounty Hunter™ Time Ranger™ is five feet. Maximum depth is only possible for large metal objects.
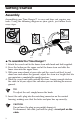
Getting Started Assembly Assembling your Time Ranger™ is easy and does not require any tools. Using the following diagram as your guide, just follow these easy steps. Knurled Knob Lower Stem Connector on back of control housing Plug Bolt Upper Stem Lower Stem Control Housing Search Coil Cable Upper Stem ▲ To assemble the Time Ranger™ 1. Attach the search coil to the lower stem with knob and bolt supplied. 2.
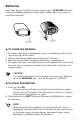
Batteries Your Time Ranger™ metal detector requires two C ALKALINE batteries. Using the following diagram as your guide, follow these easy steps to install the batteries. Release Clip Release Clip of Battery Door C Size Alkaline Batteries ▲ To install the batteries 1. To remove the battery compartment cover, carefully press the release clip to the right of the cover. 2. Pull out the battery holder and install two C batteries. 3. Slide the battery holder back into the battery compartment. 4.
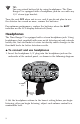
TIP: You can extend battery life by using headphones. The Time Ranger™ is equipped with a headphone jack for use with any 1/4” stereo-type headset. Turn the unit OFF when not in use, and if you do not plan to use the detector for a week or more, remove the batteries. For optimum performance, replace the batteries when the BATT indicator on the LCD display indicates L (Low). Headphones The Time Ranger™ is equipped with a stereo headphone jack.
Listening Safety • Do not listen at extremely high volume levels—extended high-volume listening can lead to permanent hearing loss. • Once you set the volume controls, do not increase them. Over time, your ears adapt to the set volume level, so a volume level that may not necessarily cause discomfort might still damage your hearing. Traffic Safety Do not wear headphones while operating your detector in traffic areas. This practice could create a traffic hazard and is illegal in some areas.
Control Panel The control panel, as shown in the following diagram, is located at the center of the control housing. It consists of an LCD display, probable target ID fields, and several touch pads. The control panel provides control and constant reference during all detector operations. Combined with its 3-Tone Audio Target Identification, the Time Ranger’s control panel provides as accurate a reference as possible while detecting in the field.
PROBABLE TARGET ID Fields Probable Target ID Description GOLD RANGE SILVER RANGE Located on the top portion of the control panel. The GOLD RANGE is located on the left and the SILVER RANGE is on the right. Other metal types can appear in this range: for example, iron, foil and nickel appear under GOLD RANGE and copper pennies appear under SILVER RANGE. IRON / FOIL Indicates that the target is probably iron or foil. Time Ranger™ has four levels of progressive iron discrimination—from small to large.
Touch pads The detector control panel includes several touch pads as shown and described in the following table. These touch pads are used to set detector operation. Dectector Touch pads POWER ON/OFF PRESET SNIFF ALL METAL SMART TRAC DISC TARGET BLANKER POWER ON/OFF is used to turn the detector on. POWER ON/OFF ALL METAL SMART TRAC ALL METAL SMART TRAC is used to select the ALL METAL mode of operation. SNIFF isused to enable the SNIFF mode of operation.
Touch pads (continued) LOW and HIGH are used to adjust the detector’s sensitivity in DISCRIMINATION mode. LOW and HIGH are used to adjust the detector’s AUDIO LEVEL in ALL METAL mode. LCD Display The LCD display consists of the TARGET readout and both adjustment and indicator dials. Arrows also appear at the top of the LCD display, pointing to the probable target detected in the Probable Target ID fields. ▲ TARGET Readout The TARGET readout displays general detector operating information.
TARGET Readout TARGET Meaning Description IR Discrimination Indicates the detector is ready for selective target discrimination adjustment in the DISCRIMINATION mode. IR 1 Iron Mass Level 1 Indicates rejection of small iron objects. IR 2 Iron Mass Level 2 Indicates rejection of small to medium iron objects. IR 3 Iron Mass Level 3 Indicates rejection of medium to large iron objects. IR 4 Iron Mass Level 4 Indicates rejection of all iron objects.
▲ Dials The LCD display has five indicator/adjustment dials, as shown in the following diagram. All are used to monitor the detector’s operation; the SENSITIVITY dial is used in conjunction with touch pads on the control panel to adjust the detector’s sensitivity and the BLANKER dial is used in conjunction with the BLANKER touch pad to set the level at which the detector will eliminate surface objects.
GROUND MONITOR The GROUND MONITOR dial indicates whether the detector has achieved ground balance in all soil conditions while operating in ALL METAL mode.
Basic Operation Turning the Detector ON Follow these steps to turn on your Time Ranger™ detector. 1. Hold the detector with the search coil about waist high and press the POWER ON/OFF touch pad. The unit emits three beeps and Ar appears momentarily in the TARGET readout, indicating that the detector is measuring the air. POWER ON/OFF PRESET SNIFF ALL METAL SMART TRAC DISC TARGET BLANKER 2.
2. Press the DISC TARGET touch pad to “lock-in” the programming. The blinking arrow under IRON/FOIL disappears and IR appears in the TARGET readout (indicating that the detector is set to accept all metals, including all levels of iron) as shown in the following diagram. POWER ON/OFF PRESET SNIFF ALL METAL SMART TRAC DISC TARGET BLANKER ▲ To select PRESET targets The Time Ranger™ has three PRESET modes: PRESET 1 Rejects all levels of iron and aluminum foil.
R appears under the metals excluded by the PRESET level you selected, as shown in the following example. R R Example of Time Ranger™ set to PRESET 2 (iron/foil and pull tabs are rejected). NOTE: Pressing PRESET a fourth time clears all PRESET settings and the unit resets to accept all metals. ▲ To select customized targets The Time Ranger™ has a valuable detection feature called Progressive Iron Discrimination which allows you to set four levels of iron discrimination based on size.
R POWER ON/OFF ➔ 4. Press REJECT three times to select IR3. IR3 appears in the TARGET readout. 5. Press REJECT four times to select IR4. IR4 appears in the TARGET readout. 6. Press ACCEPT after your selection to “lock-in” the iron discrimination level. The level of iron discrimination you selected appears in the TARGET readout, an R appears under IRON/FOIL, and the blinking arrow appears under 5¢ as shown in the following example. PRESET SNIFF ALL METAL SMART TRAC DISC TARGET BLANKER 7.
The level of iron discrimination you selected appears in the TARGET readout, and R appears under your customized selections as shown in the following diagram. Example of Time Ranger™ set for IR 4 iron discrimination with customized selections for pull tab, screw cap and zinc penny rejection. R R R ▲ To adjust sensitivity in DISCRIMINATION mode After you select your PRESET or customized targets, you can adjust the detector’s sensitivity. The default setting is 5 on the SENSITIVITY dial.
Tips for listening in DISCRIMINATION mode ◆ Most iron and steel objects emit a low tone, but on occasion when the iron is highly oxidized, you might hear a high tone. For example, some rusted bottle caps will emit a high tone and appear under the SILVER RANGE in the Probable Target ID fields. You can prevent this from happening by selecting the size of iron to eliminate. See To customize targets section of this manual for instructions on how to set progressive iron discri ination levels.
1. Perform the steps described in Turning the Detector ON section of this manual. 2. Press the DISC TARGET touch pad. A blinking arrow appears under IRON/FOIL in the Probable Target ID fields, meaning the detector is ready for programming. 3. Press the HIGH (+) SENSITIVITY touch pad on the control panel to adjust the detector’s sensitivity to 7 (default setting is 5). 4. Press the SNIFF touch pad and verify that SNIFF appears in the TARGET readout on the LCD display, as shown in the following diagram.
2. Verify that the arrow points to the Target ID field you want to reject and press the REJECT (-) TARGET touch pad on the control panel. rE appears in the TARGET readout on the LCD display. A “sniff window” based on the object’s target value is created. 3. Verify that the target value was properly set by sweeping the coil over the target object one more time. The arrow should appear under the same Target ID field in Step 1. 4.
TIP: Initially, if the unit is not reacting properly, push the ALL METAL SMART TRAC touch pad a couple of times to make sure that the batteries are connected and not discharged. ▲ To adjust sensitivity in ALL METAL mode For maximum sensitivity, you should hear a slight threshold hum while operating in ALL METAL mode. If you do not hear this threshold hum, sensitivity is low and the audio level requires adjustment. To adjust the audio level 1.
2. If you are still getting a constant signal, lower the unit’s threshold using the LOW (-) or HIGH (+) SENSITIVITY touch pads on the control panel. ▲ To update ground balancing Anytime the detector detects a target, normal fluctuations in ground conditions cause the arrow on the GROUND MONITOR dial to move from its center 0 position slightly right or left; the Time Ranger™ SMART TRAC feature automatically adjusts to these minor variances usually within 15 to 20 seconds.
Testing the detector Test your detector using different coin types (penny, nickel, etc.) and other miscellaneous metal objects such as a nail, a gold ring, a railroad spike, etc. Always test the detector away from other metals not selected for testing. ▲ Ground Testing Do not test the unit indoors on the floor because floors usually contain metal that may interfere with the detector’s signal or even mask the signal completely.
4. If you are in ALL METAL mode, hold one of the objectsyou selected for testing over (and about 4” from) the coil. 5. Since gravity causes coins to lie flat on or under the ground, sweep coins with the flat surface parallel to the search coil. Bounty Hunter™ models with LCD indicators are programmed to sense the coin type and depth while looking at the flat side of the coin; sweeping the edge of the coin across the search coil may cause inaccurate readings. 6.
Using the Detector in the Field ▲ Coil Movement ◆ When sweeping the coil, be careful to keep it level with the ground about 1/2” from the surface—never swing the coil like a pendulum The following diagrams illustrate incorrect and correct coil movement. Wrong Do not swing the coil like a pendulum. Right Swing the coil level with the ground. Swing the coil in a half-circle and repeat this motion every step you take to guarantee complete coverage of the area.
◆ Make sure you keep your search coil consistently about 1/2” above the ground as you sweep. Raising the coil during the sweep or at the end of the sweep will cause false readings. ◆ Move slowly—hurried movement will only cause you to miss targets. ▲ Pinpointing the target Accurate pinpointing takes practice. Follow these steps for best results when attempting to pinpoint a target. 1.
▲ False signals and chatter The biggest frustrations you will encounter when using a metal detector are false signals and chatter. The Time Ranger™ is a very sensitive, deep-seeking detector. It will respond loudly to many targets for which other detectors might only emit a weak signal. As a result, the detector may emit false, trash-induced signals that seem confusing. Electrical interference, or large, irregular trash objects can also cause false signaling.
▲ Ground Balancing To achieve proper ground balancing in motion modes, the search coil must stay in motion at a constant speed. Speeding up or slowing down the coil rhythm causes the detector to calculate a false “average mineralization.” The most challenging environments are beaches and black sand deposits where gold is commonly found. The water line that separates wet sand from dry sand is an abrupt change in soil condition which can confuse even a Bounty Hunter™.
Detector Applications Coinshooting Coinshooting is probably the most popular metal detecting application. Coinshooting opportunities abound—even your own yard may yield some interesting old coins. You can search for coins just about anywhere—parks, baseball fields, yards, dirt parking lots and swimming areas are only a few of the many possibilities. Most coinshooters strive, at the very least, to find silver coins (pre-1955).
Customized target selection to reject all trash metals DISCRIMINATION mode allows you to further narrow your discrimination if you are encountering many Nickel indications that turn out to be pull-tabs or foil—a common problem in heavily trashed areas. Some Beaver Tails (pull-tabs broken in half) have the same detection properties as nickels. Customize your selections so that you eliminate all metal that falls in the GOLD RANGE.
Relic Hunting A relic is anything of historical value, especially reflecting another age. Before you undertake a search for relics, first do some research in your local library or on the Internet. Look up old newspapers and find out more about your community’s history. Discover what historical events may have taken place in your locality and where historical landmarks are hidden from present day progress.
Jewelry Hunting When targeting jewelry items, consider where these items are commonly lost. There are many possibilities, including playing fields where a variety of sports take place, beach areas, playgrounds, and sandboxes. When jewelry hunting, it is not uncommon to find many coins in the process of digging up rings.
Gold Prospecting Using a metal detector to retrieve gold is still a relatively new art form. Gold prospecting poses totally different challenges than coinshooting or jewelry hunting. The biggest challenge is the black sand (highly mineralized soil with iron content) where gold is typically found; this highly mineralized soil may set off your detector, producing false signals.
Cache Hunting A cache is anything of value that may be hidden or buried to prevent theft. Long ago, people would hide their life savings near their homestead because they did not trust banks. Caches also refer to pillaged or lost treasure. Cache hunting requires extensive research and careful deduction. ▲ Recommended mode of operation Since caches are usually buried deep, the recommended mode of operation for cache hunting is ALL METAL mode.
Troubleshooting Common Problems The following table lists common problems that you may encounter when using your metal detector. Problem Probable Cause(s) Solution(s) Detector is emitting false signals in the field. • SENSITIVITY may be set too high. • Improper coil movement. • Highly oxidized metal. • Reduce SENSITIVITY per instructions in this manual for your mode of operation. • Swing the coil slowly.
Caring for Your Metal Detector Your Time Ranger™ Metal detector is an example of superior design and craftsmanship. The following suggestions will help you care for your metal detector so that you can enjoy it for years. ◆ Handle the metal detector gently and carefully. Dropping it can damage circuit boards and cases and can cause the metal detector to work improperly. ◆ Use and store the metal detector only in normal temperature environments.
Symbols $1 8 Numerics 1¢ 8 25¢ 8 288 10 58 5¢ 8 50¢ 8 A Ac 10 ACCEPT 9 accept one target, SNIFF mode 20 adjusting for change in ground conditions 22 sensitivity in ALL METAL mode 20 sensitivity in DISCRIMINATION mode 18 air testing 24 ALL METAL mode 21 adjust detector when ground conditions change 22 adjust sensitivity in 22 selecting 21 update ground balancing 20 ALL METAL SMART TRAC 9 all targets accepting 14 antenna, sentron co-relator 6 Ar 10 assembly 3 audio target identification 18 caring for your
tips for dealing with 28 Fo 11 G gb 10 getting started 3 assembly 3 batteries 4 headphones 5 gold prospecting 35 recommended mode of operation 35 tips 35 GOLD RANGE 8 ground balancing definition of 2 in the field 29 updating 23 when ground conditions change 22 GROUND MONITOR dial 13 ground testing 24 M metal types 1 aluminum1 cooper 1 gold 1 iron 1 silver 1 zinc 1 mode of operation ALL METAL 14, 21 DISCRIMINATION 14 SNIFF 19 P IR 11 IR 1 11, 16 IR 2 11, 16 IR 3 11, 16 IR 4 11, 16 iron discrimination lev
S S-CAP 8 selecting ALL METAL mode 21 all target 14 BLANKER feature 19 customized targets 16 PRESET targets 15 sensitivity adjusting in ALL METAL mode 22 adjusting in DISCRIMINATION mode 18 SENSITIVITY dial 12 silver range 8 Sn 11 SNIFF 9 operating in SNIFF Mode 19 SNIFF mode 19 accept only one target 20 reject one target 20 T TARGET readout 10 descriptions of 10 values 11 testing the detector 24 air testing 24 ground testing 24 touchpads descriptions of 9 troubleshooting 37 common problems 37 turning dete
NOTES
NOTES
NOTES
NOTES
Treasure Hunter’s Code of Ethics ◆ ◆ ◆ ◆ ◆ Respect the rights and property of others. Observe all laws, whether national, state or local. Never destroy historical or archaeological treasures. Leave the land and vegetation as it was. Fill in the holes. All treasure hunters may be judged by the example you set. Always obtain permission before searching any site. Be extremely careful with your probing, picking up and discarding of trash, and ALWAYS COVER YOUR HOLES.