
Owner`s manual


29843-5-1012Page 30
INSTALLATION
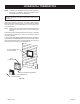
1. Unpackventcomponentsandcheckthatallitemsareincluded.
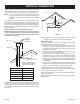
2. Checktoseethattheventspacerspringsarelocatedaroundthe
ueventat8"and12"intervalsalongitslength. See Figure 44.
Ifnot,stretchthespacerspringstoabout15"longandwrapthem
aroundtheue,theninterlocktheendsofeachspringabout2".
See Figure 45.Maintainequaldistancebetweenspringspacers.
SPACER
SPRINGS
FLEX FLUE PIPE
FLEX OUTER VENT
Figure 44
Figure 45
3. ConnecttheSD46DVA-FCFAdaptortotheventanduecollars
ontopofthereplace.
4. SlidetheFlexVentfluepipeintotheOuterFlexVentpipe.
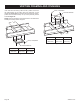
5. Install the WallFirestop/Thimble assembly as required through
the wall. Refer to the venting charts in the fireplace manual to
determine the proper height and size of the vent opening. The
minimumopeningshouldbe11"wideby11"high.Theminimum
combustibleclearancefromthehorizontal ventis2"fromsides
andbottom,and3"abovetheventpipe.See Figure 47.
6. In most cases, after determining the length of the vent that is
needed,itmaybeeasiertoinstalltheflueandouterventpipesto
theTerminationCapfirst,thenfromtheoutside,feedtheventing
throughthewalltothefireplace.
7. Iftheventingistolong,trimoffanyexcessventbeforeattaching
theventendconnectors.
8. AttachtheTerminationCaptotheoutsideofthehouse.
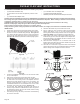
9. Prior to making the vent connections, apply high temperature
sealant (1000 degree F min.) to the vent connections before
securingwiththebandclampsprovided.Note:Thefluepipeend
without the adapteristobeinstalledtotheTerminationCap.
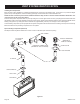
10. Applysealanttotheoutsideofthefluepipeadapterandconnect
totheflexfluepipe.Theninserttheadapterintothefireplaceflue.
Secureflueadaptertothefireplacefluewithaminimumoftwo
screwsprovided.See Figure 46.
11. Attach the Outer Vent pipe to the 7" diameter collar on the
fireplacewithalargebandclampprovided.Sealantmayalsobe
usedontheouterventconnections.
12. Check all vent connections for tightness. Make sure horizontal
ventinghastheproperriseandcombustibleclearancesrequired.
Refertoventingchartsinfireplaceinstructionmanual.
Figure 46
Figure 47
NOTE: If installing the DVVK-4F Flex Vent Kit, an SC46DVA-FCF Flex Adaptor Collar Assembly must also be used (purchased separately).
Flex venting can only be installed vertically off of the DVLL and DVTL Series replaces. When installing a horizontal vent run from top
connections, maintain at least ½" rise for every 12" of vent run.
CAUTION: Always stretch and secure venting with wire or metal strapping to ensure that the horizontal runs do not sag.
Because of sharp edges, always use gloves when handling the ex vent components.
Vent connections should overlap a minimum of 1" for proper sealing.
Always follow the general venting requirements for vent terminal location, vent lengths, and clearance to combustible materials.
TheDVVK-4F FLEX VENT KITincludesthefollowingcomponents:
• (1)HorizontalTerminationCap
• (1)4-footsectionofFlexventwithspacers(4"ue/7"outer
pipe)
• (1)4"diameterueadaptercollar
• (1)7"diameterouterventadaptercollar
• (1)WallFirestop/ThimbleAssembly
• Hardwarepackthatincludesbandclampsandscrews
DVVK-4F FLEX VENT INSTRUCTIONS