
Owner`s manual


29843-5-1012Page 24
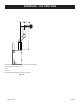
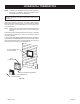
Installing Vent Components
BegintheventsysteminstallationbyinstallingtherstDuraventcomponenttothestartingcollar,24inch(60.10cm)minimumstraight
pipeonthetopoftheappliance,thentheremainingpipelengthandthehorizontalorverticalterminationkit.
NOTE: All outer connection joints must be sealed with aluminum tape, screws or silicone sealant rated above 300°F/149°C. The
inner ue joints do not require any sealant.
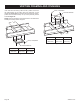
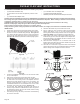
Duraventventsystemcomponentslockintoplacebyslidingtheconcentricpipesectionwithfour(4)equallyspacedinteriorbeadsonto
theappliancecollarorpreviouslyinstalledcomponentendwithfour(4)equallyspacedindentedsections.Whentheinternalbeadsofeach
startingouterpipelineup,rotatepipesectionclockwise90°(approximately3inches).Theventpipeisnowlockedtogether.
Continueaddingcomponentsperthepre-plannedventsystemconguration.Becertainthateachsucceedingventcomponentissecurely
ttedandlockedintotheprecedingcomponentintheventsystem.
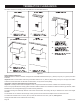
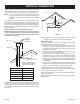
Special Venting Components (Duravent)
SeeEmpireComfortSystemsRetailPriceListfor4x6-5/8inchDuraventpartnumbersandpricing.
▲
▼
◄
◄
◄
◄
▼
▲
▲
▲
▲
PIPE LENGTH
WALL STRAP
90° ELBOW
WALL THIMBLE
CEILING FIRESTOP
90° ELBOW OR
45° ELBOW
HORIZONTAL TERMINATION
(MAXIMUM OF TWO 90° ELBOWS)
VERTICAL TERMINATION
(MAXIMUM OF
THREE 90° ELBOWS)
STORM COLLAR
ROOF FLASHING
VENT SYSTEM IDENTIFICATION
Figure 33