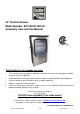
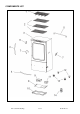
44” Electric Smoker Model Number: SC2187401-BO-00 Assembly, Care and Use Manual This Product is for outdoor use only This instruction manual contains important information necessary for the proper assembly and safe use of the appliance. Read and follow all warnings and instructions before assembling and using the appliance. Follow all warnings and instructions when using the appliance. Keep this manual for future reference.
WARNING CARBON MONOXIDE HAZARD Burning wood chips gives off carbon monoxide, which has no odor and can cause death. DO NOT burn wood chips inside homes, vehicles, tents, garages or any enclosed areas. Use only outdoors in a well-ventilated space. WARNING Important Safety Instructions When using electrical appliances, basic safety precautions should always be followed, including the following: 1. This appliance is for outdoor use only. Do NOT operate in an enclosed area. 2.
WARNING GENERAL WARNINGS AND SAFETY INFORMATION 1. Do not cover cooking racks with metal foil. This will trap heat and damage the appliance. 2. Drip tray is only used at bottom of the drawer. Do not put it on the cooking racks and this may damage the appliance. 3. Wood chip tray is HOT when the appliance is in operation. Use caution when adding wood chips. 4. For disconnection, press “OFF” button on control panel then remove the plug from the outlet. 5.
WARNING 1. This appliance is for OUTDOOR USE ONLY. 2. This appliance is used for slow cooking. Please allow sufficient time for cooking. 3. Pre-season smoker prior to first use. Please refer to page 14. 4. Before loading food, pre-heat the appliance for 30 to 45 minutes at maximum temperature. 5. Do not cover racks with aluminum foil as this will cause inappropriate heat circulation. 6. Do not overload the appliance with food. Excess amount of food may trap heat.
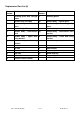
COMPONENTS LIST SC2187401-BO-00(Eng) 5 of 23 20150120 ver.
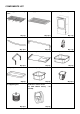
COMPONENTS LIST 1. Smoking grate with sausage 2. Smoking grates 3. Smoker body assembly hooks Qty: 1pc 4. Door/Drawer handles Qty: 3pcs 5. Rear handle 6. Air vent Qty: 2pcs 7. Side handles Qty: 1pc 8. Heat shield plate Qty:2pcs 10. Drip tray Qty: 1pc 9. Water tray Qty:1pc 11. Wood chip tray Qty:1pc 13. Supporting feet Qty: 1pc Qty:1pc 12. Casters Qty:1pc Qty:2pcs 14.
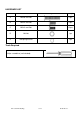
HARDWARE LIST Item No. Item name Diagram Qty A M6x35 mm Bolt 4 pcs B M6x14 mm Bolt 9 pcs C M5x12 mm Bolt 12 pcs D M6 Nut 1 pc E Φ6 Spring washer 1 pc Tools Required Phillips screwdriver (not included) SC2187401-BO-00(Eng) 7 of 23 20150120 ver.
Replacement Part List (I) SC2187401-BO-00(Eng) 8 of 23 20150120 ver.
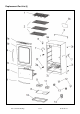
Replacement Part List (II) Part Number Part Name Part Number 1 Smoking grate with sausage 2 hooks Smoking grates 3 Smoker body assembly Smoker body – Control panel 3b Smoker body – Door with 3c glass Smoker body – Front supporting brace 3d Smoker body – Drawer Smoker body 3f Smoker body – Door/Drawer 3g latch Smoker body – Door/Drawer latch bracket 3h Smoker body – Upper door 3i fixing bracket Smoker body – Lower door fixing bracket 3j Smoker element 4 Door/Drawer handle 5 Rear han
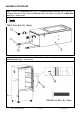
ASSEMBLY PROCEDURE Step 1. Attach the Supporting feet (13) to the Smoker body assembly (3) by rotating in clockwise direction till stop. Attach the Casters (12) to the body by using 8 pcs of M5x12mm bolts (C) as shown below. M5x12mm Bolt (C) x 8pcs Step 2. Open the door and attach the Door/Drawer Handle (4) to it by using 2 pcs of M6x35mm bolts (A) as shown below. M6x35 mm Bolt (A) x 2pcs SC2187401-BO-00(Eng) 10 of 23 20150120 ver.
Step 3. Pull out the drawer from smoker body. Attach the Door/Drawer Handle (4) to the drawer by using 2 pcs of M6x35mm bolts (A) as shown below. M6x35mm Bolt (A) x 2pcs Step 4. Place the Heat shield plate (8), Water tray (9), Drip tray (10) and Wood chip tray (11) properly to the drawer as shown below. SC2187401-BO-00(Eng) 11 of 23 20150120 ver.
Step 5. Attach the Air vent (6) to the smoker body by using 1 pc of each for M6x14mm bolt (B), Φ6 Spring washer (E) and M6 Nut (D) as shown below. M6x14mm Bolt (B) x 1pc Spring washer (E) x 1pc M6 Nut (D) x 1pc 1pc1pc Step 6. Attach the Side handles (7) to the right and left side panel of the smoker by using 8 pcs of M6x14mm bolts (B) as shown below. M6x14mm Bolt (B) x 8pcs SC2187401-BO-00(Eng) 12 of 23 20150120 ver.
Step 7. Attach the Rear handle (5) to the back panel of smoker by using 4 pcs of M5x12mm bolts (C) as shown below. M5x12mm Bolt (C) x 4pcs Step 8. Place 3 pcs Smoking grates (2) and 1pc Smoking grate with hook (1) into the inner of smoker body and locate them in the grate holding brackets as shown below. Grate holding bracket SC2187401-BO-00(Eng) 13 of 23 20150120 ver.
INSTRUCTIONS FOR PRE-SEASON: UNIT NEEDS TO PRE-SEASON PRIOR TO FIRST USE. Smoke may generate during pre-season and it is normal. 1. Put water tray in place WITHOUT water. 2. Adjust temperature setting to 275°F (135°C) and operate for 3 hours. At the last 45 minutes, open the drawer to add half volume of wood chips in wood chip tray to complete pre-seasoning. 3. Switch off the unit and cool it down completely. HOW TO USE AND SET CONTROL PANEL & REMOTE CONTROL: How to set temperature: Press ON/OFF button.
How to use meat probe: Insert the meat probe into center of meat to get more accurate temperature reading. Press and hold MEAT PROBE button until LED display show the temperature of meat inside. When MEAT PROBE button is released, LED display will resume to smoking temperature or counting time. How to use light: Press LIGHT button to switch the light on. Press LIGHT button to switch the light off.
3. Install 2pcs new “AAA” Alkaline batteries. Make sure the positive (+) and negative (-) polarities of the batteries matching with the symbols engraved on the battery apartment. 4. Install the battery cover back to the remote. Note: i, Batteries do not include. ii, Remove batteries before storing remote control. How to test frequency range: Switch the unit on. Use the remote control to switch the light on and off when you move away from the unit.
CAUTION 1. Keep batteries away from children. If battery is swallowed, consult a physician immediately. 2. Be sure to insert batteries correctly. Improper installation may result in leaks and/or possible explosion. 3. Do not dispose of batteries in fire. 4. Do not mix old and new batteries. 5. Do not mix alkaline, standard (carbon-zinc), or rechargeable (ni-cad, ni-mh,etc) batteries. IMPORTANT NOTES FOR USING THE APPLIANCE Temperature setting is limited at 275°F (135°C) maximum.
Cleaning the unit before use is recommended. Clean the smoking grates, smoking grate with sausage hooks water tray and drip tray with a moist sponge or rag using mild detergent. Rinse and dry thoroughly. Cleans the wood chip tray frequently to remove ash build-up, residue and dust. Clean the interior, glass in door, light cover, meat probe and exterior of smoker by wiping down simply with a damp cloth. Do not use cleaning agent. Ensure to dry thoroughly.
4. Remove M5 bolts and nuts at heating element and take the element out from the unit. 5. Replace a new heating element back to the unit. Reinstall it by using M5 bolts and nuts from step 4. 6. Connect two wire connectors (red and white) to the terminals of the new heating element and then install the ground wire (yellow and green) by using M4 bolt and nut from step 3 as shown below. Yellow and green 7. Install the protective cover to the back panel by using 6 pcs M4 screws from step 2.
This device complies with Part 15 of the FCC Rules. Operation is subject to the following two conditions: (1) this device may not cause harmful interference, and (2) this device must accept any interference received, including interference that may cause undesired operation. FCC Warning Warning: Changes or modifications to this unit not expressly approved by the party responsible for compliance could void the user’s authority to operate the equipment.
TROUBLE SHOOTING Problem Power light malfunction. Reason Possible Solution Poor connection between Check the socket connection or plug and socket. reconnect the plug into the socket again. Control panel malfunction. Refer to user manual P.15 “How to RESET control panel” to reset the control panel. If still cannot work, please contact customer service at (888) 837-1380. House fuse is activated. Check if any other appliances are not operating on the same socket connection then check household fuses.
No smoke comes out. No wood chips or wood Load wood chips. chips have been used up. Drip tray is not located in place. Grease is leaking out from the unit through door and Drip trip is full. drawer. Excess grease or oil build-up in unit. Bad alignment of door Gaps between door, and/or drawer. drawer and smoker during Sealing of door and/or use and the latches do not drawer are damaged. have any more adjustment. Temperature decreased rapidly or shut down abnormally after operation in few hours.
LIMITED WARRANTY 1. Manufacturer warrants this Product to be free from defects in workmanship and materials for a period of Ninety (90) days from the date of purchase, PROVIDED claims are submitted, in writing, with proof of purchase. 2.