User manual DMX DC-1224 DMX controller
Musikhaus Thomann Thomann GmbH Hans-Thomann-Straße 1 96138 Burgebrach Germany Telephone: +49 (0) 9546 9223-0 E-mail: info@thomann.de Internet: www.thomann.de 09.02.
Table of contents Table of contents 1 General notes............................................................................................................................ 1.1 Further information........................................................................................................ 1.2 Notational conventions................................................................................................. 1.3 Symbols and signal words......................................................
DMX DC-1224 DMX controller
General notes 1 General notes This manual contains important instructions for the safe operation of the unit. Read and follow the safety instructions and all other instructions. Keep the manual for future reference. Make sure that it is available to all those using the device. If you sell the unit please make sure that the buyer also receives this manual. Our products are subject to a process of continuous development. Thus, they are subject to change. 1.1 Further information On our website (www.thomann.
General notes Instructions The individual steps of an instruction are numbered consecutively. The result of a step is indented and highlighted by an arrow. Example: 1. Switch on the device. 2. Press [Auto]. ð Automatic operation is started. 3. Switch off the device. 1.3 Symbols and signal words In this section you will find an overview of the meaning of symbols and signal words that are used in this manual.
Safety instructions 2 Safety instructions Intended use This device is used to control spotlights, dimmers, lighting effects equipment, Moving Heads or other DMX-controlled devices. The device is designed for profes‐ sional use and is not suitable for use in households. Use the device only as described in this user manual. Any other use or use under other operating conditions is consid‐ ered to be improper and may result in personal injury or property damage.
Safety instructions NOTICE! Possible staining The plasticiser contained in the rubber feet of this product may possibly react with the coating of your parquet, linoleum, laminate or PVC floor and after some time cause permanent dark stains. In case of doubt, do not put the rubber feet directly on the floor, but use felt-pad floor protectors or a carpet.
Features 3 Features Special features of the device: n n n n n n n n n n n n n n n n 24 control channels, freely assignable to 512 DMX channels Connection for a fog machine 4600 scenes 4 banks with 48 freely programmable, directly accessible programmes Twelve programmable chases 24 faders for manual control Assigned or reversed DMX channel preview Sound-to-Light 3 function layers Blind home function Speed fade control Blackout master Stand-alone mode Manual overriding of scenes in chases MIDI control for
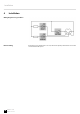
Installation 4 Installation Wiring diagram for fog machines Rack mounting 10 DMX DC-1224 DMX controller If the unit is to be mounted in a 19" rack, remove the plastic panel Thereto loosen the screws that hold the panel.
Starting up 5 Starting up Unpack and carefully check that there is no transportation damage before using the unit. Keep the equipment packaging. To fully protect the device against vibration, dust and moisture during transportation or storage use the original packaging or your own packaging material suitable for transport or storage, respectively. Create all connections while the device is off. Use the shortest possible high-quality cables for all connections.
Connections and controls 6 Connections and controls 1 [PRESET A 1-12] Indicates the current intensity of the corresponding channels. 2 [Channel faders 1-12] These faders can be used to adjust / programme the intensity of channels 1-12. 3 [FLASH 1-12] When this button is pressed, the intensity of the respective channel 1-12 is set to 100 %. 4 [PRESET B 13-24] Indicates the current intensity of the corresponding channels. 5 [SCENES 1-12] These LEDs light up when the corresponding scene is activated.
Connections and controls 10 [MODE SELECT/REC SPEED] Use [Mode Select] to select between these three modes: n CHNS〈 〉SCENES n A DOUBLE PRESET B n 1-12 SINGLE PRESET Use [Rec Speed] to adjust the speed of all programmes in ‘Mix’ mode. 11 [UP/CHASE REV] Use [DOWN] to change a scene in Edit mode. Use [CHASE REV] to change the direction of all chases. 12 [PAGE] Switches between the four PAGES (banks). 13 [DELETE/REV ONE] [DELETE] deletes every step of a scene. [REV ONE] changes the direction of a chase.
Connections and controls 21 [HOLD] Freezes all current DMX values at the output. 22 [STEP] This button is used to advance to the next step when [SPEED] is at the lowest setting or when ‘Edit’ mode is acti‐ vated. 23 [AUDIO] Activates the ‘Audio’ mode. 24 [MASTER A] Master fader for channels 1-12. 25 [MASTER B] Master fader for channels 13-24. 26 [BLIND] This key is used to temporarily remove individual channels from a running programme. 27 [HOME] Use this key to end the Blind mode.
Connections and controls 35 [POWER] Turns the device on and off. 36 [DC IN] Power supply port. 37 [MIDI THRU/OUT/IN] ‘MIDI’ ports to connect a sequencer or MIDI device. 38 [DMX OUT] This terminal sends DMX signals to DMX capable devices. Use a cable with 3-pin XLR connector to connect the devices. 39 [AUDIO] At this input, an audio signal with a level of 100 mV to 1 V can be connected. 40 [REMOTE] ‘Black out’ and ‘Full on’ can also be activated via a remote control.
Operating 7 Operating 7.1 Starting programming 7.1.1 Enabling programming 1. Keep [RECORD] pressed. 2. While holding down [RECORD], press the Flash buttons 1, 6, 6 and 8 in sequence. When you turn on the unit for the first time, the record code is 1, 6, 6 and 8. You can change the code to protect your programmes. 3. Release [RECORD] . ð The RECORD LED lights up. Now you can start programming. 7.1.2 Protecting programmes To protect your programmes, you can change the ‘Record’ code.
Operating 6. Re-enter the new ‘Record’ code. ð All Channel and Scene LEDs flash three times. The RECORD code is now changed. If you re-enter something other than the first time, the LEDs will not light up. This means that changing the ‘Record’ code has failed. WARNING! Always remember to exit ‘Record’ mode if you do not want to continue programming. If you forget this, you lose control of the device. 7. To quite the Record mode, press [REC EXIT] while holding down [RECORD] . 8. Release both buttons.
Operating 7. Keep [RECORD] pressed and additionally press one of the [FLASH] buttons between 13 and 24 ð All record LEDs flash once. The program is saved. 8. Example programme To exit programming mode, press [Exit] and [RECORD] simultaneously. Programming a chase with 16 steps with channels 1-16 and storing a sequence to [Flash 15] on Page 1. 1. Activate the programming Ä Chapter 7.1.1 ‘Enabling programming’ on page 16. Make sure the faders [Master A&B] are both set to their maximum.
Operating 7.2.2 Erasing programme 1. Activate the programming ( Ä Chapter 7.1.1 ‘Enabling programming’ on page 16). 2. Use [PAGE] to select the page where the programme to be erased is stored. 3. Keep [RECORD] pressed and press twice the respective [FLASH] button [13-24]. 4. Release both buttons. ð All LEDs flash briefly. The programme is erased. 7.2.3 Deleting all programmes 1. Activate the programming ( Ä Chapter 7.1.1 ‘Enabling programming’ on page 16). 2. Keep [RECORD] pressed. 3.
Operating 4. Press [DELETE]. ð All LEDs light up. The step is deleted. 5. Repeat steps 2 and 3 to delete all unwanted steps. 6. Exit the mode. To do so, press [REC EXIT] while keeping [RECORD] pressed. ð The LED of the scene turns off. You have left the Edit mode. Example for deleting a step Deleting the third step in the programme on [FLASH] 15 on page 2. 1. Activate the programming ( Ä Chapter 7.1.1 ‘Enabling programming’ on page 16). 2. To select [CHNS〈 〉SCENES] , press [MODE SELECT]. 3.
Operating 3. Press and hold [UP] if you want to increase the intensity. Press and hold [DOWN] if you want to decrease the intensity. 4. Press the [FLASH] button of the corresponding DMX channel of the scene to be changed. While doing this, press and hold [UP] or [DOWN] pressed. 5. Press the respective [FLASH] until you are satisfied with your new scene. 6. Repeat steps 2, 3, 4 and 5 until all steps have been edited. 7. Exit the Edit mode. To do so, press [REC EXIT] while keeping [RECORD] pressed.
Operating 7.3.3 Setting the programme speed with fader 1. Make sure that the Audio mode is disabled. 2. Select the desired programme ( Ä Chapter 7.3.1 ‘Starting a programme’ on page 21). 3. Use [FADE] to set the desired fade time. 4. Use [SPEED] to set the desired speed. 7.3.4 Setting a standard beat ‘Audio’ mode is disabled 1. To select [CHNS〈 〉SCENES], press [MODE SELECT]. 2. Select the desired programme ( Ä Chapter 7.3.1 ‘Starting a programme’ on page 21). 3.
MIDI and DMX channel settings 8 MIDI and DMX channel settings 8.1 MIDI 8.1.1 Setting MIDI IN 1. Activate the programming ( Ä Chapter 7.1.1 ‘Enabling programming’ on page 16). 2. Press and hold [RECORD] . 3. Additionally, press [FLASH 1] three times. ð The display shows ‘CHI’ . The MIDI IN channel setup is now available. 4. To assign [MIDI OUT] to a channel 1 - 16, press [FLASH 1-16]. ð The corresponding LED lights up. 8.1.2 Exiting MIDI settings 1. Keep [RECORD] pressed. 2.
MIDI and DMX channel settings 8.1.4 Sending MIDI file 1. Activate the programming ( Ä Chapter 7.1.1 ‘Enabling programming’ on page 16). 2. Keep [RECORD] pressed. 3. Press [FLASH 4] three times. ð The display shows ‘OUT’ . The controller can now send MIDI files. During the data exchange, no other functions are available. The functions are automatically available again as soon as the data exchange is complete. The data exchange is interrupted as soon as errors occur or the device is switched off. 8.1.
MIDI and DMX channel settings n The controller sends and receives Note On and Note Off data via the [Flash] but‐ tons. Note No. Touch velocity Functions 22-69 Programme master Turns programmes 1-48 on or off. 70-93 Channel intensity Activates channel 1-24. 94 Full on 95 Dark 96 Hold 97 Turns audio on or off. 98 CHNS〈 〉SCENES 99 ‘Double Preset’ mode 100 ‘Single Preset’ mode 101 Step 102 Black out 8.2 DMX 8.2.1 DMX channel settings 1. Activate the programming ( Ä Chapter 7.1.
MIDI and DMX channel settings 8.2.2 Deleting the DMX channel settings 1. Activate the programming ( Ä Chapter 7.1.1 ‘Enabling programming’ on page 16). 2. Keep [RECORD] pressed. 3. Press [FLASH 7] three times. ð All DMX channel settings will be deleted and reset to factory settings. 8.2.3 Calling up 12 preprogrammed programmes 1. Activate the programming ( Ä Chapter 7.1.1 ‘Enabling programming’ on page 16). 2. Keep [RECORD] pressed. 3.
Quick Start Guide for the main functions 9 Quick Start Guide for the main functions 9.1 Reversing scene direction To reverse the direction of all scenes: Press [ALL REV]. ð All scenes change their direction. To reverse the chase direction of all programmes using the speed control: Press [CHASE REV]. To reverse the chase direction of all programmes with standard beat: Press [BEAT REV]. To reverse the chase direction of a particular programme: 1. Keep [REC ONE] pressed. 2.
Quick Start Guide for the main functions 9.4 Using MASTER fader [MASTER] allows proportional control over all channels and scenes except the [FLASH]buttons. For example: If the master fader is in the zero position, the output will also be zero, unless [FLASH] or [FULL ON] is used. If the master fader is set to 50 % , the output of a channel will also be at 50 % , unless [FLASH] or [FULL ON] is used. When the master fader is in its highest position, all device settings can be used. 9.
Quick Start Guide for the main functions 9.8 BLIND and HOME [BLIND] temporarily removes a channel from a chase when it is playing, and allows you to manually control that chase. To switch to Blind mode: 1. Keep [BLIND] pressed and press the [FLASH] button associated with the channel that is temporarily removed from the Chase. 2. To return to normal chase, keep [BLIND] pressed and press the respective [FLASH] button. 9.
Quick Start Guide for the main functions Example 1. Change to the ‘Double Preset’ mode Ä Chapter 9.11 ‘Double Preset’ on page 29. 2. Set faders 1-6 to the highest position, as well as 19-24. 3. Set both [MASTER A] and [MASTER B] equally. ð You now have a scene.
Technical specifications 10 Technical specifications Voltage supply Plug-in power supply (12 – 20 V / 500 mA min.) DMX output 3-pin XLR chassis socket MIDI signal 5-pin standard connectors Audio input RCA socket, 100 mV, 1 Vpp Fuse (internal) 5 mm 20 mm, 0.5 A, 250 V, fast-acting Dimensions (W × H × D) 482 mm × 85 mm × 264 mm (25.12in. × 26.14in. × 4.48in.) Weight 4.
Plug and connection assignments 11 Plug and connection assignments Introduction This chapter will help you select the right cables and plugs to connect your valuable equipment so that a perfect light experience is guaranteed.
Protecting the environment 12 Protecting the environment Disposal of the packaging material For the transport and protective packaging, environmentally friendly materials have been chosen that can be supplied to normal recycling. Ensure that plastic bags, packaging, etc. are properly disposed of. Do not just dispose of these materials with your normal household waste, but make sure that they are collected for recycling. Please follow the notes and markings on the packaging.
Notes 34 DMX DC-1224 DMX controller
Musikhaus Thomann · Hans-Thomann-Straße 1 · 96138 Burgebrach · Germany · www.thomann.