
User's Manual

WASP™ NEST2 Smart Receiver and Gateway Operations Manual
- 19 -
3
3
.
.
2
2
.
.
5
5
S
S
e
e
n
n
s
s
o
o
r
r
L
L
i
i
s
s
t
t
s
s
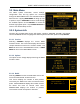
When first configuring or adding WASP™ Sensors to
the WASP™ systems, it is necessary to “bind” the
sensors to the receiver. The SENSOR LISTS will
show all available sensors within range of the NEST.
To access SENSOR LIST:
> MAIN MENU > SENSOR LISTS > SELECT.
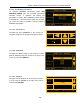
This brings up the main SENSOR LISTS screen with
3 options: FREE, BOUND, and IGNORED.
FREE: Shows all available sensors within range.
BOUND: Identifies all sensors currently “bound” to
the NEST Receiver.
IGNORED: Identifies all sensors chosen to be
ignored by the NEST Receiver, (if any).
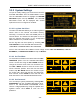
3.2.5.1 Binding And Ignoring Sensor Pucks
To bind a sensor to the receiver, you will need to select a sensor from the FREE sensor list and
bind it to the receiver. To access the FREE SENSOR LIST:
> MAIN MENU > SENSOR LISTS > FREE.
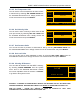
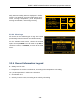
The FREE SENSOR LIST displays all sensors which
have been seen by the receiver, and currently not
bound to the receiver. Each sensor listed is displayed
with list index, sensor serial number, and the elapsed
time since last update.
Example: “1: 1366, 3S” means the NEST received the
last data update 3 seconds ago from the WASP
sensor with serial number 1366.
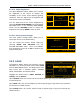
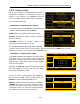
To bind a sensor, scroll up/down and highlight a
sensor from the FREE sensor list. Once found, tap
SELECT to move to BIND/IGNORE screen.
BIND will add this sensor to this receiver’s database.
IGNORE will ignore the sensor allowing another
receiver to pick up that sensor. This is useful in large
installations where you may have overlap between
the effective range of sensors and receivers.
1: 1366, 3S
2: 2046, 9S
3: 2196, 41S
4: 2241, 41S
5: 2032, 41S
6: 2273, 41S
SENSOR LIST> FREE
21'C CRI=4 WRN=1 13:46 NOV 24/10
MAIN
MENU
SELECT
1: 1366, 3S
BIND
IGNORE
SENSOR LIST> FREE
21'C CRI=4 WRN=1 13:46 NOV 24/10
MAIN
MENU
SELECT
BIND