
User's Manual
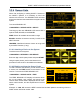

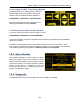
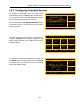
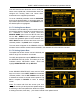
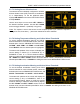
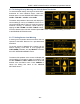
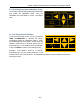
Table Of Contents
- 1. Introduction
- 2. Installation
- 2.1 Included In The Package
- 2.2 Installation
- 2.3 Wiring NEST Receiver
- 3. Interface
- 3.1 System Status Screens
- 3.2 Main Menu
- 3.2.1 System Info
- 3.2.2 System Settings
- 3.2.3 LOGS
- 3.2.4 Sensor Lists
- 3.2.5 Alarm Overide
- 3.2.6 Diagnostic
- 3.2.7 Configuring Individual Sensors
- 3.2.7.1 Setting Sensor Name
- 3.2.7.2 Setting Update Rate
- 3.2.7.3 Setting Sensor Vibration Axes
- 3.2.7.4 Setting Temperature Warning and Critical Alarm Thresholds
- 3.2.7.5 Setting Acceleration Warning and Critical Alarm Threshold
- 3.2.7.6 Setting Velocity Warning and Critical Alarm Thresholds
- 3.2.7.7 Setting Sensor Lost Warning
- 3.2.7.8 Setting Temperature Multiplier Factor
- 3.2.7.10 Temperature Calibration
- 4. Maintenance
- 5. Contact Info

WASP™ NEST4 Smart Receiver and Gateway Operations Manual
- 20 -
This SETTINGS screen allows the user to modify the
sensor name, update rate, choose vibration axes, and
configure the warning alarm and critical alarm
thresholds for the supported parameters.
To set an individual parameter scroll the UP/DOWN
arrows to the desired setting, or by tapping either the
top or bottom part of the screen. Press SELECT when
the desired option is highlighted.
3.2.7.1 Setting Sensor Name
The sensors are identified by serial number and can
be named to display a descriptive nomenclature of up
to 7 characters. To name a sensor, select the
SENSOR NAME option from the SETUP menu and
use the UP / DOWN arrows to toggle through the
numeric and alphabetic option for each character. The
LEFT / RIGHT arrows will move the cursor to the next
character position. Tap SAVE when completed.
The new name will appear in the SENSOR STATUS
windows. Serial numbers remain intact and visible in the SENSOR STATUS>DETAILS window.
3.2.7.2 Setting Update Rate
The update rate of each sensor can be individually set
within a range of 3 seconds to 10 minutes.
To modify the update rate, tap the SETUP section from
the SENSOR STATUS screen. This takes you to the
individual sensor SETTINGS screen. Scroll and
highlight UPDATE RATE and tap SELECT.
At the SENSOR UPDATE RATE menu use the arrow
keys to move the cursor LEFT / RIGHT to the desired
character position. Use the UP / DOWN arrows to add
or subtract the minute or second numeric options. Tap
OK to complete or CANCEL to return to settings
screen.
*Note: The sensor will finish the current cycle, then
complete one full cycle at the previous update rate prior
to switching to the new update time. While the request
is waiting to be sent, three dots (…) are shown instead of the update interval.