
Recording Equipment User Manual


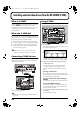


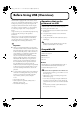
Table Of Contents
- USING THE UNIT SAFELY
- IMPORTANT NOTES
- Precautions Regarding the Hard Disk
- Before Using CD-R/RW Discs
- About the CD-ROM “Discrete Drums”
- Contents
- Introduction to the BR-1600CD
- Panel Descriptions
- Extra information on jacks and connectors
- Common operations and display items
- Section 1 Advanced Use
- Re-recording only the portion that is mistaken (Punch In/Out)
- Using V-Tracks
- Placing markers in your song (Marker)
- Registering and recalling mixer settings (Scene)
- Recalling scenes automatically during recording or playback (Auto Scene)
- Finding the start or end of a section of audio (Scrub/Preview)
- Editing a recorded performance (Track Edit)
- Maximizing the volume levels of data recorded to the tracks (Normalize)
- Organizing your songs
- Section 2 Using Effects
- Makeup of BR-1600CD effects
- Using insert effects
- Effect patches and banks
- Makeup of effect patches
- Modifying insert effect settings
- Switching compressors, equalizers, and low-cut filters between stereo and mono
- Saving insert effect settings (Effect Patch Write)
- Copying insert effect settings (Effect Patch Copy)
- Changing insert effect connections
- Using an expression pedal
- Insert effect algorithm list
- Insert effect parameter functions
- Acoustic Guitar Simulator
- Acoustic Processor
- 3 Band Equalizer
- 4 Band Equalizer
- Bass Simulator
- Bass Cut Filter
- Chorus
- 2x2 Chorus
- Compressor
- COSM Comp/Limiter (COSM Compressor/Limiter)
- COSM Overdrive/Distortion
- COSM PreAmp&Speaker
- De-esser
- Defretter
- Delay
- Distance
- Doubling
- Enhancer
- Flanger
- Foot Volume
- Humanizer
- Limiter
- Low Cut Filter
- Lo-Fi Box
- Mic Converter
- Noise Suppressor
- Octave
- Pan
- Phaser
- Pickup Simulator
- Pitch Shifter
- Preamp
- Ring Modulator
- Short Delay
- Slow Gear
- Speaker Simulator
- Sub Equalizer
- Tremolo
- Tremolo/Pan
- Uni-V
- Vibrato
- Voice Transformer
- Wah
- Using track-specific compressors and equalizers
- Using loop effects
- Fixing the pitch of vocals/Adding a backing chorus to vocals (Vocal Tool Box)
- The Vocal Tool Box
- Makeup of the Vocal Tool Box
- Vocal Tool Box patches
- Fixing the pitch of vocals (Pitch Correction)
- Setting the correction method for vocal pitch (Pitch Correction Edit)
- Applying a backing chorus to vocals (Harmony Sequence)
- Inserting rests in a backing chorus
- Setting the application method for backing choruses (Harmony Sequence Edit)
- Saving Vocal Tool Box settings (Patch Write)
- Copying Vocal Tool Box settings (Patch Copy)
- Recreating the characteristics of different monitor speakers (Speaker Modeling)
- Speaker Modeling parameter functions
- Using the Mastering Tool Kit
- Mastering Tool Kit parameter functions
- Effect parameters assigned to VALUE knobs
- Section 3 Using Rhythm
- Makeup of Drum/Bass/Loop Phrase
- Rhythm arrangements
- Using drums
- Creating drum patterns
- Preparing for recording
- Creating drum patterns using real-time recording
- Creating drum patterns using step recording
- Correcting drum patterns (Microscope)
- Changing the drum pattern’s groove (Swing)
- Changing a drum pattern’s name
- Copying drum patterns
- Deleting drum patterns
- Loading drum patterns from the CD-R/RW drive (SMF Import)
- Using bass
- Creating bass patterns
- Preparing for recording
- Creating bass patterns using real-time recording
- Creating bass patterns using step recording
- Correcting bass patterns (Microscope)
- Changing the bass pattern’s groove (Swing)
- Changing a bass pattern’s name
- Copying bass patterns
- Deleting bass patterns
- Loading bass patterns from the CD-R/RW drive (SMF Import)
- Using Loop Phrases
- Creating Loop Phrases
- Setting the Universal Beat for Drums, Bass, and Loop Phrases
- Using rhythm arrangements
- Creating rhythm arrangements
- Assembling drum and bass patterns
- Canceling pattern allocations
- Inserting patterns
- Inputting chords
- Changing and moving chords
- Deleting chords
- Inserting chords
- Assembling Loop Phrases
- Canceling Loop Phrase allocations
- Inserting Loop Phrases
- Copying a Loop Phrase from a rhythm arrangement to an audio track
- Modifying all of the loop phrases in the current rhythm arrangement (Arrangement Modify)
- Naming and saving rhythm arrangements
- Copying a rhythm arrangement
- Deleting a rhythm arrangement
- Setting tempos and beats for individual measures (Tempo Map/Beat Map)
- Using a metronome
- Section 4 Using the CD-R/RW Drive
- Section 5 Using MIDI
- MIDI fundamentals
- Playing drum and bass patterns on external MIDI sound module
- Synchronizing external MIDI sequencers and rhythm machines
- Controlling MMC-compatible devices from the BR-1600CD
- Controlling track volumes via MIDI (MIDI Fader)
- Inputting drum and bass patterns from a MIDI keyboard (MIDI Recording)
- Using MIDI to Control the Switching of the Insert Effects (Effects Program Change)
- Controlling external video devices from the BR-1600CD (V-LINK)
- Section 6 Using USB
- Section 7 Other Convenient Functions
- Tuning instruments (Tuner)
- Automatically adjusting the input volume balance (Level Calibration)
- Muting individual inputs
- Inputting audio with no loss of quality (Digital In Assign)
- Creating a master tape protected from digital copying
- Changing the content of the level meter display (Pre/Post Fader)
- Using condenser microphones (Phantom Power)
- Mixing audio-device output with the BR-1600CD’s output (Audio Sub Mix)
- Initializing all BR-1600CD settings (Initialize)
- Performing hard disk operations
- Appendices

235
Section 5
Using MIDI to Control the Switching of the
Insert Effects (Effects Program Change)
You can use Program Changes received at MIDI IN to switch
insert effects patches. Similarly, you can also have insert
effects patch selections made on the BR-1600CD transmitted
as Program Changes from MIDI OUT.
1.
Press [UTILITY].
The Utility Menu screen will appear.
fig.12-12d
2.
Move the cursor to the MIDI icon and press [ENTER/
YES].
Alternatively, you can press [F4] (MIDI) if the MIDI icon
is currently displayed.
The MIDI screen will appear.
fig.50-21d
3.
Move the cursor to “Effects Program Chg.” and use the
TIME/VALUE dial to select whether or not Program
Changes are to be transmitted and received.
fig.50-50d
OFF:
Program Changes are not transmitted or received.
PC ONLY:
Insert Effects patches are switched when a Program
Change is received at MIDI IN. In addition, when an
insert effects patch is selected with the BR-1600CD, that
patch number is transmitted from MIDI OUT as a
Program Change.
PC+BANK:
Bank Select and Program Change messages are received
at MIDI IN. Insert effects patches are switched when
Program Changes are received. Simultaneously, the
insert effects patch bank is switched according to the
Bank Select message received immediately before this.
In addition, when an insert effects patch is selected on
the BR-1600CD, the bank and number for that patch are
transmitted from MIDI OUT as Bank Select and Program
Change messages.
4.
Move the cursor to “Effects Channel” and turn the
TIME/VALUE dial to select the MIDI channel over
which the Program Change messages are to be
transmitted and received.
fig.50-60d
OFF:
Bank Select and Program Change messages are not
transmitted or received.
1–16
Bank Select and Program Change messages are
transmitted and received on the selected channel.
5.
If you wish to store the effects program change setting,
save the current song (p. 72).
Bank Select and Program numbers correspond to the insert
effect patch banks and numbers as shown below.
Bank Select
Program
Number
Patch
MSB LSB Bank Number
0
0 1–100 GUITAR P001–P100
1 1–50 MIC P001–P050
2 1–10
MULTI CHANNEL
P001–P010
3 1–50 STEREO P001–P050
4 1–50 SIMUL P001–P050
1
0 1–100 GUITAR U001–U100
1 1–50 MIC U001–U050
2 1–10
MULTI CHANNEL
U001–U010
3 1–50 STEREO U001–U050
4 1–50 SIMUL U001–U050
2
0 1–100 GUITAR S001–S100
1 1–50 MIC S001–S050
2 1–10
MULTI CHANNEL
S001–S010
3 1–50 STEREO S001–S050
4 1–50 SIMUL S001–S050
BR-1600_R_e.book 235 ページ 2007年12月6日 木曜日 午前9時52分