FreeSpace® E-4 Business Music System OWNER’S GUIDE
Contents 1.0 Introduction . . . . . . . . . . . . . . . . . . . . . . . . . . . . . . . 1.1 The Bose® FreeSpace® E-4 business music system . . . . . . . . . . . . . . . . . . . . . . . . . . 1.2 E-4 system accessories . . . . . . . . . . . . . . . . . . 1.3 FreeSpace Installer™ software . . . . . . . . . . . . . 2.0 Designing with the E-4 System . . . . . . . . . . . . . . . . 2.1 Introduction . . . . . . . . . . . . . . . . . . . . . . . . . . . . 2.2 Basic design steps . . . . . . . . . . . . . . . . . .
Contents 8.4 Common problems . . . . . . . . . . . . . . . . . . . . . . 8.4.1 Communications port error . . . . . . . . . . . 8.4.2 No audio in zone . . . . . . . . . . . . . . . . . . . 8.4.3 User interface keypads do not operate correctly . . . . . . . . . . . . . . . . . 8.4.4 Bad sound in a zone . . . . . . . . . . . . . . . . . 8.4.5 User interface selects unassigned sources . . . . . . . . . . . . . . 8.4.6 Auto Volume does not calibrate . . . . . . . . 8.4.7 All front panel LEDs are amber . . . . .
1.0 Introduction 1.
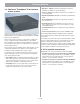
1.0 Introduction • FreeSpace® E-4 System Auto Volume Interface Kit (U.S.) (PC030101) A wall-mountable keypad that fits into a standard U.S. singlegang junction box. It provides buttons for volume up/down control, 1-3 source selection, and Auto Volume on/off. 1.3 FreeSpace Installer™ software • FreeSpace E-4 System Auto Volume Interface Kit (Euro) (PC030102) A wall-mountable keypad that fits into a standard Euro singlegang junction box.
2.0 Designing with the E-4 System 2.1 Introduction Guidelines for establishing Auto Volume zones This section describes the basic steps for designing an E-4 system and includes an example. It is assumed that a complete loudspeaker design and layout has already been created. Speaker height is… >25 ft (7.6 m) 2.2 Basic design steps There are five basic steps in designing an E-4 system. 2.2.
2.
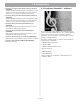
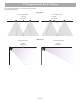
2.0 Designing with the E-4 System When mounting sensing microphones, always maintain a distance of 6 feet (1.8 m) minimum between the microphone and the speaker. Wall Surface Ceiling Flush Sensing microphone ≥6 ≥ ft6' (1.8 m) ≥6 ft (1.8 m) Mic ≥6 ft (1.8 m) Sensing microphone Ceiling Surface ≥6 ft (1.8 m) Mic ≥6 ft ≥ m) 6' (1.8 17 of 76 ≥ 6' Sensing microphone ≥6 ft (1.
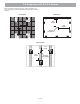
2.0 Designing with the E-4 System 2.2.3 Step 3 – Determine volume control requirements 2.2.4 Step 4 – Determine the speaker requirements Decide which areas will have volume controls. Create a control map, such as the following, showing the types of controls that will be used, and the areas in which they will be installed. Determine the speaker coverage required for the design.
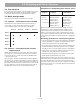
2.0 Designing with the E-4 System 2.2.5 Step 5 – Determine the E-4 requirements Now we can take a look at how the maps we created can help us determine the quantity of E-4s we will need. Once you have identified the areas that use Auto Volume and unique loudspeakers, you can combine different areas based on the types of sources and controls they are using. Sources 1 2 3 Controls 4 ● AV1 AV2 VC1 Loudspeakers VC2 M32SE Total W E-4 Ch.
2.0 Designing with the E-4 System 2.
2.
2.0 Designing with the E-4 System Hotel lobby 22 ft (6.7 m) 40 ft (12.
76 ©2003 Bose Corporation, The Mountain, Framingham, MA 01701-9168 USA 268134 AM Rev.