
Specifications


19
Operating Instructions
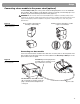
Producing individualized sound
This product will produce sound whether it is properly adjusted or not. However, if you take a
few moments to follow a simple startup procedure, you can optimize the sound for a superior
presentation based on your performance style and preferences.
Unless you make big changes in how you perform, this is typically a one-time event.
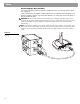
1. Set all gain and level controls on the power stand and remote to zero (0).
2. Set the Power switch to On.
CAUTION: The peak inrush current for the system is approximately 32 amps. If more than one
system is plugged into the same AC circuit, make sure you stagger the turn-on times. This can
prevent tripping the circuit breaker or blowing the house mains fuse.
3. Plug your microphone or instrument into the channel 1 or 2 Input jack. If phantom power
is required for your microphone (condenser or electret/condenser type), depress the
Phantom power button.
4. Select a preset for your microphone and/or instrument.
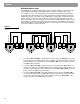
5. Sing or play as loud as you would in a performance while following steps 4 and 5.
6. Adjust the Tri m control so that the SIG/OL indicator goes from unlit to green, and finally
to occasionally blinking red. Make sure that your instrument is at the highest volume set
-
ting that you are planing to use.
7. Adjust the LEVEL control on the remote and make the SIG/OL indicator go from unlit to
green, and finally to occasionally blinking red.
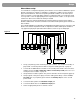
That’s it! You’re done! When you go to your concert or show:
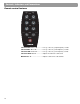
•Use the CH 1/2 LEVEL controls on the remote to adjust the channel 1/2 volume level.
•Use the MASTER control on the remote to adjust the volume level of all outputs.
•Use the HIGH, MID, and LOW equalization controls on the remote to adjust the timbre of
your sound.
Initially, keep the remote control close at hand. This allows you to conveniently adjust the vol-
ume level when you first start playing. Later, you can move it out of the way or backstage
once the system is performing the way you want it to.
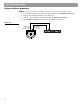
Using input channels 3 and 4
The channel 3 and 4 inputs are optimized for 0 dB line-level signals, such as the signals from
an effects processor, mixer, or CD player. Simply connect the equipment to the power stand
and raise the output level using the Channel 3/4 Level control on the rear panel of the power
stand.