® LIFESTYLE VS-2 VIDEO ENHANCER Owner’s Guide REVIEW DRAFT 4 (9/18/06)
Svenska Nederlands Italiano Français Español Deutsch Dansk English IMPORTANT SAFETY INSTRUCTIONS 1. Read these instructions. 2. Keep these instructions – for future reference. 3. Heed all warnings – on the product and in the owner’s guide. 4. Follow all instructions. 5. Do not use this apparatus near water – Do not use this product near a bathtub, washbowl, kitchen sink, laundry tub, in a wet basement, near a swimming pool, or anywhere else that water or moisture are present. 6.
Svenska Nederlands Italiano Français SAFETY INFORMATION Español Deutsch Dansk English CONTENTS Please read this installation guide Introduction . . . . . . . . . . . . . . . . . . . . . . . . . . . . . . . . . . . . . . . . . . . . . . 4 Please take the time to follow this installation guide carefully. It will help you set up and operate your system properly, and enjoy all of its advanced features. Save your installation guide for future reference. Connecting the VS-2 to Your Media Center . .
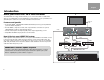
Svenska Nederlands Italiano Français Español Deutsch Dansk English Introduction About your LIFESTYLE® VS-2 video enhancer TV The LIFESTYLE® VS-2 video enhancer allows you to connect more than one audio/video device to your LIFESTYLE® home entertainment system. With this accessory installed, a single button press selects the source video and audio at the same time.
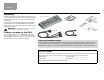
English Dansk Deutsch Español Français Italiano Nederlands Svenska Unpacking Carefully unpack the VS-2 video enhancer. Check to be sure your system includes the parts shown on this page. Save all packing materials in case you need to repack and transport your product. VS-2 video enhancer Software update disc If any part of the product appears damaged, do not attempt to use it. Notify Bose or your authorized Bose dealer immediately.
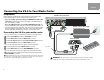
Svenska Nederlands Italiano Français Español Deutsch Dansk English Connecting the VS-2 to Your Media Center Preparation Media center rear panel When setting up a LIFESTYLE® system with the VS-2, the media center power supply plugs into the VS-2 instead of the media center. • If you are setting up the VS-2 and your LIFESTYLE system at the same time, find the media center power supply in the LIFESTYLE system carton before you begin.
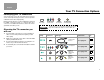
English Dansk Deutsch Español Français Italiano Nederlands Svenska Your TV Connection Options Identifying your TV connectors Your TV may have some or all of the video input connectors shown on the right. Each type of video connector provides a different level of video image quality. Examine the rear panel of your TV and determine whether it has HDMI, component, S-Video, or composite video input connectors. For additional instructions, refer to the owner’s guide that came with your TV.
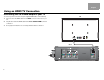
Svenska Nederlands Italiano Français Español Deutsch Dansk Using an HDMI TV Connection Connecting the VS-2 HDMI output to your TV TV To connect your TV to the VS-2 using the supplied HDMI cable, do the following: 1. Plug one end of the HDMI cable into the HDMI connector on the rear of your TV. 2. Plug the other end of the HDMI cable into the Video OUTPUT HDMI connector on the VS-2. 3. Go to page 9 for instructions on connecting other A/V devices to the VS-2.
English Dansk Deutsch Español Français Choosing connection types for your A/V devices 1. Look at the rear panel of each A/V device to determine what type of video output connectors it has. 2. In the following table, choose the type of available video connector that provides the highest possible video quality. We recommend using an HDMI connection if it is available. Place a check mark in the table for the connector type used for each of your A/V devices.
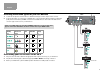
Svenska Nederlands Italiano Français Español Deutsch Dansk Using a Component Video TV Connection Connecting the VS-2 component video output to your TV TV You need to obtain a component video cable from Bose or your local electronics dealer to complete this connection. To connect your TV to the VS-2 using a component video cable (not supplied), do the following: 1. Plug one end of the component video cable into the component connectors on the rear of your TV.
English Dansk Deutsch Español Français Choosing connection types for your A/V devices 1. Look at the rear panel of each A/V device to determine what type of video output connectors it has. 2. In the following table, choose the type of available video connector that provides the highest possible video quality. We recommend using a component connection if it is available. Place a check mark in the table for the connector type used for each of your A/V devices.
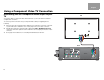
Svenska Nederlands Italiano Français Español Deutsch Dansk Using a S-Video TV Connection Connecting the VS-2 S-Video output to your TV TV You can use the S-Video cable included with your LIFESTYLE® system to make this connection. To connect your TV to the VS-2 using an S-Video cable, do the following: 1. Plug one end of the S-Video cable into the S-Video connector on the rear of your TV. 2. Plug the other end of the S-Video cable into the Video OUTPUT S-Video connector on the VS-2. 3.
English Dansk Deutsch Español Français Choosing connection types for your A/V devices Italiano Nederlands Svenska VS-2 If you connected your TV to the VS-2 using an S-Video cable, you can use only an S-Video or Composite connection for your A/V devices even though a device may have HDMI or component video output connectors. 1. Look at the rear panel of each A/V device to determine what type of video output connectors it has. 2.
Svenska Nederlands Italiano Français Español Deutsch Dansk Using a Composite Video TV Connection Connecting the VS-2 composite video output to your TV TV You can use the composite video cable included with your LIFESTYLE® system to make this connection. To connect your TV to the VS-2 using a composite video cable, do the following: 1. Plug one end of the composite video cable into the composite video connector on the rear of your TV. 2.
English Dansk Deutsch Español Connecting your A/V devices to the VS-2 Français Italiano Nederlands Svenska VS-2 If you connected your TV to the VS-2 using a composite video cable, you can use only a Composite or S-Video connection for your A/V devices even though a device may have HDMI or component video output connectors. 1. Plug one end of the video cable into the appropriate video output connector on the rear of your A/V device. 2.
Svenska Nederlands Italiano Français Español Deutsch Dansk Program Recording Connections Connecting your cable/satellite box to your VCR/DVR To record programs from your cable or satellite service, you can connect your cable/satellite box to your VCR or DVR. The diagram on this page is an example of how this equipment may be connected. Before you start, make sure that your cable/satellite box and VCR/DVR have the necessary input and output connectors available.
English Dansk Deutsch Español Français Italiano Nederlands Svenska Operating Information Updating the system software 1. Turn on your LIFESTYLE® system and select the CD/DVD source. 2. Load the software update disc into the media center disc player. 3. Wait for the display window of the media center to indicate when it is done. IMPORTANT: Software update required! Your VS-2 comes with a software update disc.
Svenska Nederlands Italiano Français Español Deutsch New Settings menu items When the VS-2 is connected to your LIFESTYLE® system, the following new items appear in the settings menus. New Menu Item Description Possible Settings (Factory/default settings in bold type) Audio Delay Changes the amount of delay between audio and video. Used to synchronize the audio with the action when viewing audio/video program content.
English Dansk Deutsch Español Français Switching sources Adding the VS-2 to your system setup greatly simplifies source selection. Just press the remote button (CD/DVD, VCR, CBL/SAT, or AUX) for the source you want to use. If you select one of the sources connected to the VS-2, be sure the source is turned on.
Svenska Nederlands Italiano Français Español Deutsch Dansk Mounting Your VS-2 on a Wall Required tools 1 Install two screws eight inches apart. Leave ¼ inch (6 mm) between wall surface and screw head. 2 Position the VS-2 mounting holes over the screws so that it is flush with the wall. Recommended hardware For solid wood 18 -inch (3.5 mm) drill bit No. 8 x 1½-inch (M4 x 36 mm) wood screws For wallboard Use drill size specified for type of wall anchor used. No. 8 (M4) wall anchor No.
English Dansk Deutsch Español Français Italiano Nederlands Svenska Maintaining Your VS-2 Cleaning • Use only a soft, dry cloth to clean the outside of the VS-2. • Do not use any solvents, chemicals, or cleaning solutions containing alcohol, ammonia, or abrasives. • Do not allow liquids to spill into any openings. • Do not use any sprays near the VS-2.
Svenska Nederlands Italiano Français Technical information Dimensions 15.6" W x 4.8" D x 1.6" H (39.55 cm x 12.07 cm x 4.0 cm) VS-2 power rating 9W Video inputs (2) HDMI (CBL-SAT and VCR) (3) Component (3) S-Video (3) Composite Video output HDMI Component S-Video Composite Weight (approximate) 2.5 lb (1.13 kg) Finish Diecast aluminum Contacting Customer Service If you need help solving problems while setting up this product, contact Bose® Customer Service.
English Dansk Deutsch Español Limited Warranty What is covered: All parts defective in material and workmanship.
Svenska 24 Nederlands Italiano Français Español Deutsch Dansk English
English Dansk Deutsch Español Français Italiano Nederlands Svenska 25
REVIEW DRAFT 4 (9/18/06) ©2006 Bose Corporation, The Mountain, Framingham, MA 01701-9168 USA 292564 AM Rev.