Owner's Guide
,& WARNING: Toreduce the risk of fire or electric shock, do not expose the Wave_ Radio/CD to rain or moisture. As with any electronic product, use care not to spill liquids into any part of the system. Liquids can cause a failure and/or a fire hazard. CAUTION: TO REDUCE THE RISK OF ELECTRIC SHOCK, AFIN DE PREVENIR UN CHOC ELECTRIQUE NE PAS ENLEVER LE COUVERCLE ARRIERE. IL NE SE TROUVE A L'INTERIEUR AUCUNE PIECE POUVANT ETRE REPAREEPAR L'USAGER. S'ADRESSER_, UN REPARATEUR COMPETENT.
Where to find... Setting Up Before you begin ........................................................................................................... 4 Unpacking the carton ................................................................................................... 5 Selecting a location for your Wave ®Radio/CD ............................................................. 5 Installing the battery .....................................................................................................
Before you begin Thank you for purchasing the Bose ®Wave®Radio/CD. Fourteen years of research by Bose Corporation bring you the benefits of award-winning patented acoustic waveguide speaker technology. Using this technology, a tube efficiently transfers energy from a small loudspeaker to the outside air over a whole range of bass notes. And, by folding long waveguides into intricate patterns, they fit into products small enough to be placed comfortably in your home.
Unpacking the carton Carefully unpack your system. Save all packing materials for possible future use. The original packing materials provide the safest way to transport your Wave®Radio/CD. If any part of the product appears damaged, do not attempt to use it. Notify Bose®Product Support immediately (see phone numbers on the inside back cover). Check to be sure your Wave Radio/CD contains the parts identified in Figure 1.
Installing the battery The 9-volt battery maintains clock and alarm settings and operates the Wave ®Radio/CD's backup alarm system for up to 24 hours, during a power loss or while the system is temporarily unplugged. Operating without this battery leaves the memory unprotected, but will not harm the product. Use a standard 9V battery (IEC 6F22 in Europe), available at most retail stores. Use an alkaline battery for longer backup time.
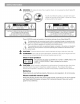
Connecting the power cord 1. Unwind the power cord completely to ensure the best FM reception. The FM antenna is built into the power cord. 2. Plug the power cord into an electric outlet (Figure 3). The display panel lights and the time display begins flashing. 3. Press and hold either Time 4 or _, button to stop the flashing and set the time.
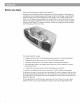
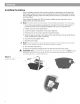
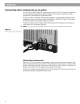
Setting up the remote control WARNING: Keep the remote control battery away from children. /t may cause a fire or chemical bum ff mishandled. Do not recharge, disassemble, heat above 212°F (100°C), or indnerate. Dispose of used battery prompdy Rep/ace only with a battery of the correct type and model number. Your remote control may be one of two types (Figure 4A or 4B). Each is identified by the way the battery compartment unlocks to install or replace the battery. 1.
Note: Use only a DuracelL Eveready, Maxell, or Toshiba CR2032 or DL2032 lithium battery (available at electronics stores). If you have difficulty finding a replacement battery, contact Bose_ Product Support (see phone numbers on the inside back cover). 3. Keeping the remote control face down, insert the new battery into the compartment with the + symbol facing up. 4. Gently slide the battery compartment closed. It locks automatically. 5.
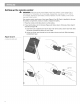
Connecting other components as an option You can use your Wave®Radio/CD to improve the sound of a TV, VCR, computer, or tape player. Or use it as extension speakers for a Bose®Lifestyle_ music system. Connect one of these components to the R (right) and L (left) AUX IN jacks. To play your radio or CD player through external speakers, connect powered speakers with an independent volume control to the system's R (right) and L (left) LINE OUT jacks.
Component Cable Portable tape player One minip!ug4o' stereo audio cable Connection component at Headphone jack Connectien at Wave Radio/CD AUX IN jacks AUX iN For best sound, set the player volume control to approximately 3/4of maximum volume. CD changer, tape deck, or VCR One stereo audio Audio output jacks _@_ Note @ 4) R AUX IN jacks You can record from your Wave® Radio/CD using the connections from the LiNE OUT jacks.
Using the remote control You can use the remote control to operate the most frequently used functions of the radio, CD player, and alarms. Aim the remote control at the display of your Wave Radio/CD. Use the remote buttons in the same way you use the system control panel. The remote normally works up to 20 feet in front of the system, and 6 feet to either side. Replace the remote control battery when it stops operating, or its range seems reduced (normally every year or two).
Using the radio/CD control panel In addition to controlling the most frequently used functions of the radio, CD player, and alarms, control panel buttons allow you to set the time, alarms, CD mode, and radio presets (Figure 8). Using button combinations on the control panel gives you access to additional special features (such as customizing the display and programming the CD player). For details, to the "Quick Reference to Special Functions" on page 28.
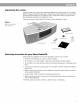
Reading the Wave Radio/CD display Flashes when mute is selected Lights when Alarm 1 is Shows current time, activated, flashes while alarm time, sleep setting Alarm 1, and when time, snooze time, going off Indicates nap time, AM/FM tone alarm frequency, CD time, is set or CD program item, going off battery level Indicates stereo reception Figure 9 The WaveRadio/CD display ] I ALARM I FH --OFF .
Setting the time Function To set the clock - Hold down either Time <1 or _ button or press the same one twice. The time display changes slowly at first, then faster. Release the clock set button to stop. Customizing the display Function hold and press To set AM/PM (12 hour) or Military (24 hour) time - With the system off, hold down Alarm Setup and press On/Off to switch between AM/PM (12 hour)and Military (24 hour) time formats.
Controlling the system Rern Function ntrol To turn on/off - Press On/Off once to turn on or off. The system turns on to the last source played. To select a source - Press FM orAM, CD, orAUX. To listen to a component connected to AUX, be sure to turn on the component. Pressing AUX does not turn on the component. = To adjust the volume - With the system on or off, press and hold either button to reset the volume. The display shows the volume level, from 0 (silent) to 99 (loud).
Using the radio Function To turn the radio on/off - Press On/Off once to turn on or off. The system turns on to the last source played. Or, press FM or AM or any Preset to turn the radio on. To seek a station - Press Track/Tune <_ or l> once to tune in the next strong station. Repeat to locate a station you prefer. After manually tuning (see below), wait 2 seconds for the system to return to seek mode.
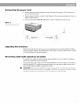
Using the CD player Lift the CD door (as shown). Place the CD, label-side up, on the spindle in the CD well. Gently lower the door more than halfway, until it begins to close by itself. Or continue to close it manually if you prefer. Figure 11 Setting up a CD / Function To turn on/off - Press On/Off once to turn on or off. The system turns on to the last source played. Or, press CD Play _ II to turn on the CD player. In CD mode, the CD begins to play as soon as you load a disc and close the CD door.
Function To display CD information - If the display is in clock mode (see page 15) and the CD is playing, hold down Alarm Setup and press Track/Tune <_ or _ on the control panel only. To display playing time for one track - After pressing CD Stop [], press Track/Tune <_ or _> to display total time for the selected track. Press OD Play 1_ | | to play the selected track.
Setting Note: the alarms You can set alarms with the Wave Radio/CD on or off Function To enter alarm setup mode - Press and release Alarm Setup. The system is now in alarm setup mode. ALARM 1 flashes for 10 seconds. To select which alarm to set - While ALARM 1 is flashing, set alarm time, volume, and alarm sound (tone o_)), radio, or CD), for Alarm 1. Press Alarm Setup again until ALARM 2 is flashing. While it flashes for 10 seconds, begin to set Alarm 2.
Using the alarms Function To turn Alarm I or Alarm 2 on/off - On the control panel only, press Alarm 1 to activate this alarm; ALARM 1 lights on the display. Press again to deactivate that alarm. Press Alarm 2 to activate this alarm; ALARM 2 lights on the display. Press again to deactivate that alarm. The alarms go off at the time, volume, and source you have set for each. To stop the alarm - Press On/Off. The alarm indicator remains lit, since the alarm automatically resets to repeat daily.
Taking care of your Wave Radio/CD The only necessary maintenance is cleaning and periodic battery replacement. Handling CDs Handle discs by their edges to prevent fingerprints and scratches. To remove stains or fingerprints from the surface of a disc, use a soft, lint-free, dry cloth. Wipe in straight movements from the center of the disc to the outside. Do not use any chemical products; they can damage the disc. Do not write on, or attach labels to the surface of the disc.
Troubleshooting Problem What to do System does not function • Make sure the power cord is fully plugged into an operating AC wall outlet. • Press On/Off to see if the display lights. The main display may be turned off (see page 15). No sound Increase the volume. Press the MUTE button on the remote control to unmute the sound. Be sure CD is loaded correctly. Check the connections for any auxiliary component. Select AUX to hear a source connected to the AUX IN jacks.
A D acoustic waveguide 4 Alarm 1 13, 14, 20, 21 Alarm 2 13, 14, 20, 21 ALARM 1 or 2 indicator 20, 21 Alarm Setup 13, 15-17, 19, 20, 28 alarm time 14, 20 alarm volume 20, 28 alarms 4, 10, 12, 13, 20, 21 AM 4, 5, 12-14, 16, 17, 19, 20, 23 AM antenna 7, 23 AM reception 5, 23 AM/FM 17 AM/PM (12 hour) time 15, 28 antenna connector 7 automatic shutoff 16 automatic turn on 16 AUX 10-13, 15, 16, 19, 20, 23 AUX IN jacks 10, 11,23 auxiliary source 10, 23 dim setting 14, 15, 28 dimensions 22 dimmer switch 23 disc 2
P stereo tuner 4 pause 14, 18, 19, 23, 28 play 12, 13, 14, 18, 19, 23, 28 playing time 18, 19 portable tape player 11 power cord 7, 23 power failure 6, 21,22 power rating 22 powered speakers 10 Pr01 19, 28 PRESET indicator 17 preset number 14, 17 preset station 12, 13, 17 Preset buttons 20 presets 4, 14, 17 product support 5, 9, 22, 23 programming a CD 4, 13, 14, 19, 28 It" R radio display 17 radio reception 7, 23 radio station 15, 16, 28 RANDOM 19 random modes 4, 13, 19, 20 RCA cable 11 tape player 4,
Function use when... system is on or off ! .............
USA & Canada Sales Bose Corporation, The Mountain Framingham, MA 01701-9168 1-800-637-8781 USA & Canada Service Bose Corporation, The Mountain Framingham, MA 01701-9168 1-800-637-8781 or 508-879-7330, x63055 European Office Bose B.V.