F1 Flexible Array Loudspeaker System F1 Model 812 and F1 Subwoofer Owner’s Guide
Important Safety Instructions Please read this owner’s guide carefully and save it for future reference. WARNINGS: • To reduce the risk of fire or electrical shock, do not expose the product to rain or moisture. • Do not expose this apparatus to dripping or splashing, and do not place objects filled with liquids, such as vases, on or near the apparatus. As with any electronic products, use care not to spill liquids into any part of the system. Liquids can cause a failure and/or a fire hazard.
Contents Introduction Product Description....................................................................................................................................................... Features and Benefits.................................................................................................................................................... Carton Contents......................................................................................................................................
Introduction Product Description The Bose® F1 Model 812 Flexible Array Loudspeaker is the first powered portable loudspeaker that lets you control its vertical coverage pattern. Simply push or pull the array into position to create “Straight,” “C,” “J” or “Reverse J” coverage patterns. And once set, the system automatically changes the EQ to maintain optimum tonal balance for each coverage pattern.
Introduction F1 Model 812 Flexible Array Loudspeaker Note: The F1 Model 812 comes with threaded M8 inserts for rigging or attaching accessory brackets. CAUTION: Only professional installers with the knowledge of proper hardware and safe mounting techniques should attempt to install any loudspeaker overhead.
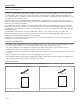
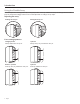
Introduction Using the Flexible Array You can shape the coverage pattern by moving the position of the top and bottom array. The array position is held in place by magnets that trigger internal sensors that adjust EQ according to array shape. Adjusting the array Pushing the array in Pulling the array out Four coverage patterns Straight pattern J pattern Pull top and bottom array out Pull top array out, push bottom array in. Reverse-J pattern C pattern Push top array in, pull bottom array out.
Introduction Applications Straight pattern Use the straight pattern when the audience is standing and their heads are approximately at the same height as the loudspeaker. Reverse-J pattern The reverse-J pattern is good for an audience in raked seating that starts at loudspeaker height and extends above the top of the loudspeaker. J pattern The J pattern works well when the loudspeaker is up on a raised stage and the audience is seated below on the floor.
Setting Up the System Using the F1 Model 812 with the F1 Subwoofer The built-in loudspeaker stand is stored in the rear of the subwoofer. Setting up the F1 Model 812 Loudspeaker with the F1 Subwoofer is easy: 1. Remove the built-in speaker stand from the back of the F1 Subwoofer and insert it into the stand slots. Built-in speaker stand Stand slots 2. Lift the F1 Model 812 Loudspeaker and place it on the stand.
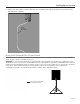
Setting Up the System 3. Plug in your audio cables. Feed the cables from the F1 Model 812 through the channels in the speaker stand to help keep them organized. Cable channel (both sides) Using the F1 Model 812 on a Tripod Stand The bottom of the F1 Model 812 Loudspeaker includes pole cup for mounting the loudspeaker on a tripod speaker stand. The pole cup fits a standard 35 mm post. WARNING: Do not use the F1 Model 812 Loudspeaker with a tripod stand that is unstable.
Operation F1 Model 812 Control Panel Note: For a complete list of LED indications and behaviors, see “LED Indicators” on page 20. POWER: AC power on/off SIGNAL/CLIP: Displays the input signal status in color. • Green = signal present. • Red = signal clipping, input signal too high VOLUME: Adjusts channel volume. SIGNAL INPUT: Selector switch sets input sensitivity for input type. Combo connector accepts XLR mic connector or ¼" phone plug (TRS balanced or TS unbalanced cables).
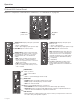
Operation F1 Subwoofer Control Panel Note: For a complete list of LED indications and behaviors, see “LED Indicators” on page 20. FRONT LED selector switch: • POWER enables LED to indicate power status. • LIMIT enables LED to indicate limiting. • OFF turns off LED. POWER/FAULT: indicates power/fault status • Blue = power on. • Red = fault condition. LIMIT: Amber = system limiting. SIGNAL/CLIP: Displays the input signal status in color. • Green = signal present.
Operation Power On/Off Sequence When turning the system on, turn on input sources and mixing consoles first and then turn on the F1 Model 812 Loudspeaker and the F1 Subwoofer. When turning the system off, turn off the F1 Model 812 and F1 Subwoofer first followed by input sources and mixing consoles. Setting EQ selector switches Recommended settings for the EQ selector switches on the F1 Model 812 Loudspeaker and the F1 Subwoofer are describe in the following table.
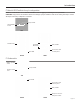
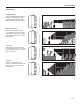
Operation Connection Scenarios Full band, mixing console stereo output to L/R F1 Model 812 Loudspeakers L Set F1 Model 812 EQ to FULL RANGE. R F1 Model 812 If using INPUT 1, set F1 Model 812 SIGNAL INPUT to LINE LEVEL. F1 Model 812 Full band with mixing console, one F1 Subwoofer and two F1 Model 812 Loudspeakers Set LINE OUTPUT EQ to THRU (full range). L R F1 Subwoofer F1 Model 812 Set F1 Model 812 EQ to WITH SUB.
Operation Mixing console stereo output to F1 Subwoofer and left/right F1 Model 812 Loudspeakers Note: The recommend EQ settings are provided under the heading, “Power On/Off Sequence” on page 12. However, for maximum bass response, set the EQ selector switch on both F1 Model 812 Loudspeakers to FULL RANGE and set the EQ selector switch on the F1 Subwoofer to THRU. F1 Subwoofer L R If using INPUT 1, set F1 Model 812 SIGNAL INPUT to LINE LEVEL. F1 Model 812 Set LINE OUTPUT EQ to THRU (full range).
Operation Full band with mixing console stereo output to two F1 Subwoofers and two F1 Model 812 Loudspeakers Set LINE OUTPUT EQ to THRU (full range). L Set F1 Model 812 EQ to WITH SUB. R F1 Subwoofer F1 Model 812 Set LINE OUTPUT EQ to THRU (full range). F1 Subwoofer Set F1 Model 812 EQ to WITH SUB. F1 Model 812 Stereo input to Left/right F1 Subwoofers and F1 Model 812 Loudspeakers L F1 Subwoofer If using INPUT 1, set F1 Model 812 SIGNAL INPUT to LINE LEVEL.
Operation Mic to F1 Model 812 Loudspeaker INPUT 1 Set F1 Model 812 SIGNAL INPUT to MIC. Set F1 Model 812 EQ to FULL RANGE. Mobile device to single F1 Model 812 Loudspeaker Set F1 Model 812 EQ to FULL RANGE. Mobile device headphone output to F1 Model 812 INPUT 2 RCA connectors.
Operation Mobile device to F1 Flexible Array Loudspeaker system Set F1 Model 812 EQ to WITH SUB. Mobile device headphone output to F1 system. Mobile device to F1 Model 812 Loudspeaker and F1 Subwoofer F1 Model 812 F1 Subwoofer Set F1 Model 812 EQ to FULL RANGE. Mobile device headphone output to F1 Model 812 INPUT 2 RCA connectors.
Operation DJ Console to two F1 Subwoofers and two F1 Model 812 Loudspeakers F1 Subwoofer F1 Model 812 Set LINE OUTPUT EQ to THRU (full range). F1 Subwoofer 18 - English F1 Model 812 Set F1 Model 812 EQ to WITH SUB.
Care and Maintenance Caring for Your Product Cleaning • Clean the product enclosures using only a soft, dry cloth. • Do not use any solvents, chemicals, or cleaning solutions containing alcohol, ammonia, or abrasives. • Do not use any sprays near the product or allow liquids to spill into any openings. • If necessary, you may carefully vacuum the grille of the loudspeaker array.
Care and Maintenance Problem What to do Excessive Noise or System Hum • When connecting a microphone to the F1 Model 812 Loudspeaker, make sure the INPUT 1, SIGNAL INPUT switch is set to MIC. • Check to make sure that all system connections are secure. Lines that are not completely connected could create noise. • If using a mixing console, external source or receiving input from the F1 Subwoofer, make sure the INPUT 1 SIGNAL INPUT switch on the F1 Model 812 Loudspeaker is set to LINE.
Care and Maintenance Technical Information Physical Dimensions Weight F1 Model 812 Loudspeaker 26.1" H x 13.1" W x 14.6" D (665 mm H x 334 mm W x 373 mm D) 44.5 lb (20.18 Kg) F1 Subwoofer 27.0" H x 16.1" W x 17.6" D (688 mm H x 410 mm W x 449 mm D) 55.0 lb (24.95 Kg) F1 system stack 73.5" H x 16.1" W x 17.6" D (1868 mm H x 410 mm W x 449 mm D) 99.5 lb (45.13 Kg) Electrical AC power rating Peak inrush current F1 Model 812 Loudspeaker 100–240V 2.3–1.2A 50/60Hz 120 V RMS: 6.3A RMS 23 V RMS: 4.
Additional Resources Visit us on the web at pro.Bose.com. Americas (USA, Canada, Mexico, Central America, South America) Bose Corporation The Mountain Framingham, MA 01701 USA Corporate Center: 508-879-7330 Americas Professional Systems, Technical Support: 800-994-2673 Australia Bose Pty Limited Unit 3/2 Holker Street Newington NSW Australia 61 2 8737 9999 Belgium Bose N.V. / S.
©2015 Bose Corporation, The Mountain, Framingham, MA 01701-9168 USA AM740644 Rev.