Bose® Modeler® Plus 6.
Bose® Modeler® Plus 6.5 Software User Guide Supplement Contents Chapter 1: Getting Started 1 System requirements . . . . . . . . . . . . . . . . . . . . . . . . . . . . . . . . . 1 Registration. . . . . . . . . . . . . . . . . . . . . . . . . . . . . . . . . . . . . . . . . 2 Installation. . . . . . . . . . . . . . . . . . . . . . . . . . . . . . . . . . . . . . . . . . 2 Setup . . . . . . . . . . . . . . . . . . . . . . . . . . . . . . . . . . . . . . . . . . . . 10 Hardware Key. . . . . . . . . . . . .
Noise level meter and field . . . . . . . . . . . . . . . . . . . . . . . . . . . . 41 Noise mute button . . . . . . . . . . . . . . . . . . . . . . . . . . . . . . . . . . 42 Room block. . . . . . . . . . . . . . . . . . . . . . . . . . . . . . . . . . . . . . . . 42 Room level meter and field. . . . . . . . . . . . . . . . . . . . . . . . . . . . 42 Output block . . . . . . . . . . . . . . . . . . . . . . . . . . . . . . . . . . . . . . . 43 USB detection indicator . . . . . . . . . . . . . . . . . . . .
Bose® Modeler® Plus 6.5 Software User Guide Supplement Introduction Bose Modeler Plus software, together with the Bose Auditioner® Playback System III, provides the ability to listen to a sound system before it is ever installed. While this feature produces very impressive customer presentations, its ease and responsiveness allow the designer to incorporate listening into the design process itself.
Bose® Modeler® Plus 6.5 Software User Guide Supplement Chapter 1: Getting Started System requirements The minimum system requirements for running Bose Modeler Plus software are: • Microsoft Windows XP Professional, Service Pack 2 (or later). • Microsoft Windows Vista (Business, Home, Premium or Ultimate editions. VISTA CLASSIC THEME ONLY). Note: Modeler Plus 6.5 is compatible only in Vista Classic theme. If you have Vista installed on your machine, the default theme is Windows Vista.
Bose® Modeler® Plus 6.5 Software User Guide Supplement Registration Before you install Modeler Plus software, you must register with Bose Professional Systems. Navigate your Web browser to http://pro.bose.com/modeler. Click on Software Registration and fill out the necessary information. Note: After submitting your registration you will be given a serial number which you will need to install Modeler Plus software. Please keep this serial number in a safe place in case you need to reinstall the application.
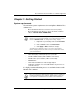
Bose® Modeler® Plus 6.5 Software User Guide Supplement 3. You should now see Figure 1.1. Click Next. Figure 1.1 - Installer window Note: A warning window appears, stating that you must have administrative rights to continue. If and when you do, click OK to continue. 4. The License Agreement appears: Figure 1.
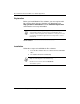
Bose® Modeler® Plus 6.5 Software User Guide Supplement 5. Read the License Agreement, then click to accept the terms of the License Agreement. Click Next. 6. Please read the important information as recommended below, then click Next. Figure 1.3 - Important Information 7. When prompted, enter the serial number that you received during the online registration process, or via the mail. Click Next. Figure 1.
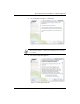
Bose® Modeler® Plus 6.5 Software User Guide Supplement 8. Now you can enter your User Information. Click Next. Figure 1.5 - Enter User Information 9. Choose the appropriate Install Set. Click Next. Figure 1.
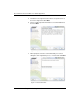
Bose® Modeler® Plus 6.5 Software User Guide Supplement 10. Choose where you would like to install. Click Next. Figure 1.7 - Choose Install Folder 11. Review the Pre-Installation Summary that appears, then click Install. Figure 1.
Bose® Modeler® Plus 6.5 Software User Guide Supplement Figure 1.9 shows the window that appears while installing. Figure 1.9 - Installing 12. After installation of Modeler Plus software, the driver for the USB hardware key will be installed. Remove your hardware key if it is already inserted in the USB port. Click Next. Figure 1.
Bose® Modeler® Plus 6.5 Software User Guide Supplement Figure 1.11 shows the window that appears while you are waiting: Figure 1.11 - Configuring your system The Please Wait window below will appear above Figure 1.11: Figure 1.12 - Please wait 13. The following window will appear. Click OK to complete: Figure 1.
Bose® Modeler® Plus 6.5 Software User Guide Supplement 14. Click Done when the installer is finished: Figure 1.
Bose® Modeler® Plus 6.5 Software User Guide Supplement Setup Hardware Key To run Modeler Plus software, you must insert the supplied USB hardware key into a USB port on your computer. The hardware key must be enabled to use the features in Modeler Plus software. These features are not available if you use the Modeler standard hardware key. Note: If you have a project open and do not see the Playlist and Playback tabs, you may not be using a Modeler Plus software enabled hardware key.
Bose® Modeler® Plus 6.5 Software User Guide Supplement 3. Under Sound Scheme choose No Sounds from the drop-down menu. Figure 1.15 - Choosing No Sounds scheme 4. Click OK to save this setting and close the window.
Bose® Modeler® Plus 6.5 Software User Guide Supplement Chapter 2: Modeler Plus Software Tutorial The tutorial will familiarize the designer with the basic functionality of the application. It will illustrate the steps needed to listen to and evaluate the sound system performance at various locations within a model. Users will learn how to easily compare design variations. The user selects a number of locations within the model at which to listen to the sound system performance.
Bose® Modeler® Software Plus 6.5 User Guide Supplement 1. Launch Windows Explorer and navigate to the Bose Modeler Plus 6.5 software installation CD directory. 2. Copy the folder titled Tutorial from the CD to your desktop, and close Windows Explorer. 3. Launch Modeler Plus software. 4. Click File > Open Project... 5. In the Look in: drop-down menu, click on the desktop. 6. Open the Tutorial folder, then open the First Street Church folder. 7. Open the project named First Street Church.
Bose® Modeler® Plus 6.5 Software User Guide Supplement Note: The Bose Media Player does not open unless the Auditioner® Playback System III is connected to your computer and powered on. For now, dismiss the player window. We will add program material for playback at a later stage of this tutorial. 9. Choose Design > D2R∆STIc > Confirm with Auditioner® or press F9 to enable listeners for playback.
Bose® Modeler® Software Plus 6.5 User Guide Supplement 10. It is always a good idea to mute playback before loading listeners. Once loaded, we will inspect the room meter to make sure that the playback is at a reasonable level. Press the Mute playback button, or use the direct key M to mute playback volume. Press again to unmute. Figure 2.5 - Mute playback button shown in mute state 11. Click in the selection box in column 1 of the Playlist window to select a location for playback.
Bose® Modeler® Plus 6.5 Software User Guide Supplement 13. Click on the Add File button, or Add Track button in the Bose Media Player to load an audio track. Figure 2.7 - Add File and Add Track buttons Add File: Allows you to load a (.wav) audio file from your hard drive or an external drive. Add Track: Allows you to load a track from an audio CD. Select a track or audio file and press the Play button to begin playback.
Bose® Modeler® Software Plus 6.5 User Guide Supplement You are now listening from position 1 in the Church model. Figure 2.9 - Controls for scrolling through listeners (up/down buttons) Change listeners using the next/previous arrow buttons to the left of the playback queue. You can also use the Ctrl + Arrow keyboard shortcuts to scroll through listeners, and to adjust the volume: Ctrl +I To scroll through listeners. Ctrl +J Ctrl +K To turn the signal volume up and down.
Bose® Modeler® Plus 6.5 Software User Guide Supplement 17. Add realism to the playback by adding background noise to the model. Before adding the background noise, make sure the system is muted. Figure 2.10 - Mute noise 18. Open the Background Noise dialogue on the Acoustics tab. Figure 2.
Bose® Modeler® Software Plus 6.5 User Guide Supplement 19. Select Auditorium from the Custom Noise folder. Figure 2.12 - Select Custom Noise 20. Make sure that the noise is at a reasonable level before unmuting the system. Figure 2.
Bose® Modeler® Plus 6.5 Software User Guide Supplement 21. Unmute the system. You should now be listening to the performance of the sound system design at a specific location within the model. Figure 2.
Bose® Modeler® Plus 6.5 Software User Guide Supplement Chapter 3: The Bose Media Player Modeler Plus software comes with a dedicated media player that controls the audio source program material during listening sessions. The Bose Media Player runs as a separate program (it shows up as a separate item in the taskbar) but it opens and closes from within Modeler Plus software.
Bose® Modeler® Plus 6.5 Software User Guide Supplement If you close the Bose Media Player by clicking on the “X” in the upper right hand corner of the Bose Media Player window, it can be re-launched from the Playback tab. Click on the Launch Player button to launch the Bose Media Player: Figure 3.2 - Launch Bose Media Player button Tip: You can also re-launch the Bose Media Player by pressing Shift + Ctrl + P.
Bose® Modeler® Plus 6.5 Software User Guide Supplement Loading audio tracks The Bose Media Player allows you to add audio tracks directly from an audio CD, or load audio tracks from your hard drive. To add audio tracks from an audio CD, insert the CD into a drive on your computer and click the Add Track button on the Bose Media Player. Select tracks from the CD and click Add, or click Add All to load all tracks from the CD. Figure 3.
Bose® Modeler® Plus 6.5 Software User Guide Supplement If you move or delete an audio file from the hard drive, it will not play in the Bose Media Player. When you close and reopen the Bose Media Player, the file is removed. Note: The playlist you create is available every time the Bose Media Player opens; it is not associated with the project. Playing audio tracks Use the following transport controls to control the Bose Media Player: Figure 3.
Bose® Modeler® Plus 6.5 Software User Guide Supplement Play/ Pause: Press once to begin playing the selected track. Press while a track is playing to pause the track. Stop: Press to stop the track. Previous: Play the previous track if within 3 seconds of the beginning, otherwise go to the beginning of the current track. Next: Play the next track. Repeat: Press to repeat the current track. Press again to disable repeat.
Bose® Modeler® Plus 6.5 Software User Guide Supplement Chapter 4: The Playlist tab Figure 4.1 - Playlist tab The Playlist tab is composed of two panels: the Sets panel and the Playlist panel. A set is a collection of listeners within or across models, and is either automatically generated (the ALL set) or user defined (custom sets). The playlist displays the list of items in the selected set, along with item properties used during playback.
Bose® Modeler® Plus 6.5 Software User Guide Supplement Figure 4.2 - Load all available listeners If an audio track is playing in the Bose Media Player, you are able to listen as soon as a listener is loaded. The second column is used to indicate which item is currently playing, if any. Figure 4.
Bose® Modeler® Plus 6.5 Software User Guide Supplement Listener state The model name and listener position label for each playlist item are displayed in the next two columns. Listeners appear in light gray if the surfaces they are on have been unchecked in the Simulation tab. Listeners appear in italics if their data has not been recalculated since a change has been made to the model. Figure 4.
Bose® Modeler® Plus 6.5 Software User Guide Supplement Modeler views For each listener, you have the ability to assign a specific View and Window to be displayed in the Modeling window when the listener is playing back. Right-click in the View and Window columns in the Playlist tab to assign a view and window to each Auditioner® enabled listener. You can select multiple listeners and right-click to change the View and Window for multiple listeners at once. Figure 4.
Bose® Modeler® Plus 6.5 Software User Guide Supplement Sets panel The smaller window on the left side of the Playlist tab contains Sets. A Set is a group of listeners. The All set is automatically filled with all of the listeners in all of the open models. The All set is always in the Sets panel and cannot be deleted. In Figure 4.8 below, all three models in the Auditorium project are open, as indicated by the model icon: Figure 4.
Bose® Modeler® Plus 6.5 Software User Guide Supplement 1. Select one or more listeners from the playlist panel by clicking on the listener name (hold Shift or Ctrl to select multiple listeners). Click once, and then drag the selected listeners to a blank area in the Sets list on the left. A new set is automatically created. Figure 4.9 - Select and drag listeners to create a new set The new set appears in the Sets panel and is named Untitled 1: Figure 4.10 - The new Untitled 1 Set 2.
Bose® Modeler® Plus 6.5 Software User Guide Supplement 3. When you click on the new set to select it, the Playlist panel displays the listeners that belong to the set: Figure 4.12 - The new Set Listeners can be dragged into existing sets at any time. For example, if you want to add another listener to the new set you created, select the desired listener from the All list by clicking once. Click again and drag the row into the new set. Follow these steps to create a new set using a different method: 1.
Bose® Modeler® Plus 6.5 Software User Guide Supplement Chapter 5: The Playback tab Figure 5.1 - Playback tab The Playback tab allows you to control the playback of the listeners that are loaded into the playback queue. The panel layout is partitioned into five blocks: Input, Signal, Noise, Room, and Output. Input block Playback queue The playback queue is displayed in the lower left of the Playback tab. It contains three columns. The first two are the model name and the position label for each listener.
Bose® Modeler® Plus 6.5 Software User Guide Supplement Figure 5.2 - Input block The value that is displayed in the dB column Playback queue depends on the level match mode. When off, this value is the Max System SPL at the listener location (also displayed in the Max System SPL column in the Playlist tab). When on, this is the gain offset value.
Bose® Modeler® Plus 6.5 Software User Guide Supplement Scroll through the listeners using the arrows in the Controls group. You can also use the keyboard shortcuts to scroll through listeners: Ctrl +I and Ctrl +J The Launch Player button opens the Bose Media Player window, which allows audio to be played. For a description of the level match feature, see Chapter 6: Using Level Match, on page 47.
Bose® Modeler® Plus 6.5 Software User Guide Supplement System clip indicator The system clip indicator, shown below, has three states: No signal present (gray), signal present and not clipping (green), and signal present and clipping (red). Only the sound system signal is used to set the state of this indicator. In other words, the background noise cannot cause system clipping. Figure 5.5 - Clip indicator Noise block There are two reasons the designer may wish to add background noise to the model.
Bose® Modeler® Plus 6.5 Software User Guide Supplement The current offset value is shown in the gain offset field above the slider. Figure 5.6 - Noise gain offset value When the noise level is changed, the new value is used to calculate STI. If the map is visible, it will be updated automatically. Figure 5.7 - Playback levels Noise level meter and field The noise playback level is displayed in dB SPL on the meter next to the noise gain slider.
Bose® Modeler® Plus 6.5 Software User Guide Supplement Noise mute button The noise can be muted and unmuted using the toggle button shown below. Figure 5.8 - Noise mute button Room block Room level meter and field The room level meter combines both the signal and the noise in the room as predicted at the current listening location. The room level is displayed in dB SPL on the meter shown below. The room level field above the meter bar is updated every 1.
Bose® Modeler® Plus 6.5 Software User Guide Supplement Output block USB detection indicator The USB detection indicator is green when the Auditioner® playback unit is detected. When the playback unit is not detected, or gets disconnected, the indicator is red and no audio can be processed. Figure 5.10 - USB detection indicator Note: Remember, if the Auditioner® Playback System III is unplugged, the Bose Media Player will not open.
Bose® Modeler® Plus 6.5 Software User Guide Supplement System mute button Use the System Mute button to mute the playback. When you press the button again to unmute, there is a short ramp-up time before full volume is restored. The ramp-up time cannot be adjusted. Figure 5.11 - System Mute button Tip: If you have enabled Direct keys, you can use the direct key shortcut to mute the sound: the M key. You can enable Direct keys in the General tab of the Application Preferences dialog box.
Bose® Modeler® Plus 6.5 Software User Guide Supplement Chapter 6: Designing with Modeler Plus software Comparing multiple models In the course of designing a sound system, it can be helpful to listen to two or more different versions of a model to reveal the best design. For example, you might compare models that have: • Different loudspeaker design or arrangement. • Different room construction materials. • Different room geometry. • Different occupancy levels or acoustic conditions.
Bose® Modeler® Plus 6.5 Software User Guide Supplement 4. Generate Auditioner® enabled listeners for the first model. Choose Design > D2R∆STIc > Confirm with Auditioner® or press F9. After the listener has been enabled, it is displayed in non-italicized font to indicate that it is available for playback. Figure 6.3 - Listeners are calculated for the first model after pressing F9 5. Click on the next model in the Project window, and choose Design > D2R∆STIc > Confirm with Auditioner® or press F9.
Bose® Modeler® Plus 6.5 Software User Guide Supplement Note: If a listener is still displayed in italics after calculation, the listener location may not be receiving enough sound energy based on your room design. 6. To compare two or more designs, load the listeners from each model into the playback queue by placing an “X” in the checkbox. Figure 6.
Bose® Modeler® Plus 6.5 Software User Guide Supplement Figure 6.6 - Level Match option Figure 6.7 - Right-click to set Gain Offset Note: When filters are played back at predicted absolute levels (Level Match unchecked), you maintain the relative levels between filters. When filters are played back in level match mode, filters are scaled to be played back at the same RMS level. You may still have to tweak them (using gain offsets) to achieve a closer level match.
Bose® Modeler® Plus 6.5 Software User Guide Supplement Adding background noise 7. To assign a background noise profile to a model, click on the Acoustics tab in the Detail window. Figure 6.8 - Acoustics tab 8. Under Background Noise, click on the “Open...” button. The following screen appears: Figure 6.9 - Background noise window Select an existing noise curve from the library on the left window frame, or create/duplicate/modify noise curves.
Bose® Modeler® Plus 6.5 Software User Guide Supplement Note: You may create a new noise curve, or duplicate and rename an existing noise curve. If you do so, there will be no corresponding audio (.wav) file, and therefore no noise will be played for listeners in models with this noise assigned. There are three types of noise files: standard, custom, and user created noise files. The audio (.wav) files associated with standard noise files are locked binaural files of shaped white noise.
Bose® Modeler® Plus 6.5 Software User Guide Supplement Chapter 7: Customer presentations Modeler Plus software is useful in a variety of presentation situations. This section outlines how to use Modeler Plus software to accomplish the following: • Playback Auditioner® enabled listeners without showing coverage maps. • Rename listeners for a presentation. • Record Auditioner® audio output. • Save Auditioner® filters and coverage maps with a room model.
Bose® Modeler® Plus 6.5 Software User Guide Supplement Figure 7.1 - Hide Maps in the Model Settings dialog box If you click on a coverage map button while maps are hidden, you will receive the following message: Figure 7.2 - Hidden maps notification Rename listeners You have the ability to rename listeners in Modeler Plus software. The name is displayed in the Position column in the Playlist tab and in the playback queue in the Playback tab. Follow these steps to rename listeners: 1.
Bose® Modeler® Plus 6.5 Software User Guide Supplement 2. Choose the Listener tab and double-click in the Identifier column. 3. Enter a new name of up to four characters. Figure 7.3 - Rename listeners Figure 7.4 - Renamed listeners This is an effective tool for providing personalization when presenting in front of customers. Record audio output You have the ability to record processed audio output to a (.wav) file. You can then burn the (.wav) file or files onto a CD along with a calibration tone.
Bose® Modeler® Plus 6.5 Software User Guide Supplement Follow these steps to record processed audio output: 1. During listener playback, press the Record button in the Playback tab. When recording, the button will be displayed in a depressed mode and the display of elapsed time will be shown: Figure 7.5 - Record button 2. While the Record button is pressed, Modeler Plus software records the output of any listener that is being played, including any volume changes.
Bose® Modeler® Plus 6.5 Software User Guide Supplement 1. Place the CD with the calibration tone into a CD player, or load the calibration tone into a media player on your computer. If you are using a media player on your computer, make sure your system volume is set to maximum. Figure 7.6 - Set system volume to maximum 2. Connect the CD player to the Auditioner® Playback System III using the supplied cable, or use a USB cable to connect the Auditioner® Playback System III to your computer. 3.
Bose® Modeler® Plus 6.5 Software User Guide Supplement 7. After setting the volume level on the CD player or media player, do not change the volume for the duration of the playback session. 8. Toggle the Calibrate button on the Auditioner® Playback System III to the down position to engage the SPL meter. PowerPoint presentations Recorded output can be used to make effective and dynamic PowerPoint presentations. • Make a PowerPoint slide that shows a coverage map by using the Copy/Paste functionality.
Bose® Modeler® Plus 6.5 Software User Guide Supplement Figure 7.7 - Saving filters with the model Turn the D2R∆STIc engine off for each model before saving the file to prevent recalculation when the file is opened. The model icon indicates when the engine is off: Figure 7.8 - Click to turn off the D2R∆STIc engine for all models before saving. When you save the file, the Auditioner® filters and coverage maps will now be embedded in the model (.mdr) file.
Bose® Modeler® Plus 6.5 Software User Guide Supplement Chapter 8: Reference Keyboard Shortcuts Use the following keyboard shortcuts in Modeler Plus software: M (direct key) or Shft + Ctrl + M Toggle system mute. Ctrl + I and Ctrl + J Scroll through listeners. Ctrl + K and Ctrl + L Adjust signal volume up and down. Shft + Ctrl + R Start recording, stop recording. Shft + Ctrl + G Toggle Level Match. Shft + Ctrl + P Re-launch Bose Media Player.
Bose® Modeler® Plus 6.5 Software User Guide Supplement Playlist tab Figure 8.1 - Playlist tab Sets: (Checkbox): 60 Groups of listeners. The All set is automatically filled with all of the listeners in the open models. Place an “X” to add the listener to the playback queue. Place an “X” in the box located in the header row to load or unload all available listeners at once. Model: The name of the model that contains the listener. Position: The Listener identifier.
Bose® Modeler® Plus 6.5 Software User Guide Supplement Max System SPL: The maximum dB SPL output that the sound system can produce without clipping. Gain Offset: The amount of additional adjustment to the gain level at the listener location. View: The view angle that is displayed in the Modeling window when the listener is playing. Window: The tab that is selected in the Modeling window when the listener is playing.
Bose® Modeler® Plus 6.5 Software User Guide Supplement Right-click on the Model or Position column and choose Edit Options to open the Edit Options window. This window allows you to change the Gain Offset, View, and Window values for a listener. Click Previous and Next to change values for a different listener. Figure 8.3 - Click Previous or Next to move to a different listener The title bar shows which listener you are editing. Figure 8.
Bose® Modeler® Plus 6.5 Software User Guide Supplement Right-click on the Gain Offset column to change the gain offset for one or more listeners. Select multiple listeners and right-click to change the gain offset for multiple listeners at the same time. Figure 8.5 - Entering gain offset for multiple listeners You can also right-click on the View and Window columns to assign a different view or window to the listener.
Bose® Modeler® Plus 6.5 Software User Guide Supplement Wing menu Access the Playlist tab wing menu by clicking on the arrow in the upper right hand corner of the Playlist tab. Figure 8.7 - Accessing the wing menu 64 New Set: Create a new set in the Sets window. Delete Set: Delete the selected set from the Sets window. The All set always contains all listeners for all open models and cannot be deleted. Edit Listener Position...: Open the Edit Options dialog box for the selected listener.
Bose® Modeler® Plus 6.5 Software User Guide Supplement Playback tab Figure 8.8 - Playback tab Level Match. Launch Bose Media Player. Play the previous listener. Play the next listener. Signal state indicator.
Bose® Modeler® Plus 6.5 Software User Guide Supplement Auditioner® Playback System III plugged or unplugged and powered on. Toggle between system mute and unmute. Toggle between noise mute and unmute. Begin/end recording. Elapsed time. Getting help User guide This user guide is a comprehensive reference for Bose Modeler Plus 6.5 software. This guide, along with the Bose Modeler 6.5 User Guide, is provided in .pdf format on the installation CD, and can also be downloaded from the http://pro.bose.
Bose® Modeler® Plus 6.5 Software User Guide Supplement Contents: View the full contents of the help system in a tree format. Click on a title to view the document in the right-side window. Index: View a list of all index topics. Type a keyword in the box at the top to jump to a topic. Search: Perform a text search for the word or phrase that you type. Favorites: Use this tab to bookmark a page or section that you use frequently.
Bose® Modeler® Plus 6.5 Software User Guide Supplement Web tab When you are working in Modeler Plus software while connected to the internet, the Web tab in the Modeling window is a link to Modeler Plus software information on the Bose Professional Systems website. Figure 8.1 - Web tab pro.bose.com The Bose Professional Systems website (http://pro.bose.com) contains information on all Bose Professional Systems products, including Modeler Plus software, and the loudspeakers used in Modeler Plus software.
Bose® Modeler® Plus 6.
Bose® Modeler® Plus 6.
Bose® Modeler® Plus 6.