® CineMate 130 home theater system 2ZQHU V *XLGH Ň *XtD GHO XVXDULR Ň 1RWLFH G¶XWLOLVDWLRQ
Important Safety Information Please read this owner’s guide carefully and save it for future reference. KH OLJKWQLQJ ÀDVK ZLWK DUURZKHDG V\PERO ZLWKLQ DQ HTXLODWHUDO WULDQJOH DOHUWV WKH XVHU WR WKH SUHVHQFH RI 7 XQLQVXODWHG GDQJHURXV YROWDJH ZLWKLQ WKH V\VWHP HQFORVXUH WKDW PD\ EH RI VXI¿FLHQW PDJQLWXGH WR FRQVWLWXWH D ULVN RI HOHFWULF VKRFN 7KH H[FODPDWLRQ SRLQW ZLWKLQ DQ HTXLODWHUDO WULDQJOH DOHUWV WKH XVHU WR WKH SUHVHQFH RI LPSRUWDQW RSHUDWLQJ DQG PDLQWHQDQFH LQVWUXFWLRQV LQ WKH RZQHU¶V JXLGH WA
Important Safety Information Important Safety Instructions 5HDG WKHVH LQVWUXFWLRQV .HHS WKHVH LQVWUXFWLRQV +HHG DOO ZDUQLQJV )ROORZ DOO LQVWUXFWLRQV 'R QRW XVH WKLV DSSDUDWXV QHDU ZDWHU &OHDQ RQO\ ZLWK D GU\ FORWK 'R QRW EORFN DQ\ YHQWLODWLRQ RSHQLQJV ,QVWDOO LQ DFFRUGDQFH ZLWK WKH PDQXIDFWXUHU¶V LQVWUXFWLRQV 'R QRW LQVWDOO QHDU DQ\ KHDW VRXUFHV VXFK DV UDGLDWRUV KHDW UHJLVWHUV VWRYHV RU RWKHU DSSDUDWXV LQFOXGLQJ DPSOL¿HUV WKDW SURGXFH KHDW 3URWHFW WK
Important Safety Information Names and Contents of Toxic or Hazardous Substances or Elements Toxic or Hazardous Substances and Elements Lead (Pb) Mercury (Hg) Cadmium (Cd) Hexavalent (CR(VI)) Polybrominated Biphenyl (PBB) Polybrominated diphenylether (PBDE) 3&%V X O O O O O 0HWDO SDUWV X O O O O O 3ODVWLF SDUWV O O O O O O 6SHDNHUV X O O O O O &DEOHV X O O O O O 3DUW 1DPH 2 ,QGLFDWHV WKDW WKLV WR[LF RU KD]DUGRXV VXEVWDQFH FRQWDLQHG LQ DOO RI WKH KRPRJHQHRXV PDWHULD
Contents Introduction About your CineMate® 130 home theater system........................................................... 7 System Features ........................................................................................................... 7 Introducing SoundTouch™ from Bose® .................................................................... 7 Unpacking the system ......................................................................................................... 8 Placement guidelines ..
Contents Finishing Setup Checking for sound............................................................................................................... 19 Changing the language on the console............................................................................ 19 Running the ADAPTiQ® audio calibration......................................................................... 20 Using the System Remote control buttons ..................................................................................
Introduction About your CineMate® 130 home theater system The CineMate 130 system delivers spacious, detailed sound from one slim soundbar. System Features • Advanced Bose audio processing provides natural and lifelike sound. • ADAPTiQ® audio calibration optimizes sound quality. • Display provides access to system settings and information. • HDMI™ connectivity allows easy setup and ensures high-quality audio from your connected sources. • Supports Consumer Electronics Control (CEC).
Introduction Unpacking the system Carefully unpack the carton and confirm that the following parts are included: Acoustimass® module Acoustimass power cord Console Console power cord HDMI™ cable Soundbar power cord Soundbar Universal remote control Speaker cable ADAPTiQ® headset Rubber feet The appropriate power cords for your region are supplied. Note: If part of the system is damaged, do not use it. Contact your authorized Bose® dealer or Bose customer service.
Introduction Placement guidelines To avoid wireless interference, keep other wireless equipment away from the system. Place the system outside of and away from metal cabinets, away from other audio/video components and away from direct heat sources. Acoustimass® module • Stand the Acoustimass module on its rubber feet along the same wall as your TV, or along any other wall in the front third of the room. • Choose a stable and level surface.
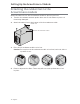
Setting Up the Acoustimass® Module Attaching the rubber feet to the Acoustimass module Attach the rubber feet to the Acoustimass module to protect your floor. 1. Turn the Acoustimass module upside down onto a soft surface to protect it from being damaged. 2. Attach the rubber feet to the bottom of the Acoustimass module. Rubber foot Bottom of Acoustimass module 3. Place the Acoustimass module on its feet. Caution: Do not place the Acoustimass module on its front, back end, side or top when in use. 4.
Setting Up the Acoustimass® Module Connecting the Acoustimass module to power 1. Plug the power cord into the connector on the Acoustimass module. 2. Plug the power cord into an AC (mains) outlet.
Setting Up the Console Connecting the console to your TV’s HDMI™ ARC connector Use the Bose® HDMI cable to connect the console to your TV. 1. Disconnect your HDMI-connected sources, such as a cable/satellite box, DVD or Blu-ray Disc™ player or game system, from your TV. 2. Insert one end of the Bose® HDMI cable into the TV connector on the console. 3. Insert the other end of the HDMI cable into your TV’s HDMI connector.
Setting Up the Console TVs without an HDMI™ ARC connector If your TV does not have an HDMI ARC connector, you may need to make a secondary connection to the console with an optical, coaxial or analog stereo audio cable. Without this secondary connection, you may not hear audio from the Bose® system. Use a secondary connection in the following configurations • You are using internal sources (such as Internet applications or an over-the-air antenna). • You are connecting sources to your TV.
Setting Up the Console Connecting to non-HDMI™ compatible sources If your source is non-HDMI compatible, connect it to your TV using audio and video cables (available separately). Refer to your TV owner’s guide for more information. Tip: If your source has IN and OUT audio connector panels, use audio OUT. Audio-only sources If your audio-only source, such as a media or CD player, is non-HDMI compatible, connect it to the console’s optical, coaxial or analog connector.
Setting Up the Soundbar Connecting the soundbar 1. Insert one end of the speaker cable into the Speaker Connection connector on the console. 2. Insert the other end of the speaker cable into the the soundbar.
Setting Up the Soundbar Attaching the optional extension feet to the soundbar Attach the optional extension feet to raise the soundbar to create space underneath. 1. Turn the soundbar upside down onto a soft surface to protect it from being damaged. 2. Attach the extension feet to the bottom of the soundbar. 3. Place the soundbar on its feet. Wall mounting the soundbar You can mount the soundbar on a wall. To purchase the WB-135 Wall Mount Kit, contact your local Bose dealer or visit www.Bose.
Connecting the System to Power Connecting the soundbar to power 1. Plug the power cord into the connector on the soundbar. 2. Plug the power cord into an AC (mains) outlet. Connecting the console to power 1. Plug the power cord into the Power connector on the console. 2. Plug the power cord into an AC (mains) outlet.
Starting Up the System Installing the remote control’s batteries 1. Slide open the battery compartment cover on the back of the remote control. 2. Insert the two provided AA (IEC-LR6) 1.5V batteries. Match the + and – symbols on the batteries with the + and – markings inside the compartment. 3. Slide the battery compartment cover back into place. Powering on the system Press on the remote. The console powers on. The display defaults to CBL SAT for first time power on.
Finishing Setup Checking for sound 1. Power on your TV. 2. If you are using a cable/satellite box or other secondary source, power on this source. Tip: If your secondary source is connected to your TV, select the appropriate TV input. You may need to use a different remote. 3. Power on the system. 4. Press the appropriate source button. 5. Check if sound is coming from the soundbar. Note: If you do not hear sound from the soundbar, see “Troubleshooting” on page 30. 6.
Finishing Setup Running the ADAPTiQ® audio calibration The ADAPTiQ audio calibration customizes the sound of the system to the acoustics of your listening area by taking five audio measurements. To perform an audio calibration, you need 10 minutes when the room is quiet. 1. Put the ADAPTiQ headset on your head. During the ADAPTiQ audio calibration, a microphone on the top of the headset measures the sound characteristics of your room to determine optimal sound quality. 2.
Using the System Remote control buttons Use the remote to control sources connected to your system, adjust the system volume, change channels, use playback functions, enable cable/satellite box functions and navigate the System menu.
Using the System Programming the universal remote control You can use the remote to control your TV, cable/satellite box, DVD or Blu-ray Disc™ player, game system, DVR or other auxiliary source. Consumer Electronics Control The system supports Consumer Electronics Control (CEC). CEC allows you to control multiple HDMI™-connected sources without programming the remote. You can turn on/off CEC using the System menu (see page 27). Your source may support CEC, but refer to it with a different name.
Using the System Test your HDMI™-connected sources for CEC Test each of your sources for CEC using the remote control. Note: Your HDMI-connected source may not support CEC. Refer to your source owner’s guide for more information. 1. Power off the Bose® system. 2. Prepare your source: • If you are testing your TV, power off your TV. • If you are testing another source, power off the source. Power on your TV. 3. Press the button for the source you are testing. The source button glows.
Using the System Program the remote to control your source If your source does not support CEC, you can program the remote to control your source. 1. Power on your source. 2. Locate the code for your source’s brand in the Universal Remote Device Codes book (provided). 3. On the remote control, press and hold the appropriate source button until all six source buttons glow, then release. For example, to program your TV, press and hold . Only the appropriate source button glows. 4.
Using the System Source selection You can switch between sources by pressing the appropriate source button on the remote control. Before you begin, program the remote to control your source (see page 24). Select a source connected to the Bose® system If your source is connected to the console and does not use CEC, follow this procedure to set the console to the appropriate mode and turn on the source. 1. Power on the system. 2. Press the button for the source you want to control.
Using the System Adjusting the volume On the remote control: • Press + to increase the volume. • Press – to decrease the volume. • Press to mute or unmute the audio. Note: If you hear sound coming from your TV, see “Troubleshooting” on page 30. Function buttons The red, green, yellow and blue buttons on the remote control correspond with the color-coded function buttons on your cable/satellite box or teletext functions. • Cable/satellite box functions: refer to your cable/satellite box owner’s guide.
Getting System Information from the Display Understanding messages on the display The display on the front of the console allows you to access the System menu and shows system information and icons. Using the System menu Use the System menu to adjust audio levels, turn on/off features (such as AUTO OFF), change the language, set the coaxial, analog and optical inputs for a particular source, run ADAPTiQ®, pair your Acoustimass® module with the console or factory reset the system. 1. Press 2.
Getting System Information from the Display Display System state 9 SURROUND LEVEL NOT AVAILABLE. 10 LANGUAGE Changes the language on the console and ADAPTiQ®. 11 SET OPTICAL INPUT Sets the optical connector to Auto/TV (Default), CBL SAT, BD DVD, GAME or AUX source. 12 SET COAXIAL INPUT Sets the coaxial connector to Auto/TV (Default), CBL SAT, BD DVD, GAME or AUX source. 13 SET ANALOG INPUT Sets the analog connector to Auto/TV (Default), CBL SAT, BD DVD, GAME or AUX source.
Getting System Information from the Display Error messages Display System state ERROR Cannot find Acoustimass The Acoustimass® module is not connected to the console. ERROR Cannot find soundbar The soundbar is not connected to the console. No signal The source is not connected to the console, or the source is connected to the console and powered off. SIDE AUX Nothing connected The source is not connected to the the console. ERROR Call Bose Call Bose® customer service.
Care and Maintenance Troubleshooting Problem What to do No power • Secure the Acoustimass® module’s, soundbar’s and console’s power cords. • Reconnect the Acoustimass module’s, soundbar’s and console’s power cords firmly into an AC (mains) outlet. • Use the remote control to power on the system. • Factory reset the system (see page 32). No sound • Unmute the system. • Increase the volume. • Plug the Acoustimass module, soundbar and console into a live AC (mains) outlet.
Care and Maintenace Problem What to do Poor or distorted sound • Remove all protective films from the system. • Secure all cable connections on the soundbar, TV, and connected sources. • If you see the error message Cannot find Acoustimass: - Plug in the Acoustimass® module. - Pair the Acoustimass module with the console (see “If your console cannot find the Acoustimass® module”). connector, decrease the volume on your source.
Care and Maintenance Factory reset the system To troubleshoot problems, reset the System menu and ADAPTiQ® to the factory settings. 1. Press 2. Press 3. Press 5. on the remote control. until 16 FACTORY RESET appears on the display. The system resets. 4. Run the ADAPTiQ audio calibration (see page 20). Reset a source button on the remote control If you are experiencing problems with a source button on the remote control, reset the source button to the factory settings.
Care and Maintenance Cleaning • Clean the surface of the system with a soft, dry cloth. • Do not use any sprays near the system. Do not use any solvents, chemicals, or cleaning solutions containing alcohol, ammonia or abrasives. • Do not allow liquids to spill into any openings. Customer service For additional help, contact Bose® Customer Service. Refer to the contact sheet in the carton. Limited warranty Your system is covered by a limited warranty.
©2014 Bose Corporation, The Mountain, Framingham, MA 01701-9168 USA AM715117 Rev.
Cine Mate®130 home theater system ....HilS~ Outck Start Gutde • Gufa de tntcto raptdo • Gutde de demarrage raptde ········ ~ ENGLISH ESPANOL FRAN<;AIS CAUTION: Refer to the owner's guide for safety-related information, and additional setup, speaker placement, and operating instructions. PRECAUCI6N: Consulte Ia guia del usuario para obtener informaciOn sabre seguridad, configuraciOn adicional, colocaciOn de los altavoces e instrucciones de usa.
Universal Remote Device Codes
Contents .. . . .. . . . .. ... . . .. . . . . .. . . . . 3 Cable-Sat ellite . . . . . . . . . . . . . . . . . . 4 DVD .. . . . . . . . . . . . . . . . . . . . . . . . . . 6 Game . . . . . . . . . . . . . . . . . . . . . . . . . 7 AUX .. . . . . . . . . . . . . . . . . . . . . . . . . .
Universal Remote Device Codes TV 3M ........................................... 0980 Aaxa ........................................ 6132 Acer ......................................... 1652 Admiral .................................... 0182 Advent ..................................... 17 54 Affinity ...................................... 6190 Aiwa ......................................... 0406 Akai .......................................... 0098 Akura ....................................... 0042 AOC .........
Universal Remote Device Codes Miray ........................................ 4998 Mitsubishi ................................ 0150 Mitsui ....................................... 3847 Mx Onda .................................. 1629 NAD ......................................... 0513 Naoki ....................................... 6147 Naxa ........................................ 3571 NEC ......................................... 0170 NetTV ....................................... 2539 New Acoustic Dimension ...
Universal Remote Device Codes Atlantic Broadband .................. 6171 ATMC ....................................... 6389 AZ. America .............................. 5128 Azteca ...................................... 3985 Baja Broadband ...................... 5035 Bell. .......................................... 5008 Bell Aliant. ................................ 8093 Bell ExpressVu ......................... 1569 Bell Fibe TV ............................. 8078 Bell Satellite TV........................
Universal Remote Device Codes Nighthawk ............................... 4428 Norsat ...................................... 0538 Northland Communicati ons .... 6173 NU Telecom ............................. 6441 Nuevo Siglo ............................. 6089 Odobo ..................................... 7984 Oi TV ........................................ 6031 Omegasat ................................ 1319 Open box .................................. 3505 Optimum .................................. 5063 OrbiSat ..
Universal Remote Device Codes Curtis ....................................... 1897 Daewoo ................................... 0092 Days ........................................ 8712 Denon ...................................... 0246 Digix .......... ~ ............................. 2441 Diplomat .................................. 8683 Disney ...................................... 2440 Durabrand ............................... 2191 Dynex ...................................... 3686 EletroVision .................
Universal Remote Device Codes CE labs .................................... 3981 Centronics ............................... 4878 Ceton ....................................... 8542 Channel Master ....................... 0198 Coby ........................................ 2056 Cos hip ..................................... 2364 CyberPower ............................. 2083 Daewoo ................................... 0092 Daytek ..................................... 2024 Dell ......................................
Universal Remote Device Codes California Audio Labs .............. 0173 Carver ...................................... 0191 Cary Audio Design ................... 1987 CCE ......................................... 0160 Curtis Mathes .......................... 0039 Denon ...................................... 0246 DirecTV .................................... 1988 DKK ......................................... 0872 DLO ......................................... 3211 DMX Electronics ......................
Better sound through research® I I 715330-0010 ©2014 Bose Corporation, The Mountain, Framingham, MA 01701-9168 USA AM715330 Rev.
OUR COMMITMENT TO YOU We take great pride in designing each of our products with the goal of providing the highest- accuracy musical performance possible in the price range of that product. We strive to reproduce the musical sounds as closely as possible to those of the original performance. And we strive to avoid flashy sounds such as those associated with accentuated bass and/or treble frequencies. While those sounds may be initially attractive to the novice, they are not real and are not enduring.
GLOBAL SUPPORT REGIONS United States France Nederland 1-800-367-4008 owners.bose.com bose.fr bose.nl Hong Kong New Zealand 852 2123 9000 bose.hk 0800 501 511 bose.co.nz Hungaria Norge bose.hu bose.no India tisterreich 180011 2673 boseindia.com bose.at Australia 1800 061 046 bose.com.au Belgique/Belgie bosebelgium.be Canada 1-877-650-2073 bose.ca Polska Ireland bose.pl China bose.ie 86 4 00 880 2266 bose.cn ltalia bose.ch Dan mark 800 83 22 77 bose.it Sverige Schweiz bos e.
Warranty information inside Register your product now Contiene informaciOn sabre Ia garantfa Registre su producto ahara Renseignements sur Ia garantie a l'interieur Enregistrez votre produit des maintenant
Registre su producto: Conozca toda Ia gama de servicios que su garantia le ofrece. Registrarse en linea es facil y rapido. Globai.Bose.com/register Enlace directo para registrarse: www.register.Bose.eu (Europa) www.Bose.com/register (EE.UU., Puetto Rico e Islas Vfrgenes de EE.UU.) L'enregistrement en ligne est simple et rapide. Globai.Bose.com/register www.Bose.eom.au/warranty (Australia) www.Bose.ca/register (Canada) www.Bose.eo.
Register your product: Learn about the full range of services your warranty provides. Registering online is quick and easy! Global. Bose. com/register To link directly to registration: www.register.Bose.eu (Europe) www.Bose.com/register (US, PR & USVI) www. Bose.com .au/warranty (Australia) www.Bose.ca/register (Canada) www.Bose.eo.