Owner’s Guide
Safety Information WARNING: To reduce the risk of fire or electric shock, do not expose the system to rain or moisture. WARNING: This apparatus shall not be exposed to dripping or splashing, and objects filled with liquids, such as vases, shall not be placed on the apparatus. As with any electronic products, use care not to spill liquids in any part of the system. Liquids can cause a failure and/or a fire hazard.
Contents Introduction . . . . . . . . . . . . . . . . . . . . . . . . . . . . . . . . . . . . . . . . . . . . . . . . . . . . . . . . . . . . . . . . . . . Before you begin . . . . . . . . . . . . . . . . . . . . . . . . . . . . . . . . . . . . . . . . . . . . . . . . . . . . . . . . . . . Selecting compatible discs . . . . . . . . . . . . . . . . . . . . . . . . . . . . . . . . . . . . . . . . . . . . . . . . Check for region code compatibility . . . . . . . . . . . . . . . . . . . . . . . . . . . . . . .
Contents Changing Source Settings . . . . . . . . . . . . . . . . . . . . . . . . . . . . . . . . . . . . . . . . . . . . . . . . . . . . . . . Using the settings menus . . . . . . . . . . . . . . . . . . . . . . . . . . . . . . . . . . . . . . . . . . . . . . . . . . . . . To view the settings menus . . . . . . . . . . . . . . . . . . . . . . . . . . . . . . . . . . . . . . . . . . . . . . . . To make changes in the settings menus . . . . . . . . . . . . . . . . . . . . . . . . . . . . . . . . . . . . . .
Introduction Before you begin Thank you for purchasing the Bose® 3•2•1 Series II or 3•2•1 GS Series II DVD home entertainment system, which offers superb sound, elegance, and simplicity in an advanced home audio setup. Using Bose proprietary signal processing technology, the 3•2•1 Series II systems provide improved spaciousness from stereo recordings, and bold movie effects from surround-encoded materials.
Introduction Glossary of terms Aspect Ratio – The shape of the rectangular picture in a TV set. It is the width of the picture relative to the height. Our standard TV picture, in terminology used by that industry, is 4 units wide by 3 units high, or 4:3 (read as 4 by 3) in aspect ratio. There are currently two standard TV aspect ratios, 4:3 and 16:9. Chapter – In DVD-Video, a division of a title. Technically called a part of title (PTT).
Introduction PCM – An uncompressed, digitally coded representation of an analog signal. This is the form of the digital audio signal used for both CD and laserdisc. It is a serial data stream that is coded for transmission or recording. PCM is also used for many other types of serial data communications. S-video – A video interface standard that carries separate luminance and chrominance signals, usually on a four-pin mini-DIN connector. Also called Y/C.
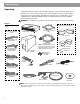
System Setup Unpacking Carefully unpack your system. Save all packing materials, which provide the safest way to transport your system. Check to be sure your system includes the parts shown in Figure 1. If any part of the system appears damaged, do not attempt to use it. Notify Bose or your authorized Bose® dealer immediately. For Bose contact information, refer to the address sheet included in the carton. WARNING: To avoid danger of suffocation, keep the plastic bags out of the reach of children.
System Setup Selecting locations for your 3•2•1 Series II system components Use the following guidelines and Figure 2 to choose locations and positions for the components of your 3•2•1 home entertainment system. Note: While these guidelines are offered to help provide great system performance, you may find other placement choices that are more convenient and provide the sound you enjoy. Placing the media center CAUTION: Do not block any ventilation openings.
System Setup Placing the speakers Choosing a good location for the speakers will allow you to experience the audio surround effects that your 3•2•1 home entertainment system is designed to deliver. • Place the two speakers either on top of the TV or at equal distance from the left and right of the TV screen (Figure 2). Keep both speakers at approximately the same height. • Place each speaker within 3 feet (1 meter) of the edge of the TV screen.
System Setup Placing the Acoustimass® module • Place the Acoustimass® module within reach of the cable from the music center and an AC (mains) power outlet. • Place the module at the same end of the room as the TV and the speakers (Figure 4). • Keep the module at least 3 feet (1 meter) away from the TV to prevent the module from interfering with the TV screen.
System Setup Making system connections CAUTION: Do not plug the Acoustimass® module into an AC power (mains) outlet until all the components are connected. Note: If additional audio cables or longer cables are needed to make these connections, contact Bose Customer Service. Refer to the list of offices included in the product carton. Connecting the Acoustimass module to the media center Plug one end of the Acoustimass module cable into the Acoustimass Module jack on the rear of the media center (Figure 6).
System Setup 2. At the other end of the speaker cable, separate the left and right speaker cords as much as necessary to reach each speaker (Figure 8). Figure 8 Note: If you purchased a 3•2•1 GS Series II system, the left and right speaker cable connectors will be marked with a “GS”. Separating left and right speaker cords 3. Plug the LEFT speaker cable into the rear jack of the left speaker (Figure 9). Plug the RIGHT speaker cable into the rear jack on the right speaker.
System Setup Connecting the supplied antennas The rear panel of the media center provides jacks for the AM and FM antennas included with your system (Figure 10). Unwind the wires for each antenna to provide the best reception. Figure 10 Antenna connections Note: An outdoor antenna may be used in place of the supplied indoor antennas. To add an outdoor antenna, consult a qualified installer. Follow all safety instructions supplied with the antenna.
System Setup Connecting your TV to the media center Note: If you will be using the 3•2•1 system with both a TV and a VCR, skip this section and go to “Connecting your TV and VCR to the media center” on page 16. Making audio connections Note: If your TV does not have audio output jacks, see “If your TV does not have audio output jacks” on page 17. Otherwise, continue. 1. Connect one end of the supplied stereo cable to the TV Audio IN jacks on the rear panel of the media center (Figure 11).
System Setup Connecting your TV and VCR to the media center Note: There are two options for connecting your TV and VCR to the media center. Before you proceed, you must determine if your TV has audio output jacks. Consult your TV owner’s guide if you need assistance. If your TV has audio output jacks If your TV has audio output jacks, you can directly route the TV audio to the 3•2•1 home entertainment system (Figure 12). 1.
System Setup If your TV does not have audio output jacks If your TV does not have audio output jacks, you will need to feed audio to the 3•2•1 home entertainment system through a secondary source, such as a VCR. To do this, you will need one additional video cable, which can be purchased at your local electronics store. 1. Connect one end of the supplied stereo cable to the AUX Audio IN jacks on the rear panel of the media center (Figure 13). Insert the white RCA plug into the AUX white L jack.
System Setup VCR considerations • Some combination TV/VCR units may not work with 3•2•1 Series II home entertainment systems. Please refer to your TV/VCR owner’s manual for information. • A stereo VCR is required for optimal sound performance. If your VCR has only one audio output and is not labeled Stereo or Hi-fi, you have a mono VCR. You will need a Y-adapter cable (available at electronics stores) to connect audio to the media center.
System Setup Making component video connections (highest quality video) Note: Component video connections are required in order to use the progressive scan feature of your 3•2•1 system. Your TV must also support this feature. To turn on the progressive scan feature, see “Video options” on page 47. For the highest quality video from DVDs, you may want to use a component video connection between the media center and the TV.
System Setup Connecting digital audio devices Some audio devices may feature a digital audio output for optimum sound performance. Use an optical digital cable or a coaxial digital cable, as appropriate, to connect this output to the digital input on the media center. You can purchase the required cables at a local electronics store. On the media center rear panel, an optical digital cable connects to the OPTICAL jack. A coaxial cable connects to the audio input jacks labeled D.
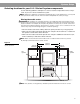
System Setup Figure 17 Advanced setup: TV, VCR and cable/satellite box Media center Cable/satellite (CBL-SAT) service CBL-SAT S-video output Cable/satellite CBL-SAT analog audio CBL-SAT digital audio CBL-SAT signal to VCR VCR TV VCR analog audio CBL-SAT signal to TV Media center’s S-video output to TV Note: For more information on advanced connections, refer to the DVD setup disc that came with your 3•2•1 Series II home entertainment system.
System Setup Connecting a game console Connect the audio output of a game console to the AUX Left and Right input jacks. Connect the video output of the game console to the C (composite) Video IN jack. Figure 18 Game console connections Media center Game console connection panel TV connection panel IMPORTANT If you connected your game console this way, you will need to select the AUX source on the 3•2•1 remote in order to hear sound from the game console.
System Setup Installing the remote control batteries 1. On the back of the remote, slide open the battery compartment (Figure 19). 2. Insert the two supplied AA (IEC-R6) 1.5V batteries, or their equivalent, as shown. Match the plus (+) and minus (–) marked on the batteries with the plus (+) and minus (–) inside the battery compartment. 3. Slide the battery compartment cover back into place. Note: Replace the batteries when the remote control stops operating or its range seems reduced.
System Setup Connecting the power cord CAUTION: For dual voltage models only, be sure to set the dual voltage switch on the back of the Acoustimass® module to the appropriate voltage for your area (115V or 230V) before connecting to power. If you are not sure about the proper voltage for your area, consult your local electrical authorities. 1. Insert the small connector end of the power cord into the AC INPUT connector on the Acoustimass module (Figure 20). 2.
System Setup Checking your system setup 1. Check the following before you continue: • All cables are connected for the setup you chose. • The batteries were installed in the remote control. • The power cord was installed and plugged into a live AC receptacle. 2. Turn on your TV. Use the remote control that came with your TV. 3. Select the right video input on your TV to view the 3•2•1 system video output. • Refer to the name of the TV video input you used during setup.
System Controls and Indicators Remote control Remote status LED On Off Turns the system on or off. Status LED: • Remains off (unlit) during normal operation. • Remains on during setup mode. Turns off briefly with each key press. • Blinks rapidly eight times if the wrong key is pressed during setup or if an unavailable device code is entered. • After ten seconds of no key presses, blinks rapidly eight times and the remote exits the setup mode. Silences or restores the sound from the current source.
System Controls and Indicators Remote control – cont. Puts the Settings menu for the current source on your TV screen or media center display. Puts the System menu on your TV screen. • Puts the DVD menu of the currently loaded DVD disc on your TV screen. • Puts the main menu of a cable/satellite box, VCR, or PVR on your TV screen (if supported).* Puts the TV program guide (if supported) on your TV screen.
System Controls and Indicators Remote control – cont. • Raises or lowers the volume of the current source. • Pressing + restores muted sound from the current source. • Pressing – lowers the volume of the current source, but does not restore muted sound. Skips to the next or previous CD track, DVD chapter, radio station preset, or TV channel (if the remote is set up to control your TV). • Stops the disc player. • For DVDs only, the disc stops and the system saves the DVD play position.
System Controls and Indicators The media center The media center has a control panel on the top, a display area to show the current status of the system, and a disc tray that opens on the front of the console. Control panel The media center has six buttons located on the top control panel. Their functions are also available through use of the remote control. Figure 21 On-Off Source – Volume + Enter Eject Turns system power on or off. Steps through the available source selections.
Operation Turning your system on and off To turn power on or off: • Point the 3•2•1 remote at the media center and press On/Off. OR • Press On-Off on top of the media center. To turn the system on to a source: • Press CD-DVD, FM-AM, TV, CBL-SAT, or AUX on the 3•2•1 remote. Note: Your 3•2•1 remote control can be set up to control other audio devices such as your TV, VCR, or cable/satellite receiver. For instructions, see “Setting up your remote to control other audio/video devices” on page 35.
Operation While a DVD video is playing, elapsed play time and chapter number are displayed on the media center front panel. Figure 23 Sample display for a DVD video D V D 0: 0 6: 1 1 CHAPTER 1/12 Basic DVD operations • Press Pause to pause a movie. OR • Press Pause again, or press Play to resume playing a paused CD. • Use the stop button ( ) to interrupt a movie in play. • Press once to interrupt a playing movie. The system holds the movie at the point of interruption.
Operation Playing audio CDs 1. On the 3•2•1 remote, press CD/DVD to turn the 3•2•1 system on to the CD/DVD source. Eject 2. On the media center control panel, press Eject to open the disc tray. 3. Place the DVD disc in the disc tray. Eject 4. Press Eject again to close the tray. 5. The audio CD should begin to play automatically. If not, press Play on the 3•2•1 remote. Basic CD operations • Press Pause to pause an audio CD. OR • Press Pause again, or press Play to resume playing a paused CD.
Operation Listening to FM/AM radio On the 3•2•1 remote, press FM-AM. If the system is off, the radio will turn on to the most recently selected station. Tuning to a station You can tune to a radio station in any of the following ways: • Press FM-AM to switch between the FM and AM bands. • Press Tune to tune up the band. Press Tune to tune down the band. • Press Seek to go to the previous station. Press Seek to go to the next available station. Press and hold for rapid tuning.
Operation Erasing a preset 1. Tune to the preset station. 2. Press and hold the 0 button on the remote until the media center display tells you that the preset is erased. Playing other sources Turn on any component connected to the media center by using the remote for that component or controls on the component front panel.
Controlling Other Audio Devices Setting up your remote to control other audio/video devices Your remote can be set up to control other audio devices such as a TV, VCR, PVR or cable/satellite box by entering a device code while in the setup mode. • If you know the device code, follow the instructions under the heading, “Direct entry of a device code” below. Device codes are listed in the back section of this owner’s guide and in the System menus under Remote Control options.
Controlling Other Audio Devices To set up the remote to control your VCR or PVR (such as Tivo or Replay TV) 1. Turn on both the 3•2•1 system and your VCR or PVR. AUX 2. Press and hold the AUX button until the remote LED is lit (about five seconds). 3. On the remote keypad, enter the four-digit device code for your VCR/PVR. The LED will turn off temporarily as you press each key. 4. Check that the LED turns off after the code is entered. If the LED blinks, the code is invalid. Try again. AUX 5.
Controlling Other Audio Devices To set up the remote to control your cable/satellite box 1. Turn on both the 3•2•1 system and your cable/satellite box. 2. Press and hold CBL-SAT until the remote LED is lit (about five seconds). 3. Alternately press Channel turns off. and CBL-SAT On-Off until your cable/satellite box 4. Press Enter. Check that the remote LED turns off. 5. Point the remote at your cable/satellite box and press CBL-SAT On-Off.
Controlling Other Audio Devices Verifying an entered device code In case you need to check to see what code the remote is using for a particular audio device, do the following: 1. Press and hold a source key (TV, CBL-SAT, or AUX) until the remote LED lights (about five seconds) 2. Press the Info button. 3. Press 1 on the remote and count the number of times the LED blinks (zero is indicated by a long blink). This is the first digit. 4.
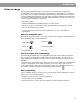
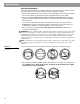
Changing Source Settings Using the settings menus While watching a video or listening to music on your system, you can make quick adjustments that will increase your enjoyment of the program. For that purpose, each source you use with this system has its own Settings menu with features appropriate to that source. To view the settings menus You can see the Settings menu for each source on your TV screen (Figure 24) and on the display panel of your media center (Figure 25). 1.
Changing Source Settings To make changes in the settings menus Whether you use your TV screen or the media center display to change settings, the same instructions apply. You can use the actions above to change back to the original (default) settings, too. Do that if you do not like the effect of a change you have made, or accidentally made a change you did not intend. The default settings for each source are shown in the menu tables on the following pages. 1.
Changing Source Settings FM/AM settings menu To see the FM/AM Settings menu, press FM-AM on the remote. Then press Settings. Press Exit to remove the menu from the screen. Item Name Settings Default Description Output Mode (FM only) Auto, Stereo, Mono Auto Allows you to listen to stereo broadcasts in either stereo or mono output. RDS Info (FM only, and only on some systems) Off, On Off Displays station and program information (as available from Radio Data System).
Changing Source Settings DVD settings menu To see the DVD Settings menu, press CD-DVD on the remote while playing a DVD video disc. Then press Settings. Press Exit to remove the menu from the screen. Item Name Settings Default Description On, Off On Optimizes the tonal balance for movies. Range Compression* On, Off On Adjusts volume to maintain dialogue intelligibility. Keeps some sounds from overwhelming others.
Changing Source Settings TV, CBL-SAT, and AUX settings menu The settings below affect programs on the TV, even when the source of the program is VCR, CBL/SAT or AUX. There are no separate setting menus for these sources. Movie EQ, Range Compression and Mono Decoding appear in the menu only if Audio Processing is set to User Adjustable. Audio Processing can be found in the System menu under Audio options.
Changing System Options Using the System menu Changes to system options are typically made only once. If your system operates as you want it to, there may be no need for any changes. In some cases, however, changes are required to make the system fully compatible with the installation options you have chosen. To view the System menu Unlike the source settings menus, the System menu only appears on your TV screen. 1. Turn on your TV and select the correct TV input to view your 3•2•1 system. 2.
Changing System Options To change system options Changing system options in this menu is similar to changing the settings for a source. 1. Turn on your TV and select the correct TV input to view your 3•2•1 system. 2. Press the System button on your 3•2•1 remote control. 3. Using the right ( ) and left ( ) arrow buttons, highlight one of the option categories (Audio, Video, Media Center, Remote Control, or DVD Lock). 4. Press Enter or the down ( 5. Using the down ( ) and up ( 6. Press the right arrow ( 7.
Changing System Options Audio options The audio options affect the way the system sounds in your home. Note: Listening to an audio source while you change audio options can be helpful. Some changes will be immediately noticeable and therefore useful in fine tuning your selections.
Changing System Options Video options The video options affect the way the picture looks on your TV. Figure 29 Video system options Audio Video Media Center Remote Control DVD Lock Select Video to adjust these system options: TV Aspect Ratio Widescreen DVDs Video Connector Video Black Level Video Format Progressive Scan navigate navigate select select System Option Settings Description TV Aspect Ratio Normal [default] Widescreen 4:3 ratio screen display. 16:9 ratio widescreen display.
Changing System Options Media center options The media center options affect the general operation of the system.
Changing System Options Remote control options The Remote Control options help you set up your remote to control other audio devices that are connected to your system.
Changing System Options DVD Lock options The DVD Lock options allow you to restrict viewing of DVD videos with certain ratings. To activate this feature, you need to set a level of restriction and establish a password in the DVD Lock section of the System menu.
Changing System Options 5. Enter your four-digit password. 6. Using the down ( ) button, scroll down to Lock Discs Rated Above. 7. Press the right arrow ( 8. Press the up ( ) button to see the available settings. ) or down ( ) arrow button to find the rating you want. 9. Press Enter or the left arrow ( ) button to save the setting. 10. Press Exit to dismiss the Settings menu.
Maintaining Your System Cleaning Cleaning the media center • Use only a soft, dry cloth to clean the outside surfaces of the media center. • Do not use any sprays near the system. Do not use any solvents, chemicals, or cleaning solutions containing alcohol, ammonia, or abrasives. • Do not allow liquids to spill into any openings. Cleaning the speakers • Clean the surface of your speakers with a soft, damp cloth. You can use an ammonia-free window cleaner on a soft cloth to maintain the finish.
Maintaining Your System Replacing the remote control batteries CAUTION: Please dispose of used batteries properly, following any local regulations. Do not incinerate. • Slide open the battery compartment (Figure 34). • Notice the polarity markings (+ and –) inside the compartment and install the batteries accordingly. Be sure to replace both batteries. • Slide the battery compartment cover back into place.
Troubleshooting Troubleshooting table Problem What to do System doesn’t do anything • Make sure the unit is turned on. Try pressing the remote On-Off button and the media center On-Off button. • Make sure the power cord is inserted securely into the Acoustimass® module and plugged firmly into an operating AC wall outlet. • Be sure to select a source (CD/DVD, AM/FM, etc.). • Unplug the Acoustimass module power cord from the outlet for one minute, then reconnect it. This allows the unit to reset itself.
Troubleshooting Problem What to do Sound, but no picture • Make sure the TV is on. • When playing a DVD or other video source, make sure the TV is set to the correct video input. Remote control is inconsistent or does not work • Check batteries and their polarity (+ and –). See “Replacing the remote control batteries” on page 53. • Point the remote control at the media center. Radio does not work or has poor reception • • • • • • Make sure antennas are connected properly.
Technical Information Power rating USA/Canada: 120V Maximum ambient temperature 50/60Hz 300W International: 220-240V 50/60Hz 300W Dual voltage: 115/230V 50/60Hz 300W Audio inputs AUX – Left, Right (analog); D (digital) CBL-SAT – L, R (analog); D (digital) TV – L, R (analog); D (digital) Optical – SPDIF digital, mapped to input Audio outputs ® Acoustimass Module – SPDIF Video inputs 104°F (45°C) Dimensions Media center: 3¼"H x 13¾"W x 10"D (8.3 cm x 34.9 cm x 25.
Device Codes Cable box device codes ABC ............................. 0003, 0008, 0014, 0007, 0013, 0047, 0011, 0017, 0001 General Instrument ...... 0476, 0810, 0276, 0003, 0014, 0015, 0011, 0098 ADB ............................. 1063 GHZ ............................. 0078 Philips .......................... 0305, 0317, 0652, 0013, 0069, 0211, 0290, 0619, 0060, 0153, 0255, 0025, 0111, 0242 Ajinvision ..................... 1271 GMI .............................. 0057, 0015, 0797, 0069 Pioneer.........
Device Codes Cable box device codes Texscan ....................... 0001 Thomson ..................... 1110 Timeless ...................... 0040, 0418, 0274 Tocom.......................... 0012, 0013 TongKook .................... 0840, 0777 TopStone ..................... 1355 Torx.............................. 0003 Toshiba ........................ 0000 Trans PX ...................... 0276, 0153, 0315, 0303 TS ................................ 0003, 0303, 0255, 1018 Tudi ..............................
Device Codes Satellite box device codes GE ............................... 0566 JVC .............................. 2003, 0775, 0571, 0492, 0515, 1170, 0506, 2011, 0505 Next Level .................... 0869 General Instrument...... 0869 GOI .............................. 2003, 0775 Kabil............................. 0737 Nikko............................ 0713 Gold Box ..................... 0853 Kathrein .......................
Device Codes Satellite box device codes RCA ............................ 2001, 0392, 0566, 0855, 0143 Skymaster.................... 0628, 1062, 0240, 0605, 0880, 0519, 0713, 0288 Thorens ........................ 0586 SM Electronic .............. 0713, 0240, 0157, 1200 Topfield ........................ 1206 RFT .............................. 0288, 0220 Saba ............................ 0690, 0520, 0885, 0336, 0710 Smallear....................... 1103 Toshiba.........................
Device Codes TV device codes Anam ........................... 0250, 0009, 0700, 0003, 0628 Anam National............. 0250, 0650, 0055 Anitech ........................ 0009 AOC............................. 0451, 0093, 0178, 0179, 0009, 0052, 0003, 0019, 0108, 0185, 0018 Bush ............................ 0036, 0698, 0218, 0294, 0363, 0519, 0009, 0668, 0211, 1900, 0282, 0355, 0374, 0581, 0037, 1037, 0272, 0349, 0371, 0552 Dansai .......................... 0037 Candle .........................
Device Codes TV device codes Frontech ...................... 0264, 0448, 0247, 0414, 0163, 0363 Hisawa ......................... 0400, 0282, 0455 Kendo .......................... 0235, 0037 Hinari ........................... 1908 Kennedy....................... 0552 Kenwood...................... 0019 Geloso ......................... 0009 Hitachi..........................
Device Codes TV device codes Mark ............................ 0037 Newave........................ 0093, 0178, 0009 Matsui.......................... 0211, 0272, 0355, 0011, 0443, 0037, 0544, 0208, 0235, 0354, 0009, 0371, 0036, 0516, 0177, 0217, 0294, 0363, 0035, 0487, 0072, 0579 Nicam .......................... 0544 Matsushita................... 0250, 0650 Nobliko ........................ 0102 McMichael................... 0043 Nokia ...........................
Device Codes TV device codes RCA ............................. 0000, 0178, 0018, 0135, 1917, 1948, 0038, 1907, 1922, 0019, 1919 Realistic....................... 0178, 0019, 0056, 0039, 0032, 0165 Rediffusion .................. 0201, 0361, 0351 Reoc ............................ 0714 Revox .......................... 0037 Rex .............................. 0206, 0163, 0264, 0259 RFT .............................. 0428, 0087 Sunkai .......................... 0355, 0321, 0294 Sears............................
Device Codes TV device codes Thomson ..................... 0343, 0560, 0109, 0205, 0399, 0198, 0349, 0625, 0196 Triumph........................ 0516, 0243, 0177 Visorex ......................... 0432 Tuntex .......................... 0009 Voxson ......................... 0087, 0163 Thorn ........................... 0499, 0535, 0037, 0084, 0192, 0361, 0512, 0035, 0074, 0190, 0343, 0505, 0072, 0104, 0193 Uher ............................. 0303, 0206, 0320 Waltham .......................
Device Codes VCR device codes Ferguson ..................... 0041, 0493, 0321, 0320 ITT................................ 0240, 0104, 0041, 0384, 0106 Fidelity ......................... 0000 ITV................................ 0037, 0278 Finlandia ...................... 0081, 0104 Jensen ......................... 0041 Mitsubishi..................... 0081, 0067, 0043, 0041, 0807 Finlux ........................... 0081, 0000, 0042, 0104 JVC ..............................
Device Codes VCR device codes Pilot ............................. 0037 Pioneer ........................ 0081, 0042, 0067, 0206 Scott ............................ 0184, 0045, 0121, 0043 Teleavia ........................ 0041, 0493 Telefunken.................... 0041, 0384, 0321, 0494, 0320, 0493 Polk Audio ................... 0081 Sears............................ 0035, 0037, 0047, 0000, 0042, 0104, 1237 Portland....................... 0020 SEG ............................. 0240 Tensai...............
©2004 Bose Corporation, The Mountain, Framingham, MA 01701-9168 USA 274558 AM Rev.