
Installation Guide


26 en | Installing the Pendant Arm Wall, Corner, and Mast (Pole) Mounts AutoDome 100 Series Fixed Camera
F.01U.217.818 | 1.0 | 2011.04 Installation Manual Bosch Security Systems, Inc.
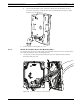
9. If using UTP for video, connect the incoming RJ45 video connector, installed previously,
to its mating connector from the Pendant Connector Harness. Refer to Section 5 Cable
and Wire Standards, page 61 for connections and specifications.
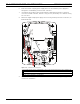
10. Attach the grounding strap of the Pendant Arm to the Power Supply Box. Refer to
Figure 2.10, Page 24.
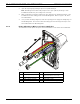
11. After making the harness connections to the Power Supply Box, rotate the Pendant Arm
to close and seal the Power Supply Box and tighten the two (2) captive screws to
10-12 N-m (90-105 in.-lbs).
12. Refer to Section 2.9 Attach Pendant to Arm and Tighten, page 31, to continue the VG5
AutoDome Installation procedure.
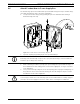
2.8 Installing the VG4-A-ARMPLATE
This section provides instructions to install a wall, corner, or mast mount with the VG4-A-
ARMPLATE Mounting Plate instead of a Power Supply Box.
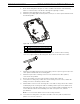
1. For a Corner installation:
a. Secure the Corner Plate to the wall corner using four (4) studs (not included).
b. Secure the Mounting Plate to the Corner Plate using the four (4) 3/8 x 1-3/4-inch
bolts and split lock washers (supplied).
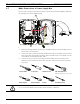
2. For a Mast or pole installation:
The metal straps included with the Mast mount accommodate a pole with a diameter of
100–380 mm (4–15 in.). You must use a banding tool (sold separately) for a mast or pole
installation. In addition, you must obtain a 3/4 in. (20-mm) right angle conduit connector
through which you route the wires that connect to the pendent arm.
a. Follow the instructions provided with the banding tool to securely mount the Mast
Plate to the pole. Contact your Bosch Sales Representative to order Banding Tool
P/N TC9311PM3T.
b. Secure the Mounting Plate to the Mast Plate using the four (4) 3/8 x 1-3/4-inch bolts
and split lock washers (supplied).
c. Remove one of the rubber gaskets from the Mounting Plate.
NOTICE!
After all wiring is complete, close the cover door and tighten the two (2) captive screws on
the cover door to 10-12 N-m (90-105 in.-lbs) to ensure the Power Supply Box is watertight.
CAUTION!
You must route the main power supply through a 120/230 VAC transformer (VG4-PSU1 or
VG4-PSU2 power supply box) before connecting the power to a 24 VAC AutoDome.
WARNING!
A stud diameter of 6.4 mm (1/4 inch) to 8 mm (5/16 inch) able to withstand a 120 kg (265 lb)
pull-out force is recommended. The mounting material must be able to withstand this pull out
force. For example, 19-mm (3/4-inch) minimum for plywood.