TES 711..
de ....................................................................................................................................6 en ..................................................................................................................................29 fr ..................................................................................................................................52 it .................................................................................................
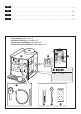
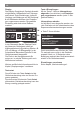
A 5a 5b 5c 2 4 3 7 15 6 16 17 12 11 18 10 19 9 1 23 25 24 20 8 4
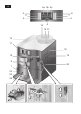
B 13 27 14 11 C D 24 23 26 10a c b d 25
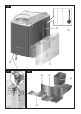
E I 22 II 21 III 21b 21a IV
de Inhalt Lieferumfang...............................................7 Auf einen Blick.............................................7 Vor dem ersten Gebrauch...........................8 Bedienelemente..........................................9 –– Netzschalter O / I......................................9 –– Taste á Personalisierung........................9 –– Taste à Service-Programme...................9 –– Drehknopf................................................9 –– Wähltasten < und >...................
de 7 Gerät oder Netzkabel niemals in Wasser tauchen. Nicht in das Mahlwerk greifen. Gerät nur in frostfreien Räumen verwenden.
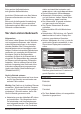
Sehr geehrte Kaffeeliebhaberin, . sehr geehrter Kaffeeliebhaber, . . herzlichen Glückwunsch zum Kauf dieses Espressovollautomaten aus dem Hause Bosch. Bitte auch die beiliegende Kurzanleitung beachten. Sie kann in einem speziellen Aufbewahrungsfach 22 bis zum nächsten Gebrauch verstaut werden. Vor dem ersten Gebrauch Allgemeines Nur reines, kaltes Wasser ohne Kohlensäure und vorzugsweise Espresso- oder Vollauto maten-Bohnenmischungen in die entspre chenden Behälter füllen.
de ●● Das Markenlogo leuchtet im Display 5. Das Gerät heizt nun auf und spült, etwas Wasser läuft aus dem Kaffeeauslauf 9. Erscheinen im Display 5 die Symbole für die Auswahl der Zubereitung, ist das G erät betriebsbereit.. ËÍ ÂÃ À Á Å Æ Espresso Info: Der Espressovollautomat ist ab Werk mit den Standardeinstellungen für optima len Betrieb programmiert. Das Gerät schal tet nach 1 Stunde automatisch ab (siehe Kapitel „Menüeinstellungen“ – . „Auto Off in“).
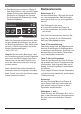
de Display Das Display 5 zeigt durch Symbole Auswahl möglichkeiten, Kaffeestärke und Füllmenge sowie durch Texte Einstellungen, laufende Vorgänge und Meldungen an. Mit Drehknopf 6 und Wähltasten 4 können hier Einstellun gen vorgenommen werden. Die gewählte Einstellung wird durch einen Rahmen markiert. ËË Í ÂÃ À Á Å Æ Espresso 5a 5b 5c In der Statuszeile 5a des Displays 5 wird der Name der Getränkeart sowie bei Kaffeegetränken die Einstellung Stärke z. B. 55 und Menge z. B. � angezeigt.
de 11 Mahlgrad einstellen Mit dem Drehwähler 17 für Mahlgradein stellung kann die gewünschte Feinheit des Kaffeepulvers eingestellt werden. ¡¡Achtung! Den Mahlgrad nur bei laufendem Mahlwerk verstellen! Das Gerät kann sonst beschä digt werden. Nicht in das Mahlwerk greifen. ●● Bei laufendem Mahlwerk den Drehwähler 17 zwischen feinem Kaffeepulver (a: Drehen gegen den Uhrzeigersinn) und gröberem Kaffeepulver (b: Drehen im Uhrzeigersinn) einstellen.
de Displayeinstellungen Auswahlmöglichkeiten Programmauswahl ËË Í À Á Å Æ È É Espresso Espresso ËÍ 5 55 555 ËÍ Î Ð Ò Espresso Espresso Î ± 0 ml Robert Bosch Hausgeräte GmbH ËÍ Â À Å È Ê Ã Á Æ É 2 Espresso Espresso Macchiato Milchschaum Heißwasser 2 Café Crème Café Crème Cappuccino Warme Milch Kaffeestärke (nur für Kaffeegetränke) aromaDouble Shot 5 = sehr mild 2x 5 55 = mild 555 = normal 2x 555 55 = stark 55 55 55 2x 555 555 = sehr stark Füllmenge (nu
de aromaDouble Shot Je länger der Kaffee gebrüht wird, desto mehr Bitterstoffe und unerwünschte Aromen werden gelöst. Geschmack und Bekömm lichkeit des Kaffees werden dadurch beein trächtigt. Für extra starken Kaffee verfügt die TES711 deswegen über eine spezielle aromaDouble Shot-Funktion. Nach der Hälf te der zubereiteten Menge wird erneut Kaf feepulver gemahlen und gebrüht, so dass jeweils nur die wohlschmeckenden und gut bekömmlichen Aromastoffe gelöst werden.
de ●● Durch Drehen des Drehknopfes 6 einen Buchstaben oder eine Zahl auswählen. ●● Mit Taste 8 start bestätigen. Für den Benutzernamen stehen 6 Felder zur Verfügung. Symbol â bedeutet löschen. ●● Entweder alle Felder ausfüllen oder die Taste 8 start so oft drücken bis wieder Name ändern start im Display erscheint. Die Eingabe ist gespeichert. Info: Die Eingabe kann jederzeit über schrieben werden.
de 15 Menüeinstellungen ●● Taste 7 j mindestens 3 Sek. gedrückt halten. Es erscheinen nun die verschiedenen Einstellmöglichkeiten. Einstellungen Sprache Kaffee Temp. Heissw. Temp. j start j 3 Sek. + > Kaffee Temp. ●● Durch Drehen des Drehknopfs 6 kann die Kaffeetemperatur eingestellt werden. Die Einstellung ist für alle Zubereitungsarten wirksam, außer den persönlichen Einstel lungen unter „Personalisierung“. 3 Sek. + > Profil verlassen j 3 Sek.
de ●● Den Teststreifen kurz in das Wasser tau chen und nach 1 Minute das Ergebnis ablesen. Stufe Wasserhärtegrad Deutsch (°dH) Französisch (°fH) 1 1-7 1-13 2 8-14 14-25 3 15-21 26-38 4 22-30 39-54 j 3 Sek. + > Wasserfilter Bevor ein neuer Wasserfilter verwendet werden kann, muss dieser gespült werden. ●● Dazu Wasserfilter mit Hilfe des Pulver löffels 14 in den Wassertank 11 fest ein drücken. Wassertank bis zur Markierung „max“ mit Wasser füllen.
de j 3 Sek. + > 17 Werkseinstellg. Die eigenen Einstellungen können gelöscht und die Werkseinstellungen wieder aktiviert werden. ●● Zur Aktivierung der Werkseinstellung Taste 8 start drücken. Info: Das Gerät kann auch manuell durch Tastenkombination auf die Werkseinstellun gen zurückgestellt werden. Das Gerät muss komplett ausgeschaltet sein. ●● Tasten 4 < und > und Netzschalter 1 O / I gleichzeitig mindestens 5 Sekun den gedrückt halten.
ËÍ À Á Å Æ ÈÉ Cappuccino Die Einstellungen können verändert werden (siehe Kapitel „Bedienelemente“) oder die persönlichen Einstellungen vorgenom men und abgerufen werden (siehe Kapitel „Personalisierung“). ●● Taste 8 start drücken. Zuerst wird Milch in die Tasse bzw. das Glas gefördert. Anschließend wird der K affee gebrüht und läuft in die Tasse bzw. das Glas.
de Hinweis: Für eine weitere Kaffee / Milch mischung den Vorgang wiederholen. Wird innerhalb von 90 Sekunden kein Kaffee be zogen, entleert sich die Brühkammer auto matisch, um eine Überfüllung zu vermeiden. Das Gerät spült. Milchschaum und warme Milch zubereiten ¡¡Verbrennungsgefahr! Der Milchschäumer 10 wird sehr heiß. Nach Benutzung zuerst abkühlen lassen und erst dann berühren. Das Gerät muss betriebsbereit sein. ●● Das Milchrohr 10d des Milchschäumers 10 in den Behälter mit Milch einführen.
●● Abstellfläche 25 abnehmen. Tropfschale 24 mit Kaffeesatzbehälter 26 nach vorne herausziehen, entleeren und reinigen. Diese Teile können auch im Geschirrspüler gereinigt werden. ●● Pulverschublade 18 entnehmen und reinigen. . de Milchsystem reinigen Wichtig: Milchsystem 10 unbedingt nach jeder Benutzung reinigen! Das Milchsystem 10 kann automatisch vor gereinigt (siehe Kapitel „Service-Program me“) oder manuell gereinigt werden.
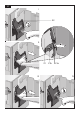
de Brüheinheit reinigen (siehe auch Kurzanleitung) Zusätzlich zum automatischen Reinigungs programm sollte die Brüheinheit 21 regel mäßig zum Reinigen entnommen werden. ●● Mit dem Netzschalter 1 O / I komplett aus schalten, keine Taste leuchtet. ●● Den Türöffner 20 nach rechts schieben und die Tür 19 zur Brüheinheit 21 öffnen. ●● Die rote Verriegelung 21b an der Brühein heit 21 ganz nach links schieben.
de Speziell entwickelte und geeignete Entkalkungs- und Reinigungstabletten sind über den Handel, sowie den Kundendienst erhältlich. Bestellnummer Handel Kundendienst Reinigungstabletten TCZ6001 310575 Entkalkungstabletten TCZ6002 310967 Milchsystem reinigen Dauer: ca. 1 Minute Reinigung und Service Kurzspülen Milchsytem start Calc‘n‘clean Das Milchsystem 10 kann automatisch vor gereinigt werden. ●● Taste à 3 drücken. Kurzspülen Milchsystem start ●● Taste 8 start drücken.
de 0,5 L Wasser + Entkalker einfüllen start ●● Lauwarmes Wasser in den leeren Was sertank 11 bis zur Markierung „0,5l“ ein füllen und 2 Bosch Entkalkungstabletten darin auflösen. ●● Taste 8 start drücken, das Entkalkungsprogramm läuft jetzt ca. 20 Minuten. 23 Reinigen Dauer: ca. 8 Minuten. Reinigung und Service Entkalken Reinigen start Entkalkungsprogramm läuft Zu wenig Entkalker Entkalker nachfüllen start Während der einzelnen Reinigungsschritte blinkt die Taste 8 start.
Tropfschale leeren Tropfschale einsetzen ●● Tropfschale 24 leeren und wieder einsetzen. Das Gerät ist fertig gereinigt und wieder betriebsbereit. Calc‘n‘Clean Dauer: ca. 36 Minuten. Calc‘n‘Clean kombiniert die Einzelfunktionen Entkalken und Reinigen. . Liegt die Fälligkeit der beiden Programme nah beieinander, schlägt der Espresso vollautomat automatisch dieses ServiceProgramm vor.
de Tropfschale leeren Tropfschale einsetzen ●● Tropfschale 24 leeren und wieder einsetzen. Wenn ein Filter verwendet wird, diesen jetzt wieder einsetzen. Das Gerät ist fertig ent kalkt, gereinigt und wieder betriebsbereit. Wichtig: Das Gerät mit einem weichen, feuchten Tuch abwischen um Rückstände der Entkalkungslösung sofort zu entfernen. Unter solchen Rückständen kann sich K orrosion bilden. Hinweis: Wurde eines der Service-Pro gramme z. B.
de Zubehör Garantiebedingungen Folgendes Zubehör ist über den Handel und Kundendienst erhältlich. Für dieses Gerät gelten die von unserer jeweils zuständigen Landesvertretung he rausgegebenen Garantiebedingungen, in dem das Gerät gekauft wurde. Sie können die Garantiebedingungen jederzeit über Ihren Fachhändler, bei dem Sie das Ge rät gekauft haben oder direkt bei unserer Landesvertretung anfordern.
de 27 Einfache Probleme selbst beheben Problem Displayanzeige Ursache Abhilfe Bohnen fallen nicht ins Leicht an den Bohnen Bohnenbehälter Mahlwerk (zu ölige Bohnen). behälter 15 klopfen. Eventu f üllen trotz gefülltem ell Kaffeesorte wechseln.. Bohnbehälter 15 oder Bei geleertem Bohnenbehäl Mahlwerk mahlt keine ter 15 diesen mit einem tro Kaffeebohnen. ckenen Tuch auswischen. Der Milchschäumer 10 Kein Heißwasserbezug Den Milchschäumer 10 möglich.
de Einfache Probleme selbst beheben Problem Der Kaffee ist zu „sauer“. Ursache Der Mahlgrad ist zu grob eingestellt oder das Kaffee pulver ist zu grob. Ungeeignete Kaffeesorte. Der Kaffee ist zu „bitter“. Der Mahlgrad ist zu fein eingestellt oder das Kaffee pulver ist zu fein. Ungeeignete Kaffeesorte. Im Gerät ist ein Fehler. Displayanzeige Störung Bitte Hotline anrufen Der Wasserfilter hält nicht im Der Wasserfilter ist nicht Wassertank 11. richtig befestigt.
en 29 Table of Contents Included in delivery....................................30 Overview...................................................30 Before using for the first time....................31 Controls.....................................................32 –– Power on / off switch O / I........................32 –– Customising button á...........................32 –– Service programmes button à. .............32 –– Rotary knob............................................
¡¡Risk of scalding! The milk frother 10 for milk and hot water gets very hot. After use, allow to cool down first before touching.
en Dear Coffee Connoisseur, Congratulations on purchasing this fully automatic espresso machine from Bosch. Please also note the enclosed quick refer ence guide. . It can be kept in the special storage com partment 22 until it is needed. Before using for the first time General Fill the water tank with fresh, cold, uncar bonated water only, and preferably use only beans for fully automatic coffee and espres so machines.
●● The brand logo lights up in the display 5. The appliance now heats up and rinses. Some water will run out of the coffee out let 9. The appliance is ready for use when the symbols for selecting the type of cof fee preparation appear in the display 5. ËÍ ÂÃ À Á Å Æ Espresso Note: The factory settings of the fully auto matic espresso machine are programmed for optimal performance. The appliance switches off automatically after 1 hour (see “Menu settings” ‒ “Auto off after”). N.B.
en 33 Display The display 5 uses symbols to indicate the selection options, coffee strength and per-cup quantity, and uses texts to indicate settings, ongoing processes and messages. The rotary knob 6 and selection buttons 4 can be used to change settings. The select ed setting is highlighted by a frame. ËË Í ÂÃ À Á Å Æ Espresso 5a j button and settings Use the j button 7 to display information (press briefly) and adjust settings (hold down for at least 3 seconds).
en Adjusting the grinding unit The rotary selector 17 adjusts the grind set tings from coarse to fine. ¡¡Warning! Adjust the grinding unit only while it is running! Otherwise the appliance may be damaged. Do not reach into the grinding unit. ●● While the grinding unit is running, adjust the rotary selector 17 from fine (a: Turn anticlockwise) to coarse (b: Turn clock wise) as required. a Displays Display messages Various messages are shown on the display 5.
en 35 Display settings Selection options Programme selection ËË Í À Á Å Æ È É Espresso Espresso ËÍ 5 55 555 ËÍ Î Ð Ò Espresso Espresso ËÍ Â À Å È Ê Ã Á Æ É 2 Espresso Espresso Macchiato Milk froth Hot water 2 Coffee Coffee Cappuccino Warm milk Coffee strength (only for coffee drinks) aromaDouble Shot 5 = very mild 2x 5 55 = mild 555 = normal 2x 555 55 = strong 55 55 55 555 = very strong 2x 555 Per-cup quantity (only for coffee drinks) Î small Ð medium
aromaDouble Shot The longer the coffee is brewed, the more bitter substances and undesired aromas are released. This has a negative effect on the taste and makes the coffee less easily digestible. So for extra strong coffee the TES711 has a special aromaDouble Shot function. When half the quantity has been prepared, coffee is ground and brewed again so that only the pleasant, aromatic flavours are released.
en 37 ●● Turn the rotary knob 6 to select a letter or number. ●● Confirm by pressing the start button 8. There are 6 characters available for the user name. Symbol â means delete. ●● Either complete all of the fields or press the start button 8 repeatedly until Edit name start appears in the display again. The entry is saved. Information: The entry can be overwritten at any time. To delete the user, use the arrow button to select Delete name start and press the start button 8.
en Menu settings j ●● Hold the j button 7 down for at least 3 seconds. The different setting options are now displayed. Settings Language English Coffee temp. Hot Water temp. In the following operating instructions, each new setting begins with j 3 sec. + > followed by an exact description. The different setting options can be selected with the < and > buttons 4. Settings Water hardness Water filter Transport. lock N.B.: The changes you have made are saved automatically.
en j 3 sec. + > 39 Water filter Before a new water filter is used, it must be rinsed. ●● To do this, press the water filter firmly into the water tank 11 with the aid of the measuring spoon 14. Fill the water tank with water up to the “max” mark. ●● Turn the knob 6 to select start and press the start button 8. ● Place 0.5 l container under milk frother start ●● Place a container with a capacity of 0.5 litres under the milk frother 10. ●● Press the start button 8.
Preparation using coffee beans This fully automatic espresso machine grinds beans freshly for each brew. If pos sible, use only beans for fully automatic coffee and espresso machines. For optimal quality, deep-freeze the beans or store in a cool place in sealed containers. Coffee beans can be ground while frozen. Important: Fill the water tank 11 with fresh, cold water every day. The tank 11 should always contain sufficient water for operating the appliance.
en Preparation using ground coffee This fully automatic espresso machine can also be operated with ground coffee (not instant coffee powder). N.B.: The aromaDouble Shot function can not be used when coffee is prepared using ground coffee. Drink preparation without milk ●● Select À or Á by turning the knob 6. ●● Place the pre-warmed cup(s) under the coffee outlet 9. ●● Open the drawer 18 by pressing. ●● Pour in no more than 2 level measuring spoons 14 of ground coffee.
Tip: For optimal milk froth quality, use cold milk with a fat content of at least 1.5 % if possible. Important: Dried milk residue is difficult to remove, so the milk frother 10 must be cleaned with lukewarm water immediately after use (see “Cleaning the milk system”). en ●● The drip tray panel 23 should only be wiped gently with a damp cloth. Do not put it in the dishwasher. ●● Remove cup stand 25. Pull the drip tray 24 with the coffee grounds container 26 forward and out, then empty and clean them.
en Dismantling the milk system 10 for cleaning: ●● Pull the milk system 10 forward out of the appliance. ●● Turn the upper part (10a) in an anti-clock wise direction and remove from the lower part (10b). ●● Clean the individual parts with detergent solution and a soft cloth. ●● Rinse all parts with clear water and dry them. ●● Put all the parts back together, making sure the markings are overlapping. The milk frother can then be clicked back into place in the appliance.
en Service Programmes Tip: Refer also to the quick reference guide in the storage compartment 22. At regular intervals, the display 5 shows the following texts: Short rinse milk system or Service - descale or Service - clean or Service - Calc‘n‘Clean. The appliance should be cleaned or descaled immediately using the corresponding pro gramme. You have the option of combining the processes Descaling and Cleaning with the Calc‘n‘Clean function (see “Calc‘n‘Clean”).
en Descaling Duration: approx. 30 minutes. Cleaning and service Descale start Clean The start button 8 flashes while the differ ent descaling processes are running. The figures on the top right indicate the progress of the programme. Important: If there is a filter in the water tank 11, it needs to be removed before the service programme is run. ●● Press the à button 3. 45 ●● Press the start button 8. The descaling programme will now run for about 20 minutes. Descaling Not enough descaling fluid.
Cleaning Duration: approx. 8 minutes. Cleaning and service Descale start Clean The start button 8 flashes while the differ ent cleaning processes are running. The figures on the top right indicate the progress of the programme. ●● Fill the water tank 11 up to the “max” mark. ●● Hold the j button 7 down for at least 3 seconds. en Empty drip tray Replace drip tray ●● Empty drip tray 24 and replace. The appliance is ready for use again. Calc‘n‘Clean Duration: approx. 36 minutes.
en Open drawer ●● Open the drawer 18 by pressing. Insert Bosch cleaning tablet and close drawer ●● Drop a Bosch cleaning tablet in the draw er 18 and close. Note: If the water filter is activated, the display 5 will prompt you to remove the filter and press the start button 8 again. Remove filter start Add 0.5 l water and descaler start ●● Pour lukewarm water into the empty wa ter tank 11 up to the “0.5” litre mark and dissolve 2 Bosch descaling tablets in it. ●● Press the start button 8.
en A Frost protection Disposal ¡¡To avoid damage from low tempera- This appliance is labelled in accordance with the European Directive 2002/96/EG relating to waste electrical and electronic equipment – WEEE. The directive provides the framework for the EU-wide take-back and disposal of end-of-life appliances. Please ask your specialist retailer about current disposal facilities. tures during transport and storage, the appliance must be completely emptied first. See “Menu settings” ‒ “Transport.
en 49 Simple troubleshooting Problem Display shows Cause Solution Beans are not falling into the Gently tap the bean con Refill bean container grinding unit (beans too oily). tainer 15. although the bean container Change the type of coffee if 15 is full, or the grinding unit necessary. When the bean does not grind the beans. container 15 is empty, wipe it with a dry cloth. The milk frother 10 or its Clean the milk frother 10 or No hot water dispensed. holder is soiled.
en Simple troubleshooting Problem Display shows Error Please contact hotline Cause The appliance has a fault. Solution Please call the hotline. The water filter is not mount Firmly press the water filter ed correctly. straight down into the tank connection. Water tank has been in Insert the water tank cor Check water tank correctly inserted or the rectly or rinse the water filter new water filter has not according to instructions and been rinsed according to then switch on. instructions.
en 51 Technical specifications Electrical connection (voltage/frequency) 220-240 V / 50-60 Hz Heating output 1700 W Maximum pump pressure, static 15 bar Maximum water tank capacity (without filter) 2.
fr Sommaire Contenu de l’emballage.............................53 Présentation..............................................53 Avant la première utilisation......................54 Eléments de commande............................55 –– Interrupteur électrique O / I.....................55 –– Touche á Personnalisation...................55 –– Touche à Programmes de maintenance.....................................55 –– Bouton rotatif..........................................
fr En cas de défaut, débrancher immédiatement le cordon électrique. Les réparations sur la machine, par ex. le remplacement du cordon électrique, doivent être effectuées unique ment par notre Service après-vente afin d’éli miner tous les risques. Ne jamais plonger la machine ou le cordon électrique dans l’eau. Ne pas glisser les doigts à l’intérieur du moulin. Utiliser la machine uniquement dans des locaux à l’abri du gel. ¡¡Risque de brûlure ! Le mousseur lait 10 devient brûlant.
Chère amatrice de café, cher amateur de café. Félicitation pour avoir choisi la cafetière Bosch. Veuillez également tenir compte du Mémento fourni. Un logement 22 a été prévu pour le conserver à portée de . main dans la machine. Avant la première utilisation Généralités N’utiliser que de l’eau pure et froide, sans gaz carbonique, et de préférence un mé lange de café adapté, pour espresso ou machine à café.
fr ●● Le logo de la marque s’allume à l’écran 5. La machine se met à chauffer et à effec tuer un rinçage ; un peu d’eau s’écoule du bec verseur du café 9. Lorsque les symboles de sélection de la préparation apparaissent à l’écran 5 la machine est prête à fonctionner. ËÍ ÂÃ À Á Å Æ Espresso Info : La machine à café est programmée en usine de manière à fonctionner de ma nière optimale. La machine s’arrête auto matiquement au bout de 1 heure (voir point « Réglages menu » – « AR auto dans »).
fr Ecran A l’aide des symboles Boissons au café, Arôme et Quantité ainsi que des textes de réglage, l’écran 5 affiche en permanence les opérations en cours et les messages. Le bouton rotatif 6 et les touches de sélection 4 servent à effectuer les réglages. Le ré glage sélectionné est identifié par un cadre. ËË Í ÂÃ À Á Å Æ Espresso Appeler des informations Dans le menu Info, vous pouvez consul ter combien de boissons ont été pré 5a parées depuis la mise en service de la machine à café.
fr 57 Régler la finesse de la mouture Le sélecteur 17 de réglage de la mouture du café permet de régler la finesse de mou ture souhaitée du café. Affichages à l’écran ¡¡Attention ! Informations Par exemple : Modifier le réglage de la mouture unique ment lorsque le broyeur fonctionne. Sinon la machine peut être endommagée. Ne pas glisser les doigts à l’intérieur du moulin.
fr Réglages de l’écran Sélections possibles Sélection des programmes ËË Í À Á Å Æ È É Espresso Espresso ËÍ 5 55 555 ËÍ Î Ð Ò Espresso Espresso Î ± 0 ml Robert Bosch Hausgeräte GmbH ËÍ Â À Å È Ê Ã Á Æ É 2 Espresso Espresso Macchiato Mousse lait Eau chaude 2 Café Café Cappuccino Lait chaud Arôme du café (uniquement pour les boissons au café) aromaDouble Shot 5 = très doux 2x 5 55 = doux 555 = normal 2x 555 55 = fort 55 55 55 2x 555 555 = très fort Quanti
fr aromaDouble Shot Plus la percolation du café dure longtemps, plus les substances amères et les arômes indésirables sont prononcés. Cela a un effet négatif sur le goût et rend le café moins digeste. La TES711 dispose donc d’une fonction spéciale, aromaDouble Shot pour préparer un café très fort. Une fois que la moitié de la quantité a été préparée, la ma chine moud de nouveau du café et effectue une percolation. Cela permet de ne déve lopper que les arômes parfumés et très digestes du café.
fr ●● Remplir tous les champs ou appuyer plusieurs fois sur la touche 8 start jusqu’à ce que Modifier nom start appa raisse de nouveau à l’écran. L’entrée est enregistrée. Info : L’entrée peut être écrasée à tout moment. Pour supprimer l’utilisateur, sélectionner Supprimer nom start avec la touche fléchée et appuyer sur la touche 8 start. Enregistrer les températures ●● Sélectionner Température café ou Température eau chaude avec la touche fléchée.
fr 61 Réglages menu ●● Maintenir appuyée durant 3 s au moins . la touche 7 j. Les différentes possibilités de réglage s’affichent. Réglages Langue Français Temp. du café Temp. eau chaude Dans la suite du texte de ce mode d’em ploi, chaque nouveau réglage commence par j 3 s + > suivi d’une description précise. Les touches 4 < et > permettent de sélectionner les différentes possibilités de réglage. Réglages Dureté eau Filtre eau Sécurité trans. 3s+> Temp.
j fr 3s+> Filtre eau Avant d’utiliser un nouveau filtre à eau il faut tout d’abord effectuer un rinçage. ●● Pour cela, enfoncer fermement le filtre à eau dans le réservoir d’eau 11 à l’aide de la cuillère dose 14. Remplir d’eau le réservoir jusqu’au repère « max ». ●● Tourner le bouton rotatif 6 pour sélec tionner start et appuyer sur la touche 8 start. ●● Placer récipient 0,5 l sous mousseur lait start ●● Placer un récipient d’une capacité de 0,5l sous le mousseur lait 10.
fr Préparation avec du café en grains Cette machine à espresso / café entièrement automatique moud du café frais lors de chaque préparation. Utiliser de préférence du café pour espresso / pour percolateur. Conserver le café au froid dans un récipient hermétiquement fermé ou le congeler. Il est possible de broyer les grains de café congelés. Important : Remplir tous les jours le réser voir d’eau 11 avec de l’eau fraîche et froide.
Important : Les restes de lait séchés sont difficiles à retirer ; après chaque utilisation, il est impératif de nettoyer le mousseur lait 10 à l’eau tiède (voir point « Nettoyage du mousseur de lait »). Préparation à partir de café moulu La machine peut aussi préparer un café à partir de café moulu (pas du café soluble). Remarque : Lorsque l’on utilise du café moulu pour la préparation du café, la fonc tion aromaDouble Shot n’est pas disponible.
fr Préparer de la mousse de lait et du lait chaud ¡¡Risque de brûlure ! Le mousseur lait 10 devient brûlant. Après utilisation, bien laisser refroidir avant de le saisir. La machine doit être prête à fonctionner. ●● Placer le tube mousseur 10d du mous seur lait 10 dans le récipient de lait. ●● Placer la tasse préchauffée ou le verre sous le mousseur lait 10. ●● Sélectionner « Mousse lait » È ou « Lait chaud » É en tournant le bouton rotatif 6.
fr ●● Ne pas passer au lave-vaisselle. ●● Retirer la grille 25. Extraire vers l’avant le bac collecteur 24 et le écipient de marc de café 26, vider et nettoyer. Tous ces éléments sont lavables en machine. ●● Retirer le tiroir à café 18 et le nettoyer. Démonter le mousseur lait 10 pour le nettoyer ●● Extraire le mousseur de lait 10 de la ma chine en le tirant vers l’avant. ●● Tourner la partie supérieure (10a) dans le sens inverse des aiguilles d’une montre et la défaire de la partie inférieure (10b).
fr Nettoyer l’unité de percolation (voir aussi Mémento) En plus du programme de nettoyage auto matique, il convient de retirer régulièrement l’unité de percolation 21 afin de la nettoyer. ●● Arrêter entièrement la machine à l’aide de l’interrupteur électrique 1 O / I, aucune touche n’est allumée. ●● Faire glisser l'ouvre-volet 20 vers la droite et ouvrir le volet 19 de l’unité de percola tion 21. ●● Faire glisser le verrouillage rouge 21b de l’unité de percolation 21 vers la gauche.
fr Des pastilles de détartrage et de nettoyage spécialement développées sont disponibles dans le commerce et auprès du Service Clientèle. N° commande Commerce Service Clientèle Pastilles de nettoyage TCZ6001 310575 Pastilles de détartrage TCZ6002 310967 De plus, nettoyer régulièrement et très soigneusement le mousseur de lait 10 (en lave-vaisselle ou à la main). Détartrage Durée : env. 30 minutes. Nettoyage et service Détartrage start Nettoyage Nettoyage du mousseur de lait Durée : env.
fr 0,5 l eau + détartrant Remplir start ●● Verser de l’eau tiède dans le réservoir d’eau 11 jusqu’au repère « 0,5l » et dis soudre 2 pastilles de détartrage Bosch. ●● Appuyer sur la touche 8 start, le pro gramme de détartrage se déroule mainte nant durant 20 minutes environ 69 Nettoyage Durée : env. 8 minutes. Nettoyage et service Détartrage start Nettoyage Détartrage en cours Détartrant insuffis.
fr Vider le bac collecteur Placer le bac collecteur ●● Appuyer sur la touche 8 start, la machine effectue deux rinçages. La machine est maintenant nettoyée et de nouveau prête à fonctionner. Ouvrir tiroir ●● Vider le bac collecteur 24 et le replacer. Calc‘n‘Clean Durée : env. 36 minutes. Calc‘n‘Clean combine les fonctions Détar trage et Nettoyage. Si le moment de réaliser chacun des deux programmes est proche, la machine propose automatiquement ce programme.
fr Vider le bac collecteur Placer le bac collecteur ●● Vider le bac collecteur 24 et le replacer. Si un filtre est utilisé, le replacer mainte nant. La machine est nettoyée et détartrée et de nouveau prête à fonctionner. Important : Essuyer l’appareil avec un torchon doux et humide pour éliminer im médiatement les résidus du détartrant. En effet, de la corrosion peut se former sous ces résidus. Remarque : Si l’un des programmes de maintenance a été interrompu, par ex.
fr Accessoires Garantie Les accessoires suivants sont disponibles dans le commerce ou auprès du service Clientèle. Les conditions de garantie applicables sont celles publiées par notre distributeur dans le pays où a été effectué l’achat. Le revendeur chez qui vous vous êtes procuré l’appareil fournira les modalités de garantie sur simple demande de votre part. En cas de recours en garantie, veuillez toujours vous munir de la preuve d’achat.
fr 73 Eliminer soi-même les problèmes simples Problème Affichage de. Remplir le bac à café bien que le bac à café 15 soit rempli, ou bien le moulin ne parvient pas à moudre. Impossible de produire de l’eau chaude. Trop peu de mousse ou pas de mousse ou le mousseur de lait 10 n’aspire pas le lait. Cause Les grains ne tombent pas dans le broyeur (grains trop gras). Le mousseur lait 10 ou le support du mousseur lait 10 est obturé. Remède Frapper légèrement le bac à café 15.
fr Eliminer soi-même les problèmes simples Problème Le café est trop « amer ». Affichage à l’écran D éfaillance Appeler Service Clientèle Le filtre à eau ne tient pas dans le réservoir d’eau 11. Cause La mouture est trop fine ou le café moulu est trop fin. Qualité du café ne convient pas. Une défaillance s’est pro duite dans la machine. Appeler le Service Clientèle. Placer le filtre d’eau bien droit et appuyer fortement pour l’enfoncer dans le réservoir.
it 75 Sommario Contenuto della confezione.......................76 Panoramica...............................................76 Al primo impiego........................................77 Elementi di comando.................................78 –– Interruttore di rete O / I............................78 –– Tasto á Personalizzazione...................78 –– Tasto à Programmi di assistenza..........78 –– Selettore . ..............................................78 –– Tasti selettori < e > .......................
Utilizzare l’apparecchio solo in ambienti protetti dal gelo. ¡¡Pericolo di scottature! L’inserto schiuma 10 si riscalda molto. Prima di toccarlo, dopo l’uso, è necessario lasciarlo raffreddare.
it Gentili amanti del caffè, congratulazioni per aver acquistato questa macchina automatica per espresso della società Bosch. Si prega di osservare anche le istruzioni brevi. Queste si possono inserire in un apposito scomparto 22, che consente di tenerle sempre a portata di mano per la consultazione durante l’uso.
●● Sul display 5 compare il logo del marchio. Ora l’apparecchio si riscalda ed esegue un risciacquo, un po’ di acqua fluisce dall’uscita caffè 9. Quando sul display 5 compaiono i simboli per la preparazione, l’apparecchio è pronto per l’uso. . ËÍ ÂÃ À Á Å Æ Espresso Informazione: la macchina per il caffè espresso è preprogrammata con imposta zioni standard per un funzionamento otti male. Dopo 1 ora l’apparecchio si spegne automaticamente. (vedere capitolo “Impo stazioni del menu” – “Auto spegn.
it 79 Display Il display 5 visualizza, mediante simboli, possibilità di selezione, intensità del caffè e quantità, e, mediante testi, impostazioni, processi in corso e messaggi. Le imposta zioni si eseguono qui mediante il selettore 6 e i tasti selettori 4. L’impostazione selezio nata viene contrassegnata con una cornice.
it Regolare il grado di macinatura Con il selettore 17 è possibile regolare il grado di macinatura desiderato per il caffè. Visualizzazioni del display ¡¡Attenzione! Regolare il grado di macinatura solo con il macinacaffè in funzione! In caso contrario l’apparecchio potrebbe subire danni. Non toccare i dispositivi di macinazione. Messaggi sul display Sul display 5 vengono visualizzati diversi messaggi.
it 81 Impostazioni del display Possibilità di selezione Selezione programma ËË Í À Á Å Æ È É Espresso Espresso ËÍ 5 55 555 ËÍ Î Ð Ò Espresso  À Å È Ê 2 Espresso Espresso Macchiato Schiuma latte Acqua calda ËÍ 2 Caffè Caffè Cappuccino Latte caldo Intensità del caffè (solo per bevande a base di caffè) aromaDouble Shot 5 = molto delicato 2x 5 55 = delicato 555 = normale 2x 555 55 = forte 55 55 55 2x 555 555 = molto forte Quantità (solo per bevande a base di ca
aromaDouble Shot Una cottura prolungata del caffè provoca un gusto più amaro e lo formazione di aromi indesiderati, che ne compromettono il sapore e la digeribilità. Per un caffè extra-forte la TES711 dispone di un’apposita funzione spe ciale aromaDouble Shot. A metà della quan tità di preparazione il caffè viene macinato nuovamente e infuso in modo da attivare solo gli aromi più profumati e pregiati.
it 83 Informazione: l’immissione può essere sempre sovrascritta. Per cancellare l’utente selezionare Cancella nome start e premere il tasto 8 start. Memorizzazione delle temperature ●● Selezionare con il tasto freccia T emperatura caffè o Temperatura acqua calda. ●● Selezionare l’impostazione desiderata con il selettore 6. ●● Premere il tasto 2 á. ●● Le impostazioni sono memorizzate. Richiamo di un profilo utente ●● Premere brevemente il tasto 2 á.
it Impostazioni del menu ●● Tenere premuto il tasto 7 j per almeno 3 secondi. Compaiono le diverse possibilità di impostazione. Impostazioni Lingua Temp. caffè Tmp. acqua calda Italiano Nel testo che segue ogni nuova impostazio ne inizia con j 3 sec. + > ed è seguita da una descrizione precisa. Con i tasti 4 < e > è possibile selezionare le diverse possibilità di impostazione. Impostazioni Durezza acqua Filtro acqua Blocco trasp.
it j 3 sec. + > 85 Filtro acqua Ogni volta che si inserisce un nuovo filtro acqua nel serbatoio acqua 11, è necessario eseguire un risciacquo del nuovo filtro. ●● Per eseguire questa operazione spingere saldamente il filtro dell’acqua nel serbato io dell’acqua 11 aiutandosi con il dosatore 14. Riempiere poi il serbatoio con acqua fino al contrassegno “max”. ●● Ruotando il selettore 6 scegliere start e premere il tasto 8 start. ●● Posizionare recip.
Preparazione con chicchi di caffè Questa macchina automatico per espresso macina automaticamente i chicchi freschi prima di ogni preparazione. Usare preferi bilmente miscele di caffè o espresso appo sitamente preparate per l’uso con macchine da caffè. Per garantire una qualità ottimale, conservare i chicchi di caffè in luogo fresco e chiuso oppure congelarli. È possibile maci nare anche chicchi congelati. Importante: versare ogni giorno acqua pulita e fredda nel serbatoio dell’acqua 11.
it Importante: i resti secchi di latte sono difficili da rimuovere, per questa ragione si deve assolutamente sempre pulire l’in serto schiuma 10 con acqua tiepida dopo ogni uso (vedere capitolo “Pulire la linea del latte”). Preparazione con caffè macinato Questa macchina automatica per caffè espresso può funzionare anche con caffè macinato (non con caffè solubile). Nota: la funzione aromaDouble Shot non è disponibile per la preparazione con caffè macinato.
●● Selezionare l’impostazione . “Schiuma latte” È oppure “Latte caldo” É ruotando il selettore 6. ●● Premere il tasto 8 start, la schiuma (per circa 40 secondi) o il latte caldo (per circa 60 secondi) fuoriescono dall’uscita dell’in serto schiuma 10. ●● Premendo nuovamente il tasto 8 start è possibile interrompere anticipatamente l’operazione. Informazione: durante la preparazione del latte caldo, è possibile che la macchina emetta dei fischi. Questi sono dovuti alla struttura dell’inserto schiuma 10.
it Importante: il raccogligocce uscita caffè 24 e il contenitore per fondi di caffè 26 si dovrebbe vuotare e pulire ogni giorno, per evitare la formazione di muffe. 89 ●● Rimontare tutti gli elementi in modo che entrambi i contrassegni combacino tra loro. Inserire nuovamente l’inserto schiu ma nell’apparecchio fino al suo incastro.. Nota: se l’apparecchio viene acceso a fred do o spento dopo il prelievo di caffè, esegue automaticamente il risciacquo. Il sistema è quindi autopulente.
●● Tenere il filtro del bollitore sotto il getto dell’acqua.. it Programmi di assistenza Consiglio: vedere anche Istruzioni brevi nello scomparto per la conservazione 22. A determinati intervalli di tempo sul . display 5 compare Risciacquo breve sistema latte oppure Decalcificare oppure Eseguire pulizia oppure Calc‘n‘Clean. Importante: non usare detersivi e non lava re in lavastoviglie.
it Pulire la linea del latte Durata: circa 1 minuto.. Pulizia e manutenzione Risciacquo breve start sistema latte Calc‘n‘clean Il sistema latte 10 può essere prepulito automaticamente. ●● Premere il tasto 3 à. Risciacquo breve Sistema latte start ●● Premere il tasto 8 start Posiz.bicch.sotto ins.schiuma, aspir. nel bicch. start ●● Inserire un bicchiere vuoto sotto la linea del latte 10 e immergere l’estremità del tubicino del latte nel bicchiere 10d. ●● Premere il tasto 8 start.
●● Premere il tasto 8 start. Il programma di decalcificazione dura circa 20 minuti. Decalcificazione in corso Manca decalcificante Aggiung. decalcificante start Informazione: se il serbatoio dell’acqua 11 contiene troppo poco decalcificante, com pare il messaggio corrispondente. Aggiun gere decalcificante e premere nuovamente il tasto 8 start. Sciacquare e riempire serbatoio acqua start ●● Sciacquare il serbatoio dell’acqua 11 e riempirlo con acqua pulita fino al contras segno “max”.
it Svuotare raccogligocce Inserire roccogligocce ●● Svuotare il raccogligocce 24 e reinserirlo. L’apparecchio è di nuovo pronto per l’uso. Calc‘n‘Clean Durata: circa 36 minuti. La funzione Calc‘n‘Clean combina le due operazioni di decalcificazione e di pulizia. Se la scadenza delle due procedure è ravvicina ta, la macchina automatica per caffè espres so propone questo programma di servizio.
Se viene utilizzato un filtro, è il momento di reinserirlo. L’apparecchio è di nuovo pronto per l’uso. Importante: pulire l’apparecchio con un panno umido e morbido per eliminare su bito i residui di soluzione decalcificante. Sotto questi resti possono formarsi punti di corrosione. Nota: se il programma di assistenza viene interrotto, ad esempio a causa di un’interru zione di corrente, procedere come indicato qui di seguito.
it 95 A Accessori Smaltimento I seguenti accessori generalmente sono disponibile presso i rivenditore e presso il servizio clienti. Questo apparecchio è contrassegnato con formemente alla Direttiva europea 2002/96/ CE Rifiuti di apparecchiature elettriche ed elettroniche (waste electrical and electronic equipement – WEEE). La direttiva stabilisce il quadro generale per un ritiro e recupero valido in tutta I’UE.
it Soluzione di piccoli guasti Guasto Messaggio sul display Riempire serbatoio chicchi Causa I chicchi non ricadono nel macinacaffè (chicchi troppo oleosi). anche se il serbatoio chicchi 15 è pieno o se il macina caffè non macina chicchi. L’inserto schiuma 10 o Prelievo acqua calda impossibile. l’alloggiamento dell’inserto schiuma è otturato. Troppo poco o troppa schiuma oppure L’inserto schiuma 10 non aspira il latte. L’inserto schiuma 10 o l’alloggiamento dell’inserto schiuma è sporco.
it 97 Soluzione di piccoli guasti Guasto Il caffè è troppo “acido”. Causa Il grado di macinatura è troppo grosso oppure il caffè è macinato troppo grosso. Tipo di caffè non adatto. Il caffè è troppo “amaro”. Messaggio sul display Errore Chiamare l’ assistenza Il filtro dell’acqua non resta incastrato nel serbatoio dell’acqua 11. Messaggio sul display Controllare serbat. Acqua I fondi di caffè non sono compatti e sono troppo bagnati.
Kundendienst-Zentren • Central-Service-Depots • Service Après-Vente • Servizio Assistenza • Centrale Servicestation • Asistencia técnica • Servicevaerkter • Apparatservice • Huolto DE Deutschland, Germany BSH Hausgeräte Service GmbH Zentralwerkstatt für kleine Hausgeräte Trautskirchener Straße 6 – 8 90431 Nürnberg Online Auftragsstatus, Pickup Service für Kaffeevollautomaten und viele weitere Infos unter: www.bosch-home.com Reparaturservice* (Mo-Fr: 8:00-18:00 erreichbar) Tel.
ES España, Spain En caso de avería puede ponerse en contacto con nosotros, su aparato será trasladado a nuestro taller especializado de cafeteras. Tel.: 902 28 88 38 BSH Electrodomésticos España S.A. Polígono Malpica, Calle D, Parcela 96 A 50016 Zaragoza Tel.: 902 245 255 Fax: 976 578 425 mailto:CAU-Bosch@bshg.com www.bosch-home.es FI Suomi, Finland BSH Kodinkoneet Oy Itälahdenkatu 18 A, PL 123 00201 Helsinki Tel.: 0207 510 700 Fax: 0207 510 780 mailto:Bosch-Service-FI@ bshg.com www.bosch-home.
ME Crna Gora, Montenegro Elektronika komerc Ul. 27 Mart br. 2 81000 Podgorica Tel./Fax: 020 662 444 Mobil: 069 324 812 mailto:ekobosch.servis@ t-com.me MK Macedonia, Македонија GORENEC Jane Sandanski 69 lok. 3 1000 Skopje Tel.: 02 2454 600 Mobil: 070 697 463 mailto:gorenec@yahoo.com MT Malta Oxford House Ltd. Notabile Road Mriehel BKR 14 Tel.: 021 442 334 Fax: 021 488 656 www.oxfordhouse.com.mt MV Raajjeyge Jumhooriyyaa, Maledives Lintel Investments Ma. Maadheli, Majeedhee Magu Malé Tel.
Garantiebedingungen DEUTSCHLAND (DE) Die nachstehenden Bedingungen, die Voraussetzungen und Umfang unserer Garantieleistung beschreiben, lassen die Gewährleistungsverpflichtungen des Verkäufers aus dem Kaufvertrag mit dem Endabnehmer unberührt. Für dieses Gerät leisten wir Garantie gemäß nachstehenden Bedingungen: Für Produktinformationen sowie Anwendungsund Bedienungsfragen aus Deutschland: Bosch-Infoteam (Mo-Fr: 8.00-18.00 Uhr erreichbar) Tel.: 01805 267242* oder unter bosch-infoteam@bshg.
Beratung bei Störungen • Advice on troubleshooting • Conseils sur les problèmes • Consejos sobre problemas de • Consulenza su problemi Service-Hotlines www.bosch-home.com AT 0810 700 400 BE 070 222 141 CH 043 455 4095 DE DK 01805 - 26 72 42 (0,14 €/Min, Mobil max.
Robert Bosch Hausgeräte GmbH Carl-Wery-Str. 34 81739 München Germany www.bosch-home.