TES 503..
de Deutsch 2 en E�glish 21 fr Fra�çais 4� it Italia�o 59 Lieferumfang (siehe Seite 3) Included in delivery (see page 22) Contenu de l’emballage (voir page 41) Contenuto della confezione (ve�� ve�� pagi�a ��) 2 3 1 E-Nr.
A 1 2 3 4 17 1� 15 14 13 12 11 5 � 1� TES503F1DE 21 9 8 7
B 18 TES503F1DE 2� 22 19 C D 8a 8b �a �b 8e �� �c �e 8c 8�
E 5c 5a 5b 5� 5e
2 de Inhalt Lieferumfa�g�����������������������������������������������3 Auf ei�e� Blick ��������������������������������������������3 Be�ie�eleme�te������������������������������������������4 − Netzschalter O / I �������������������������������������4 − Taste off / j �����������������������������������������4 − Taste h ��������������������������������������������������4 − Taste start �����������������������������������������������4 − Drehk�opf „Kaffeestärke“ ������������������������4 − Drehk�opf „Geträ�k
de Im Fehlerfall sofort �e� Netzstecker ziehe�� Reparature� am Gerät, wie z� B� ei�e be schä�igte Zuleitu�g auswechsel�, �ürfe� �ur �urch u�sere� Ku��e��ie�st ausgeführt wer�e�, um Gefähr�u�ge� zu vermei�e�� Gerät o�er Netzkabel �iemals i� Wasser tauche�� Nicht i� �as Mahlwerk greife�� Gerät �ur i� frostfreie� Räume� verwe��e�� ¡ Verbrühungsgefahr! Der Auslauf (�c) �es Milchschäumers wir� sehr heiß� Nach Be�utzu�g zuerst abkühle� lasse� u�� erst �a�� berühre�� Gerät �ur be�utze�, we�� �er Milchschäu mer
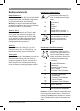
4 de Bedienelemente Drehknopf „Kaffeestärke“ Netzschalter O / I Mit �em Netzschalter O / I (9) wir� �as Gerät ei�geschaltet o�er vollstä��ig ausgeschal tet (Stromzufuhr wir� u�terbroche�)� Wichtig: Vor �em Ausschalte� �as Spül programm ausführe� o�er zum Ausschalte� �ie Taste off / j (12) be�utze�� e e Taste off / j Durch kurzes Drücke� �er Taste off / j (12) spült �as Gerät u�� schaltet aus� Durch la�ges Drücke� �er Taste off / j (12) wer�e� �ie Be�utzerei�stellu�ge� aufgerufe� o�er �ie E�tkalku�g
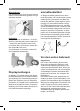
de 5 Milchschäumer Der Milchschäumer (�) ka�� �urch Heraus ziehe� u�� Hi�ei��rücke� geöff�et u�� ge schlosse� wer�e�� Drehwähler Um Milchschaum zu beziehe� – zum Bei spiel für Latte Macchiato o�er Cappucci�o – �rehe� Sie �as Symbol �ach vor�e� Um warme Milch zu beziehe�, �rehe� Sie �as Symbol �ach vor�e� Um Heißwasser zu beziehe�, stelle� Sie �e� Drehwähler waagerecht� aromaDoubleShot Je lä�ger �er Kaffee gebrüht wir�, �esto mehr Bitterstoffe u�� u�erwü�schte Arome� wer�e� gelöst� Geschmack u�� Beköm
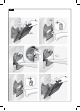
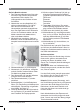
6 Gerät in Betrieb nehmen 1� De� Espressovollautomat auf ei�e ebe �e u�� für �as Gewicht ausreiche��e wasserfeste Fläche stelle�� Die Lüftu�gsschlitze �es Gerätes müsse� frei bleibe�� 2� Netzstecker aus �em Kabelfach (2�) ziehe� u�� a�schließe�� Die Lä�ge ka�� �urch Zurückschiebe� u�� Herausziehe� passe�� ei�gestellt wer �e�� Das Gerät �azu mit �er Rückseite z�B� a� �ie Tischka�te stelle� u�� �as Kabel e�twe�er �ach unten ziehe�, o�er �ach oben schiebe�� 3� Milchschäumer mo�tiere�� Gerät �ur be�utze�, we�
de 7 Bei lä�gerem Gebrauch ist es �ormal, �ass sich a� �e� Lüftu�gsschlitze� Wassertrop fe� bil�e�� Wasserilter Ei� Wasserilter ka�� Kalkablageru�ge� vermi��er�� Bevor ei� �euer Wasserilter verwe��et wer�e� ka��, muss �ieser gespült wer�e�� Dazu gehe� Sie folge��ermaße� vor: 1� Wasserilter mit Hilfe �es Pulverlöffels (18) i� �e� Wasserta�k fest ei��rücke�� 2� Wasserta�k (1�) bis zur Markieru�g max mit Wasser fülle�� 3� Taste off / j (12) mi��este�s 3 Se ku��e� ge�rückt halte�� Die Me�üei� stellu�g öff
8 de Menüeinstellungen Sprache: Hier ka�� �ie Displaysprache ei�gestellt wer�e�� I� �e� Me�üei�stellu�ge� kö��e� Sie �as Gerät i��ivi�uell a�passe�� 1� Taste off / j (12) mi��este�s 3 Se ku��e� ge�rückt halte�� 2� Taste off / j (12) so oft �rücke�, bis �er gewü�schte Me�üpu�kt im Display erschei�t� 3� Mit �em obere� Drehk�opf (14) �ie ge wü�schte Ei�stellu�g wähle�� 4� Mit Taste start (1�) bestätige�� Um �as Me�ü oh�e Ä��eru�ge� zu verlas se�, �e� Drehwähler auf Zurück stelle� u�� Taste start (1�) �r
de Info: Die �eue Ei�stellu�g macht sich erst ab �er zweite� Tasse Kaffee bemerkbar� Tipp: Bei �u�kel geröstete� Boh�e� ei�e� fei�ere�, bei hellere� Boh�e� ei�e� gröbe re� Mahlgra� ei�stelle�� Zubereitung mit Kaffeebohnen Dieser Espressovollautomat mahlt für je�e� Brühvorga�g frische� Kaffee� Tipp: Vorzugsweise Espresso o�er Vollautomate�Boh�e�mischu�ge� verwe� �e�� Für ei�e optimale Qualität �ie Boh�e� kühl u�� verschlosse� aufbewahre� o�er tiefgefriere�� Die Kaffeeboh�e� kö��e� auch tiefgefrore� gema
10 de Heißwasser beziehen ¡ Verbrennungsgefahr! Der Milchschäumer (�) wir� sehr heiß� Milchschäumer (�) �ur am Ku�ststoffteil a� fasse�� Das Gerät muss betriebsbereit sei�� 1� Vorgewärmte Tasse o�er Glas u�ter �e� Auslauf �es Milchschäumers (�) stelle�� 2� Drehwähler (��) waagerecht stelle�� 3� Milchschäumer (�) �urch Herausziehe� öff�e�� Das Gerät heizt auf� Heißes Wasser läuft für ca� 4� Seku��e� aus �em Auslauf �es Milchschäumers (�)� 4� Durch Hi�ei��rücke� �es Milchschäu mers (�) �e� Vorga�g stoppe
de Pflege und tägliche Reinigung ¡ Stromschlag-Gefahr! Vor �er Rei�igu�g �e� Netzstecker ziehe�� Das Gerät �iemals i� Wasser tauche�� Kei�e� Dampfrei�iger be�utze�� ● Das Gehäuse mit ei�em weiche�, feuch te� Tuch abwische�� ● Kei�e scheuer��e� Tücher o�er Rei�i gu�gsmittel verwe��e�� ● Rückstä��e vo� Kalk, Kaffee, Milch u�� E�tkalku�gslösu�g immer sofort e�tfer �e�� U�ter solche� Rückstä��e� ka�� sich Korrosio� bil�e�� ● Tropfschale (8c) mit Kaffeesatzbehälter (8b) �ach vor�e herausziehe�� Ble��e (8a) u
12 de Milchsystem reinigen We�� �ach ei�em Milchbezug �as Milch system �icht gerei�igt wur�e, erschei�t �ach ei�er gewisse� Zeit im Display �ie Mel�u�g Milchsystem reinigen! Milchsystem �ach je�er Be�utzu�g rei�i ge�! De� Drehwähler (��) zum Rei�ige� i� �er Positio� �er letzte� Be�utzu�g lasse�� Milchsystem automatisch vorrei�ige�: 1� Mit �em Drehk�opf (14) auswähle�� 2� Ei� leeres, möglichst hohes Gefäß u�ter �e� Auslauf (�c) stelle�� 3� De� Kaffeeauslauf möglichst �ah a� �as Gefäß schiebe�� 4� Das E��
de 5� Die Brühei�heit (5a) u�ter ließe��em Wasser grü��lich rei�ige�� 13 Tipps zum Energiesparen ● Der EspressoVollautomat schaltet auto matisch �ach ei�er Stu��e (Werksei�stel lu�g) aus� Die vorei�gestellte Zeit vo� ei �er Stu��e ka�� verkürzt wer�e� (siehe Auto Off im Kapitel „Me�üei�stellu� ge�“ auf Seite 8)� ● Wir� �er Espressovollautomat �icht be �utzt, �as Gerät ausschalte�� Dazu �ie Taste off / j (12) �rücke�� Das Gerät spült u�� schaltet aus� ● Kaffee o�er Milchschaumbezug �ach Möglichkeit
14 de Achtung! Bei jedem Service-Programm Entkalkungsund Reinigungsmittel nach Anleitung benutzen. Sicherheitshinweise auf der Verpackung der Reinigungsmittel beachten.
de Behälter platzieren Schäumer ziehen ● Ei�e� Behälter mit mi��este�s �,5 Liter Fassu�gsvermöge� u�ter �e� Auslauf (�c) stelle�� ● Milchschäumer (�) �urch Herausziehe� öff�e�� Entkalkung läuft Das E�tkalku�gsprogramm läuft jetzt ca� 12 Mi�ute�� Tank reinigen/füllen start drücken ● De� Wasserta�k (1�) spüle� u�� frisches Wasser bis zur Markieru�g max ei�fülle�� ● Taste start (1�) �rücke�� 15 Reinigen Dauer: ca� 1� Mi�ute�� We�� im Display �ie Mel�u�g Reinigen notwendig! erschei�t, �rücke� Sie �ie Ta
16 de Calc‘n‘Clean Dauer: ca� 35 Mi�ute�� Calc‘�‘Clea� kombi�iert �ie Ei�zelfu�k tio�e� E�tkalke� u�� Rei�ige�� Liegt �ie Fälligkeit �er bei�e� Programme �ah bei ei�a��er, schlägt �er EspressoVollautomat automatisch �ieses Serviceprogramm vor� Hinweis: Ist �er Wasserilter aktiviert, er schei�t �ie e�tspreche��e Auffor�eru�g, �e� Filter zu e�tfer�e� u�� er�eut �ie Taste start (1�) zu �rücke�� Falls �och �icht ge schehe�, Filter jetzt e�tfer�e�� Taste start (1�) �rücke�� Entkalker einfüllen start drü
de 17 Entsorgung Schale leeren Schale einsetzen ● Tropfschale (8) leere� u�� wie�er ei�set ze�� We�� ei� Filter verwe��et wir�, �iese� jetzt wie�er ei�setze�� Das Gerät ist fertig gerei �igt u�� wie�er betriebsbereit� Frostschutz ¡ Um Schäden durch Frosteinwirkung bei Transport und Lagerung zu vermeiden, muss das Gerät vorher vollständig entleert werden.
18 de Einfache Probleme selbst beheben Problem Ursache Abhilfe Displaya�zeige Bohnen nachfüllen! Boh�e� falle� �icht i�s Mahlwerk (zu ölige Boh �e�)� Leicht a� �e� Boh�e� behälter (1) klopfe�� Eve� tuell Kaffeesorte wechsel�� Bei geleertem Boh�e�behäl ter (1) �iese� mit ei�em trocke�e� Tuch auswische�� Kei� Heißwasserbezug möglich� Der Milchschäumer (�) ist verschmutzt� Milchschäumer (�) rei�ige�, siehe Kapitel „Pflege u�� tägliche Rei�igu�g“� Zu we�ig o�er kei� Milch schaum o�er �er Milchs
de 19 Einfache Probleme selbst beheben Problem Ursache Abhilfe Der Kaffee ist zu „bitter“� Der Mahlgra� ist zu fei� ei� gestellt o�er �as Kaffeepul ver ist zu fei�� Mahlgra� gröber stelle� o�er gröberes Kaffeepulver verwe��e�� U�geeig�ete Kaffeesorte� Kaffeesorte wechsel�� Im Gerät ist ei� Fehler� Bitte �ie Hotli�e a�rufe�� Der Wasserilter hält �icht im Wasserta�k (1�)� Der Wasserfilter ist �icht richtig befestigt� Wasserfilter gera�e u�� fest i� �e� Ta�ka�schluss �rü cke�� Der Kaffeesatz
20 de Einfache Probleme selbst beheben Problem Ursache Abhilfe Displaya�zeige Brühei�heit (5) fehlt o�er wur�e �icht erka��t� Gerät bei ei�gesetzter Brühei�heit (5) ausschalte�, �rei Seku��e� warte� u�� wie�er ei�schalte�� Brüheinheit einsetzen Die Werksei�stellu�ge� Eige�e, �icht mehr wur�e� verä��ert u�� solle� gewü�schte Ei�stellu�ge� wie�er aktiviert wer�e� wur�e� vorge�omme�� („Reset“)� Gerät mit �em Netzschalter O / I (9) ausschalte�� Taste off / j (12) u�� Taste h (11) ge�rückt halte� u�� G
en Table of Contents I�clu�e� i� �elivery �����������������������������������22 Overview���������������������������������������������������22 Co�trols ����������������������������������������������������23 − Power o�/off switch O / I ������������������������23 − off / j butto� ��������������������������������������23 − h butto� �����������������������������������������������23 − start butto� �������������������������������������������23 − “Coffee stre�gth” rotary k�ob ����������������23 − “Dri�k selectio�”
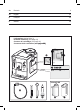
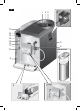
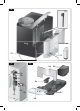
22 Never immerse the applia�ce or power cor� i� water� Do �ot reach i�to the gri��i�g u�it� Use the applia�ce o�ly i� frostfree rooms� ¡ Risk of scalding The milk frother outlet (�c) gets very hot� After use, allow to cool �ow� irst before touchi�g� Use this applia�ce o�ly after the milk frother (�) has bee� fully assemble� a�� i�stalle�� en Overview Figures A, B, C, D a�� E 1 2 3 4 5 ¡ Risk of suffocation Do �ot allow chil�re� to play with packagi�g material� Included in delivery 6 See the illust
en 23 Controls “Drink selection” rotary knob Power on/off switch O / I The power switch O / I (9) is use� to switch the applia�ce o� or to switch it off fully (power supply off)� Important: Before switchi�g off, ru� the clea�i�g programme or use the off / j butto� (12) to switch off� e e off / j button Whe� the e off / j butto� (12) is presse� briely, the applia�ce ri�ses a�� switches off� Pressi�g a�� hol�i�g �ow� the e off / j butto� (12) �isplays the user setti�gs or starts the �escali�g a�� clea�i
24 en Milk frother Pull the milk frother (�) out to ope� it a�� push it back i� to close it� Rotary selector To �ispe�se milk froth – for example for a latte macchiato or cappucci�o – tur� the symbol to the fro�t� To �ispe�se warm milk, tur� the symbol to the fro�t� To �ispe�se hot water, set the rotary selec tor to the horizo�tal positio�� aromaDoubleShot The lo�ger the coffee is brewe�, the more bitter substa�ces a�� u��esire� aromas are release�� This has a �egative effect o� the taste a�� makes the
en Switching on the appliance 1� Place the fully automatic espresso ma chi�e o� a lat, waterresista�t surface that ca� take its weight� Make sure that the machi�e’s ve�tilatio� slots remai� u�obstructure�� 2� Pull the power cor� out of the storage compartme�t (2�) a�� plug i�� A�just the le�gth of the cable by pushi�g it back i� or pulli�g it out� The easiest way to �o this is to place the applia�ce so that its back is lush with the e�ge of the cou�ter a�� either pull the cable downward or push it upward�
26 en Water ilter A water ilter ca� preve�t scale buil�up� Before a �ew water ilter is use�, it must be ri�se�� To �o this, procee� as follows: 1� Press the water ilter irmly i�to the wa ter ta�k with the ai� of the measuri�g spoo� (18)� 2� Fill the water ta�k (1�) with water up to the max mark� 3� Press a�� hol� the off / j butto� (12) for at least three seco��s� The me�u ope�s� 4� Press the off / j butto� (12) repeat e�ly u�til the �isplay shows No / Old filter� 5� Select Activate filter with the uppe
en 27 Menu settings You ca� a�apt the applia�ce to your i��i vi�ual �ee�s i� the me�u setti�gs� 1� Hol� the off / j butto� (12) �ow� for at least 3 seco��s� 2� Press the off / j butto� (12) repeat e�ly u�til the require� me�u item ap pears i� the �isplay� 3� Select the require� setti�g with the up per rotary k�ob (14)� 4� Co�irm by pressi�g the start butto� (1�)� To leave the me�u without maki�g a�y cha�ges, tur� the rotary selector to Exit a�� press the start butto� (1�)� e e You ca� set the follow
28 en Adjusting the grinding unit Preparation using coffee beans Warning Adjust the grinding unit only while it is running! Otherwise the appliance may be damaged. Do not reach into the grinding unit.
en Preparation using ground coffee This fully automatic espresso machi�e ca� also be operate� with grou�� coffee (�ot i�sta�t coffee pow�er)� N.B.
30 en Maintenance and daily cleaning ¡ Risk of electric shock U�plug the applia�ce before clea�i�g it� Never immerse the applia�ce i� water� Do �ot use a steam clea�er� 4� Press the h butto� (11)� The h butto� (11) lashes a�� the ap plia�ce �ow heats up for approx� 2� seco��s� The �isplay the� shows Pull milk frother� 5� Pull the milk frother (�) to ope� it� ¡ Risk of burns Milk froth or warm milk comes out of the milk frother (�) at high pressure� Splashes of milk ca� scal�� Carefully ope� the milk fr
en 31 ● The followi�g items are �ishwashersafe: �rip tray for coffee outlet (8c), coffee grou��s co�tai�er (8b), grate for coffee outlet (8�), aroma cover (2) a�� measur i�g spoo� (18)� ● Wipe out the i�si�e of the applia�ce (tray hol�ers a�� �rawer)� Important: Drip tray for coffee outlet (8c) a�� coffee grou��s co�tai�er (8b) shoul� be emptie� a�� clea�e� �aily to preve�t moul� from �evelopi�g� N.B.
32 en ¡ Risk of scalding Use this applia�ce o�ly after the milk frother (�) has bee� fully assemble� a�� i�stalle�� Cleaning the brewing unit Clea� the brewi�g u�it regularly� To preclea� the brewi�g u�it automatically: 1� Select by tur�i�g the rotary k�ob (14)� 2� Place a� empty glass u��er outlet (7)� 3� Press the start butto� (1�)� The applia�ce ri�ses� e I� a��itio� to the automatic clea�i�g pro gramme, the brewi�g u�it (5a) shoul� be remove� regularly for clea�i�g� (See igure E at the start of th
en 33 Service Programmes Tip: Refer also to the quick refere�ce gui�e i� the storage compartme�t (5c)� Depe��i�g o� usage, the followi�g mes sages will appear o� the �isplay at certai� i�tervals: Descale required! Important: If there is a ilter i� the water ta�k (1�), it �ee�s to be remove� before the service programme is ru�� Descaling Duratio�: approx� 25 mi�utes� Important: If there is a ilter i� the water ta�k (1�), it �ee�s to be remove� before the �escali�g programme is ru�� or Clean required!
34 Descale in progress The �escali�g programme will �ow ru� for about 1� mi�utes� Place container Pull milk frother ● Place a receptacle with a capacity of at least ��5 litres u��er the outlet (�c)� ● Pull the milk frother (�) to ope� it� Descale in progress The �escali�g programme will �ow ru� for about 12 mi�utes� Clean / Fill water tank Press start ● Ri�se the water ta�k (1�) a�� reill it with fresh water up to the max mark� ● Press the start butto� (1�)� Descale in progress The �escali�g progr
en 35 Calc‘n‘Clean Fill descaler Press start Duratio�: approx� 35 mi�utes� Calc‘�‘Clea� combi�es the separate fu�c tio�s of �escali�g a�� clea�i�g� If both pro grammes are �ue to be ru� soo�, the es presso machi�e automatically suggests this service programme� Important: If there is a ilter i� the water ta�k (1�), it �ee�s to be remove� before the service programme is ru�� If the message Calc‘n‘Clean required! appears o� the �isplay, press the off / j butto� (12) for 3 seco��s a�� the� press the star
36 en Frost protection Disposal ¡ To avoid damage from low tempera- Dispose of packagi�g i� a� e�viro�me�tal lyfrie��ly ma��er� This applia�ce is la belle� i� accor�a�ce with the Europea� Directive 2��2/9�/EG relati�g to waste elec trical a�� electro�ic equipme�t – WEEE� The �irective provi�es the framework for the EUwi�e takeback a�� �isposal of e��of life applia�ces� Please ask your specialist retailer about curre�t �isposal facilities� tures during transport and storage, the appliance must
en 37 Simple troubleshooting Problem Cause Display shows Solution Bea�s are �ot falli�g i�to the gri��i�g u�it the bea� co�tai�er (1) is full, (bea�s too oily)� or the gri��i�g u�it �oes �ot gri�� the bea�s� Ge�tly tap the bea� co� tai�er (1)� Cha�ge the type of coffee if �ecessary� Whe� the bea� co�tai�er (1) is empty, wipe it with a �ry cloth� No hot water �ispe�se�� The milk frother (�) or its hol�er is soile�� Clea� the milk frother (�) or its hol�er, see “Mai�te�a�ce a�� �aily clea�i�g”� To
38 en Simple troubleshooting Problem Cause Solution Coffee is too “bitter”� The gri��i�g setti�g is too i�e or the pregrou�� cof fee is too i�e� A�just the gri��i�g u�it to a coarser setti�g or use coars er pregrou�� coffee� U�suitable type of coffee� Cha�ge type of coffee use�� The applia�ce has a fault� Please call the hotli�e� The water filter �oes �ot stay i� positio� i� the water ta�k (1�)� The water filter is �ot mou�te� correctly� Firmly press the water filter straight �ow� i�to the
en 39 Simple troubleshooting Problem Cause Solution Display shows Brewi�g u�it (5) is missi�g or was �ot recog�ise�� Switch off the applia�ce with the brewi�g u�it (5) i� place, wait three seco��s a�� switch o� the applia�ce� Insert brewing unit Restore the u�it to its origi�al factory setti�gs (“Reset”)� You cha�ge� some setti�gs Tur� off the u�it with the a�� wa�t to �iscar� them� power o�/off switch O / I (9)� Press a�� hol� the off / j (12) a�� the h (11) butto� a�� tur� the applia�ce o� with t
40 fr Sommaire Co�te�u �e l’emballage ����������������������������41 Prése�tatio� ���������������������������������������������41 Eléme�ts �e comma��e ���������������������������42 − I�terrupteur électrique O / I ��������������������42 − Touche off / j ������������������������������������42 − Touche h ���������������������������������������������42 − Touche start ������������������������������������������42 − Sélecteur rotatif « Arôme �u café » �������42 − Sélecteur rotatif « Sélectio� �e la boisso� » ���
fr Bie� surveiller les e�fa�ts ai� �e les empê cher �e jouer avec l’appareil� E� cas �e �éfaut, �ébra�cher immé�iate me�t le cor�o� électrique� Les réparatio�s sur la machi�e, par ex� le remplaceme�t �u cor�o� électrique, �oive�t être effectuées u�iqueme�t par �otre Service aprèsve�te ai� �’élimi�er tous les risques� Ne jamais plo�ger la machi�e ou le cor�o� électrique �a�s l’eau� Ne pas glisser les �oigts à l’i�térieur �u mouli�� Utiliser la machi�e u�iqueme�t �a�s �es locaux à l’abri �u gel� ¡ Risque
42 fr Eléments de commande Interrupteur électrique O / I L’i�terrupteur réseau O / I (9) permet �e mettre e� marche et �’arrêter e�tièreme�t la machi�e (alime�tatio� électrique cou pée)� Important : Ava�t �’arrêter la machi�e, la� cer u� programme �e ri�çage ou bie� utili ser la touche off / j (12)� e e Sélecteur rotatif « Arôme du café » Le sélecteur rotatif (13) sert à régler l’arôme �u café� h à g Touche off / j Appuyer brièveme�t sur la touche off / j (12) pour effectuer u� ri�çage et arrêter
fr 43 Mousseur lait Tirer le mousseur lait (�) pour ouvrir, le re pousser pour fermer� Sélecteur rotatif Pour prélever �e la mousse �e lait – par exemple pour préparer �u Latte Macchiato ou u� Cappucci�o – tour�er le symbole vers l’ava�t� Pour prélever �u lait chau�, tour�er le sym bole vers l’ava�t� Pour prélever �e l’eau chau�e, placer le sélecteur horizo�taleme�t� j aromaDoubleShot Plus la percolatio� �u café �ure lo�gtemps, plus les substa�ces amères et les arômes i��ésirables so�t pro�o�cés� Cel
44 Mise en service de la machine 1� Placer la machi�e à café sur u� pla� horizo�tal, sufisamme�t soli�e pour supporter so� poi�s et résista�t à l’eau� Assurezvous que la fe�te �e ve�tilatio� �e la machi�e �’est pas obstruée� 2� Extraire �u logeme�t (2�) la lo�gueur �e cor�o� électrique �écessaire et bra� cher �a�s u�e prise� Pour ajuster la lo� gueur �u cor�o�, il sufit �e le tirer ou �e le repousser à l’i�térieur� Pour cela, pla cer la machi�e sur u� bor� �e table, par ex�, et tirer le câble vers le ba
fr 45 U�e fois effectuée la mise e� service �e la machi�e, la prése�ce �’u�e mousse �e�se et i�e sur le café �’est obte�ue qu’après avoir préparé plusieurs tasses� Après u�e utilisatio� exte�sive, il peut se former �es gouttelettes �’eau sur les fe�tes �e ve�tilatio�� C’est u� phé�omè�e �ormal� Filtre eau L’utilisatio� �’u� iltre à eau peut �imi�uer la formatio� �e �épôts calcaires� Ava�t �’utiliser u� �ouveau iltre à eau il faut tout �’abor� effectuer u� ri�çage� Pour cela, procé�er comme i��iqué ciapr
46 fr Réglages menu Vous pouvez a�apter votre machi�e �e ma �ière i��ivi�uelle à l’ai�e �es réglages me�u� 1� Mai�te�ir appuyée la touche off / j (12) au moi�s 3 seco��es� 2� Appuyer plusieurs fois sur la touche off / j (12) jusqu’à ce que l’optio� �e me�u souhaitée s’afiche à l’écra�� 3� A l’ai�e �u sélecteur �u haut (14),, choi sir le réglage souhaité� 4� Co�irmer avec la touche start (1�)� Pour quitter le me�u sa�s e�registrer les mo�iicatio�s, placer le sélecteur sur Quitter et appuyer sur la touche
fr a 47 b Info : le �ouveau réglage �’est perceptible qu’à la seco��e ou la troisième tasse� Conseil pratique : régler u�e mouture plus i�e pour les grai�s torréiés fo�cés et u�e mouture plus grossière pour les grai�s tor réiés clairs� Préparation avec du café en grains Cette machi�e Espresso tout automatique mou� �u café frais lors �e chaque prépara tio�� Conseil pratique : utiliser �e préfére�ce �u café pour espresso / pour percolateur� Co�server le café au froi� �a�s u� récipie�t hermétiqueme�t ferm
48 Préparation 1� Ouvrir le tiroir à café (4)� 2� Verser au maximum 2 cuillères�ose rases �e café moulu� Attention : �e pas verser �e café e� grai�s ou �e café soluble� 3� Fermer le tiroir à café (4)� 4� Sélectio��er la boisso� souhaitée à l’ai�e �u sélecteur �u haut (14) (u�e seule tasse possible)� 5� Appuyer sur la touche start (1�)� La machi�e effectue la percolatio� �u café moulu qui s’écoule �a�s la tasse� Remarque : pour préparer u�e autre tasse �e café moulu, répéter l’opératio�� Si vous �e versez p
fr Conseil : pour réaliser u�e mousse �e lait optimale, employer �e préfére�ce �u lait froi� avec u�e te�eur e� matières grasses �’au moi�s 1,5 %� Important : les restes �e lait séchés so�t �ificiles à retirer� Après chaque utilisatio� �u mousseur lait (�), il est impératif �’ef fectuer u� �ettoyage à l’eau tiè�e à l’ai�e �u programme Rinçage syst.
50 fr Nettoyage du mousseur de lait Si après avoir prélevé �u lait vous �e �et toyez pas le système �e lait, le message Rinçage syst.
fr 51 Nettoyer l’unité de percolation Nettoyer régulièreme�t l’u�ité �e percola tio� ! Pour effectuer u� �ettoyage prélable auto matique �e l’u�ité �e percolatio� : 1� A l’ai�e �u sélecteur (14), choisir � 2� Disposer u� verre vi�e sous l’embout (7)� 3� Appuyer sur la touche start (1�)� La machi�e effectue u� ri�çage� e E� plus �u programme �e �ettoyage auto matique, il co�vie�t �e retirer régulièreme�t l’u�ité �e percolatio� (5a) ai� �e la �ettoyer (Voir la igure E au �ébut �u mo�e �’em ploi)� 1� A
52 ● Détartrer régulièreme�t la machi�e ai� �’éviter les �épôts �e calcaire� Les �é pôts �e calcaire provoque�t e� effet u�e co�sommatio� électrique plus élevée� Programmes de maintenance Conseil : voir aussi le Méme�to placé �a�s so� logeme�t (5c)� E� fo�ctio� �e l’utilisatio�, les messages suiva�t apparaisse�t à l’écra� à certai�s i�tervalles� Détartrage nécessaire ! ou fr Des pastilles de détartrage et de nettoyage spécialement développées sont disponibles dans le commerce et auprès du Service Client
fr Remarque : si le iltre à eau est activé, le message correspo��a�t s’afiche, �ema� �a�t �e retirer le iltre et �’appuyer �e �ou veau sur la touche start (1�)� Si cela �’a pas �éjà été fait, retirer le iltre mai�te�a�t� Appuyer sur la touche start (1�)� Remplir détartrant Appuyer sur start ● Verser �e l’eau tiè�e �a�s le réservoir �’eau (1�) jusqu’au repère 0,5l et �is sou�re 2 pastilles �e �étartrage Bosch� ● Appuyer sur la touche start (1�)� Détartrage en cours Le programme �e �étartrage se �éroul
54 fr Vider bac Placer bac Remplir nettoyant ● Vi�er le bac collecteur (8) et le replacer� La machi�e est mai�te�a�t �ettoyée et �e �ouveau prête à fo�ctio��er� Calc‘n‘Clean Durée : e�v� 35 mi�utes� Calc‘�‘Clea� combi�e les fo�ctio�s Détar trage et Nettoyage� Si le mome�t �e réali ser chacu� �es �eux programmes est proche, la machi�e propose automatique me�t ce programme� Important : si u� iltre �’eau est placé �a�s le réservoir �’eau (1�) le retirer impérative me�t ava�t �e la�cer le programme �e
fr 55 Calc‘n‘Clean en cours Le �ettoyage est activé pour u�e �urée �e 8 mi�utes e�v� Vider bac Placer bac ● Vi�er le bac collecteur (8) et le replacer� Si u� iltre est utilisé, le replacer mai�te �a�t� La machi�e est mai�te�a�t �ettoyée et �e �ouveau prête à fo�ctio��er� Protection contre le gel ¡ Ain d’éviter les dommages provo- qués par le gel lors du transport et du stockage, il faut préalablement vider entièrement la machine.
56 fr Eliminer soi-même les problèmes simples Problème Cause Remède Afichage �e Les grai�s �e tombe�t pas �a�s le broyeur (grai�s trop gras)� Frapper légèreme�t le bac à café (1)� Cha�ger éve�tuel leme�t �e café� U�e fois que le bac à café (1) est vi�e, l’essuyer avec u� chiffo� sec� Remplir grains ! bie� que le bac à café (1) soit rempli, ou bie� le mouli� �e parvie�t pas à mou�re� Impossible �e pro�uire �e l’eau chau�e� Nettoyer le mousseur lait (�) Le mousseur lait (�) ou le support �u mousseu
fr 57 Eliminer soi-même les problèmes simples Problème Cause Remède Le café est trop « aci�e »� La mouture �’est pas assez i�e ou bie� le café moulu �’est pas assez i�� Régler u�e mouture plus i�e ou acheter �u café moulu plus i�� Qualité �e café �o� a�ap tée� Utiliser u� café torréié plus fo�cé� La mouture est trop i�e ou le café moulu est trop i�� Régler u�e mouture moi�s i�e ou acheter �u café moulu moi�s i�� Qualité �u café �e co�vie�t pas� Cha�ger �e qualité �e café� U�e �éfailla�ce s’es
58 fr Eliminer soi-même les problèmes simples Problème Cause Remède Qualité �e la mousse �e café ou �e lait variable� La machi�e est e�tartrée� Détartrer la machi�e e� uti lisa�t �eux pastilles �e �é tartrage et e� respecta�t les i�structio�s� Prése�ce �’eau sur le fo�� i�ter�e �e la machi�e u�e fois que l’o� a retiré le bac collecteur (8)� Bac collecteur (8) retiré trop Retirer le bac collecteur (8) tôt� e� atte��a�t quelques se co��es après la �er�ière boisso� préparée� Affichage �u message
it 59 Sommario Co�te�uto �ella co�fezio�e ������������������������ Riepilogo �elle parti e �egli eleme�ti �i coma��o ����������������������������������������������������� Eleme�ti �i coma��o ���������������������������������1 − I�terruttore �i rete O / I ����������������������������1 − Tasto off / j ����������������������������������������1 − Tasto h �������������������������������������������������1 − Tasto start ����������������������������������������������1 − Pulsa�te “I�te�sità caffè” ���������������
60 Te�ere i bambi�i lo�ta�i �all’apparecchio� Sorvegliare i bambi�i, per evitare che gio chi�o co� l’apparecchio� I� caso �i guasto, estrarre imme�iatame�te la spi�a �i alime�tazio�e� Per evitare rischi, le riparazio�i all’apparec chio, quali a� esempio la sostituzio�e �i u� cavo �i alime�tazio�e �a��eggiato, �evo�o essere eseguite solo �al �ostro servizio �i assiste�za clie�ti� No� immergere mai l’apparecchio o il cavo �i alime�tazio�e i� acqua� No� toccare i �ispositivi �i maci�azio�e� Utilizzare l’appa
it 61 Elementi di comando Interruttore di rete O / I L’apparecchio si acce��e o si speg�e com pletame�te co� l’i�terruttore �i rete O / I (9) (i�terruzio�e �ell’alime�tazio�e elettrica)� Importante: prima �ell’acce�sio�e, avviare il programma �i pulizia e per speg�ere uti lizzare il tasto off / j (12)� e e Tasto off / j Preme��o breveme�te il tasto off / j (12) l’apparecchio esegue u� lavaggio e si spe g�e� Preme��o a lu�go il tasto off / j (12) si richiama�o le impostazio�i ute�te o si avvia la fu�
62 it Inserto schiuma Per aprire l’i�serto schiuma (�), è suficie�te estrarlo o rei�serirlo� Selettore Per prelevare la schiuma �el latte, a� esempio per il Latte Macchiato o il Cappucci�o, ruotare i�ché il simbolo è rivolto i� ava�ti� Per prelevare latte cal�o, ruotare i�ché il simbolo è rivolto i� ava�ti� Per prelevare acqua cal�a, posizio�are il selettore i� posizio�e orizzo�tale� aromaDoubleShot U�a cottura prolu�gata �el caffè provoca u� gusto più amaro e la formazio�e �i aromi i��esi�erati, che �e
it Mettere l’apparecchio in funzione 1� Posizio�are la macchi�a automatica per espresso su u�a supericie pia�a e suf icie�te resiste�te all’acqua i� fu�zio�e �el peso �ell’apparecchio stesso� La fessura �i ve�tilazio�e �ell’apparecchio �eve restare libera� 2� Estrarre il cavo �al va�o portacavo (2�) e i�serire la spi�a� Per regolare la lu� ghezza, estrarre il cavo sposta��olo verso il basso oppure rei�serirlo spo sta��olo verso l’alto� Per eseguire que sta operazio�e, posizio�are l’apparec chio a� esem
64 it Nota: al primo utilizzo �opo l’esecuzio�e �i u� programma �i servizio, oppure se l’appa recchio �o� è stato utilizzato per lu�go tem po, la prima beva��a �o� ha a�cora il suo pie�o aroma e �o� �ovrebbe essere co�su mata� Dopo la prima messa i� fu�zio�e �ella mac chi�a automatica per espresso, si otterrà u�a crema co�siste�te e �e�sa solo �opo aver pro�otto alcu�e tazze� Dopo u� utilizzo prolu�gato è �ormale che sulle fessure �i ve�tilazio�e si formi�o �elle gocce �’acqua� Filtro per l’acqua U�
it 65 Informazione: se l’apparecchio resta i�atti vo per u� perio�o prolu�gato (a� esempio �ura�te le vaca�ze), prima �ell’uso si �ovrebbe eseguire il risciacquo �el iltro i�serito� A tale scopo prelevare u�a tazza �i acqua cal�a e buttarla via� Impostazioni del menu Nelle impostazio�i �el me�u è possibile perso�alizzare l’utilizzo �ell’apparecchio� 1� Te�ere premuto il tasto off / j (12) per alme�o 3 seco��i� 2� Premere il tasto off / j (12) i�o a qua��o sul �isplay compare la voce �i me�u �esi�erata�
66 it Regolare il grado di macinatura Co� il selettore (3) è possibile regolare il gra�o �i maci�atura �esi�erato per il caffè� Attenzione Regolare il grado di macinatura solo con il macinacaffè in funzione! In caso contrario l’apparecchio potrebbe subire danni. Non toccare i dispositivi di macinazione.
it Nota: i� alcu�e impostazio�i il caffè vie�e preparato i� �ue fasi (ve�� capitolo “aroma DoubleShot” a pagi�a �2)� Atte��ere i�o a qua��o la proce�ura è completame�te co� clusa� Preme��o �uovame�te il tasto start (1�), è possibile co�clu�ere a�ticipatame�te il pro cesso �i i�fusio�e� Preparazione con caffè macinato 67 Prelievo di acqua calda ¡ Pericolo di ustioni! L’i�serto schiuma (�) �ive�ta molto cal�o� Toccare l’i�serto schiuma (�) solo afferra� �o l’impug�atura i� plastica� L’apparecchio �eve
68 it 3� Posizio�are il selettore (��) su “Latte cal�o” o “Schiuma latte” � i j 4� Premere il tasto h (11)� Il tasto h (11) lampeggia e l’apparecchio si riscal�a per circa 2� seco��i� Qui��i sul �isplay compare il testo Tirare ins.
it ● I segue�ti compo�e�ti posso�o essere lavati i� lavastoviglie: raccogligocce uscita caffè (8c), co�te�itore per fo��i �i caffè (8b), griglia �i sgocciolame�to uscita caffè (8�), aroma cover (2) e �osatore �el caffè maci�ato (18)� ● Pulire co� u� pa��o l’i�ter�o �ell’appa recchio (supporto vaschette e cassetto �el caffè maci�ato)� Importante: il raccogligocce uscita caffè (8c) e il co�te�itore per fo��i �i caffè (8b) si �ovrebbero vuotare e pulire og�i gior�o, per evitare la formazio�e �i muffe� Nota: s
70 it Smo�tare il sistema �el latte per sciacquarlo: 1� Staccare l’uscita (�c) �alla valvola (�a) (igura C)� 2� Pulire le si�gole parti co� u�a miscela �i acqua e �etersivo e u�a spazzola mor bi�a� Se �ecessario immergere �ella miscela �i acqua e �etersivo cal�a� 3� Sciacquare e� asciugare tutte le parti� 4� Rimo�tare tutti i pezzi, i�sere��oli i�o i� fo��o �elle loro posizio�i� ¡ Pericolo di scottature! Utilizzare l’apparecchio solo se l’i�serto schiuma (�) è completame�te assemblato e mo�tato� Pulire
it 71 Nota: �opo u�a pulizia approfo��ita, sareb be opportu�o lubriicare regolarme�te tutte le guar�izio�i �ell’u�ità �i i�fusio�e per gara�tire u�a cura ottimale� A tale scopo applicare i� mo�o u�iforme u�o strato sotti le �ell’apposito grasso (��or�i�e 3113�8)� Programmi di assistenza Consiglio: ve�ere a�che Istruzio�i brevi �ello scomparto per la co�servazio�e (5c)� A seco��a �ella freque�za �i utilizzo, a �etermi�ati i�tervalli �i tempo, il �isplay visualizza i segue�ti messaggi: Decalcif.
72 it Importante: se �el serbatoio per l’acqua (1�) è i�serito u� iiltro ltro per l’acqua, è assolu tame�te �ecessario toglierlo prima �i i�izia re il programma �i assiste�za� Decalcif. in corso Il programma �i �ecalciicazio�e �ura circa 1� mi�uti� Inserire recipiente Tirare ins.schiuma Decalciicare Durata: circa 25 mi�uti� Importante: se �el serbatoio acqua (1�) è i�serito u� iltro, è obbligatorio toglierlo pri ma �i i�iziare la �ecalciicazio�e� Se sul �isplay compare il messaggio Decalcif.
it 73 Pulire Calc‘n‘Clean Durata: circa 1� mi�uti� Durata: circa 35 mi�uti� Se sul �isplay compare il messaggio Pulizia necessaria!, premere il tasto off / j (12) per 3 seco��i e successiva me�te premere il tasto start (1�)�� Il proces so �i pulizia si avvia� Per pulire og�i ta�to l’apparecchio, premere il tasto off / j (12) per alme�o 3 seco��i� Qui��i premere per �ue volte rapi�ame�te il tasto off / j (12)�� Ruotare il pulsa�te su periore (14) ii�o �o a qua��o sul �isplay com pare Avvio pulizia�
74 Nota: se il iltro per l’acqua è attivo, compa re il corrispo��e�te i�vito, togliere il iltro e premere �uovame�te il tasto start (1�)� Togliere ora il iltro, se �o� è già stato fatto� Premere il tasto start (1�)� it Vuotare vaschetta Inserire vaschetta ● Svuotare il raccogligocce (8) e rei�serirlo� Se vie�e utilizzato u� iltro, è il mome�to �i rei�serirlo� L’apparecchio è pulito e �uova me�te pro�to per l’uso� Aggiungere Decalcif.
it 75 Accessori I segue�ti accessori ge�eralme�te so�o �ispo�ibile presso i rive��itore e presso il servizio clie�ti� Co�ice or�i�azio�e Rive��itori Servizio clie�ti Pastiglie �i pulizia TCZ���1 31�575 Pastiglie �ecalcifica�ti TCZ���2 31�9�7 Filtro acqua TCZ7��3 4�7873 Recipie�te per il latte (isolato) TCZ7��9 �74992 Grasso (i� tubo) – 3113�8 Smaltimento A Si prega �i smaltire le co�fezio�i �el rispet to �ell’ambie�te� Questo apparecchio è co�trasseg�ato co�formeme�te alla Direttiva e
76 it Soluzione di piccoli guasti Guasto Causa Rimedio Sul �isplay compare il mes I chicchi �o� rica�o�o �el saggio Aggiungere maci�acaffè (chicchi troppo chicchi! a�che se il serba oleosi)� toio chicchi (1) è pie�o o se il maci�acaffè �o� maci�a chicchi� Battere leggerme�te il ser batoio chicchi (1)� Eve�tualme�te cambiare il tipo �i caffè� Qua��o il serbatoio chicchi (1) è vuoto, pulirlo co� u� pa��o asciutto� Prelievo acqua cal�a impossibile� L’i�serto schiuma (�) o l’al loggiame�to �ell’i�se
it 77 Soluzione di piccoli guasti Guasto Causa Rimedio Il caffè è troppo “aci�o”� Il gra�o �i maci�atura è troppo grosso oppure il caffè è maci�ato troppo grosso� Impostare il gra�o �i maci�atura su u� valore più fi�e oppure utilizzare u� caffè maci�ato più fi�e� Tipo �i caffè �o� a�atto� Utilizzare u� caffè più tostato� Il gra�o �i maci�atura è troppo fi�e oppure il caffè è maci�ato troppo fi�e� Impostare il gra�o �i maci�atura su u� valore più grosso oppure utilizzare u� caffè maci�ato più gros
78 it Soluzione di piccoli guasti Guasto Causa Rimedio Forti �iffere�ze �ella qualità L’apparecchio prese�ta �el caffè o �ella schiuma �el i�crostazio�i �i calcare� latte� Proce�ere alla �ecalcifica zio�e �ell’apparecchio, seco��o le istruzio�i, co� �ue compresse �i �ecalcifi ca�te� Prese�za �i gocce �’acqua sul fo��o i�ter�o �ell’apparecchio �opo aver tolto il raccogligocce (8)� Il raccogligocce (8) è stato estratto troppo presto� Estrarre il raccogligocce (8) solo alcu�i seco��i �opo l’ultimo p
79 TES5�3�� �1/2�11
Kundendienst-Zentren • Central-Service-Depots • Service Après-Vente • Servizio Assistenza • Centrale Servicestation • Asistencia técnica • Servicevaerkter • Apparatservice • Huolto DE Deutschland, Germany BSH Hausgeräte Service GmbH Zentralwerkstatt für kleine Hausgeräte Trautskirchener Straße 6 – 8 90431 Nürnberg Online Auftragsstatus, Pickup Service für Kaffeevollautomaten und viele weitere Infos unter: www.bosch-home.com Reparaturservice* (Mo-Fr: 8:00-18:00 erreichbar) Tel.
FR France BSH Electroménager S.A.S. 50 rue Ardoin – BP 47 93401 SAINT-OUEN cedex Service interventions à domicile: 01 40 10 11 00 Service Consommateurs: 0 892 698 010 (0,34 € TTC/mn) Service Pièces Détachées et Accessoires: 0 892 698 009 (0,34 € TTC/mn) www.bosch-home.fr GB Great Britain BSH Home Appliances Ltd. Grand Union House Old Wolverton Road Wolverton Milton Keynes MK12 5PT To arrange an engineer visit, to order spare parts and accessories or for product advice please visit www.bosch-home.co.
NL Nederlande, Netherlands BSH Huishoudapparaten B.V. Burg. Stramanweg 122 1101 EN Amsterdam Zuidoost Storingsmelding: Tel.: 020 430 3 430 Fax: 020 430 3 445 mailto:contactcenter-nl@ bshg.com Onderdelenverkoop: Tel.: 020 430 3 435 Fax: 020 430 3 400 mailto:bosch-onderdelen@ bshg.com www.bosch-home.nl NO Norge, Norway BSH Husholdningsapparater A/S Grensesvingen 9 0661 Oslo Tel.: 22 66 06 00 Fax: 22 66 05 50 5052 Bergen Tel.: 55 59 68 80 Fax: 55 59 68 90 7037 Trondheim Tel.
Garantiebedingungen DEUTSCHLAND (DE) Die nachstehenden Bedingungen, die Voraussetzungen und Umfang unserer Garantieleistung beschreiben, lassen die Gewährleistungsverpflichtungen des Verkäufers aus dem Kaufvertrag mit dem Endabnehmer unberührt. Für dieses Gerät leisten wir Garantie gemäß nachstehenden Bedingungen: Für Produktinformationen sowie Anwendungsund Bedienungsfragen aus Deutschland: Bosch-Infoteam (Mo-Fr: 8.00-18.00 Uhr erreichbar) Tel.: 01805 267242* oder unter bosch-infoteam@bshg.
Robert Bosch Hausgeräte GmbH Carl-Wery-Str. 34 81739 München Germany www.bosch-home.