Register yo new devic ur e on MyBosch now and get free b enefits: bosch-h ome.
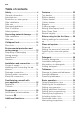
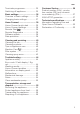
aus Table of contents Safety ............................................... 4 General information.......................... 4 Intended use..................................... 4 Restriction on user group................. 4 Safe installation ................................ 5 Safe use ........................................... 6 Damaged appliance ......................... 8 Risk to children ................................ 8 Safety systems ............................... 10 Preventing material damage ....
aus Terminate programme.................... 35 Switching off appliance .................. 35 Basic settings................................ 36 Overview of basic settings ............. 36 Changing basic settings................. 37 Home Connect .............................. 38 Home Connect quick start ............. 38 Home Connect settings.................. 39 Remote Start ............................ 39 Remote Diagnostics ...................... 39 Software update .............................
aus Safety Safety Please read the safety information to ensure that you use the appliance safely. General information You can find general information about this instruction manual here. ¡ Read this instruction manual carefully. Only this will ensure you use the appliance safely and efficiently. ¡ Follow the safety instructions and warnings. ¡ Keep the instruction manual and the product information safe for future reference or for the next owner. ¡ Check the appliance after unpacking it.
Safety aus Keep children under the age of 8 years away from the appliance and power cable. Safe installation Follow these safety instructions when installing the appliance. WARNING ‒ Risk of injury! Improper installation may cause injury. ▶ When installing and connecting the appliance, follow the instructions in the manual and installation instructions. WARNING ‒ Risk of electric shock! ¡ Improper installation is dangerous.
aus Safety WARNING ‒ Risk of fire! It is dangerous to use an extended power cord and non-approved adapters. ▶ Do not use extension cables or multiple socket strips. ▶ If the power cord is too short, contact Customer Service. ▶ Only use adapters approved by the manufacturer. WARNING ‒ Risk of injury! Hinges move when opening and closing the appliance door and can cause injury.
Safety aus ¡ Highly caustic alkaline or highly acidic cleaning agents in conjunction with aluminium parts in the interior of the appliance may cause explosions. ▶ Never use highly caustic alkaline or highly acidic cleaning agents, in particular commercial or industrial products, in conjunction with aluminium parts (e.g. grease filters of extractor hoods or aluminium pans), e.g. for the Machine Care programme. WARNING ‒ Risk of injury! ¡ Leaving the appliance door open may result in injury.
aus Safety ▶ Never kink, crush or modify the power cord. Damaged appliance Follow the safety instructions if the appliance is damaged. WARNING ‒ Risk of electric shock! ¡ If the appliance or the power cord is damaged, this is dangerous. ▶ Never operate a damaged appliance. ▶ Never operate an appliance with a cracked or fractured surface. ▶ Never pull on the power cord to unplug the appliance. Always unplug the appliance at the mains.
Safety aus ¡ Children may breathe in or swallow small parts, causing them to suffocate. ▶ Keep small parts away from children. ▶ Do not let children play with small parts. WARNING ‒ Risk of harm to health! Children can lock themselves in the appliance, thereby putting their lives at risk. ▶ With redundant appliances, unplug the power cord. Then cut through the cord and damage the lock on the appliance door beyond repair so that the appliance door will no longer close.
aus Safety Safety systems Protect children from possible hazards resulting from the appliance. The appliance is equipped with a "Childproof lock " → Page 12.
Preventing material damage Preventing material damage Preventing material damage Preventing material damage Safe installation Follow the instructions when installing the appliance. ATTENTION! ¡ Improper installation of the appliance may cause damage. ▶ If the dishwasher is installed above or below other domestic appliances, follow the information on installation in combination with a dishwasher in the installation instructions for the individual appliances.
aus Childproof lock Childproof lock Childproof lock The childproof lock lets you protect children from possible hazards resulting from the appliance. The appliance is equipped with a door lock. Childproof lock Deactivating the door lock 1. Open the appliance door. 2. Push the catch of the childproof lock to the right and slide it backwards . 1 Door lock The door lock is a mechanical safety system and makes it more difficult to open the appliance door. You can activate or deactivate the door lock.
Installation and connection aus Saving energy Sensor setting SE:00 If you follow these instructions, your appliance will use less electricity and less water. Use the Eco Wash programme. The Eco Wash programme is energy-efficient and environmentally friendly. → "Programmes", Page 20 SE:01 Change the sensor setting to the default. Consumption is reduced. → "Sensors", Page 13 SE:02 AquaSensor The AquaSensor is an optical measuring device (light barrier) which measures the turbidity of the rinsing water.
aus ¡ ¡ ¡ ¡ ¡ Installation and connection Installation Instructions Warranty Installation material Steam guard plate Mains cable Installing and connecting the appliance You can position your built-under or integrable appliance in a fitted kitchen between wooden and plastic walls. If you subsequently install your dishwasher as a free-standing appliance, you must stop it from tipping over, e.g.
Installation and connection aus Electrical connection Connect your appliance to the power supply. Connecting the appliance to the electricity supply Notes ¡ Follow the "Safety instructions" → Page 5. ¡ Please note that the water safety system is only functional if there is a power supply. 1. Insert the non-heating appliance plug of the power cable into the appliance. 2. Insert the mains plug of the appliance into a nearby socket. The connection data for the appliance can be found on the rating plate. 3.
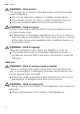
aus Familiarising yourself with your appliance Familiarising yourself with your appliance Familiarising yourself with your appliance Familiarising yourself with your appliance Appliance You can find an overview of the parts of your appliance here. 7 6 8 5 9 4 10 3 11 2 12 1 1 1 16 Rating plate Depending on the appliance specifications Rating plate with "E number and FD number" → Page 57. The data you need for "Customer Service" → Page 56.
Familiarising yourself with your appliance 2 Detergent dispenser 3 4 Bottom basket 5 Tablet collecting tray 6 7 8 9 Top basket 10 11 12 1 Lower spray arm Cutlery drawer 1 aus "Detergent" → Page 29 is added to the detergent dispenser. "Bottom basket" → Page 24 The lower spray arm washes the tableware in the bottom basket. If the tableware has not been washed properly, clean the spray arms.
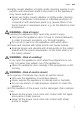
aus Familiarising yourself with your appliance 1 2 13 3 4 5 6 7 12 11 10 9 8 ON/OFF button 2 3 Programme buttons 4 Display 5 Timer programming and setting buttons Remote Start The programme sequence display shows the current cycle of the appliance, e.g. washing, rinsing or drying. The display shows information about progress of the programme, the remaining running time or the basic settings. You can change the basic settings via the display and the setting buttons.
Familiarising yourself with your appliance 12 13 1 Water supply display 1 Door opener aus Display for water supply "Opening the appliance door" → Page 34 Depending on the appliance specifications 19
aus Programmes Programmes Programmes You can find an overview of the programmes that can be selected here. Different programmes, which can be found on the control panel of your appliance, are available depending on the appliance configuration. The running time may vary depending on the programme selected.
Programmes Programme aus Consumption values 1) Duration in hrs:mins 2) Energy consumption in kWh 3) Water consumption in litres ¡ 1) 2:00 - 3:10 ¡ 2) 0,980 - 1,550 ¡ 3) 7,6 - 15,4 Use Programme sequence Sensor-controlled: ¡ Optimised by sensors depending on the soiling level of the washing water Eco Wash ¡ 1) 3:15 ¡ 2) 0,650 ¡ 3) 11,0 Tableware: ¡ Mixed tableware and cutlery Level of soiling: ¡ Common household food remnants lightly dried on Tableware: ¡ Mixed tableware and cutlery Level of soiling
aus Programmes Programme Machine Care Favourite Consumption values 1) Duration in hrs:mins 2) Energy consumption in kWh 3) Water consumption in litres ¡ 1) 2:10 ¡ 2) 1,350 ¡ 3) 15,2 ¡ 1) 0:15 - 0:15 ¡ 2) 0,050 - 0,050 ¡ 3) 4,0 - 4,0 Information for test institute Test institutes can request the conditions for comparison tests, e.g. according to AS/NZS2007, by sending an e-mail to dishwasher@test-appliances.com.
Additional functions Tip: To reset the programme, either use the Home Connect app or reset your appliance back to the factory settings. → "Overview of basic settings", Page 36 Additional func- Use tion ¡ For a better drying result the final rinse temExtra Dry perature is increased and the drying phase extended. ¡ Especially suitable for drying plastic parts. ¡ There is a slight increase in energy consumption and the run time is extended.
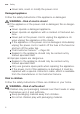
aus Features Adjusting top basket with side levers To wash large items of tableware in the baskets, adjust the shelf position of the top basket. 1. Pull out the top basket. 2. To prevent the basket from suddenly dropping down, hold the side of the basket by the top edge. 3. Press in the levers on the right and left on the outside of the basket. Bottom basket Arrange pans and plates in the bottom basket. a Cutlery basket 1 The basket can then slip down slightly. 4.
Features aus Cutlery basket Etagere Arrange cutlery in the cutlery basket, always without sorting it and with the sharp points downwards. Use the cutlery shelf and space underneath for small cups and glasses or for large items of cutlery, e.g. cooking spoons or serving cutlery. Cutlery drawer If you do not need the cutlery shelf, you can fold it up. Arrange cutlery in the cutlery drawer. Folding prongs Use the folding prongs to position tableware securely, e.g. plates.
aus Features 1. Push the lever forwards down the prongs and fold . 1. Remove top basket. 2. Insert the baking sheet spray head in the holder right . 1 and turn to the 2 2. To use the prongs again, fold them back up. a The prongs audibly click into position. Baking sheet spray head Use the baking sheet spray head to clean large items of tableware, e.g. trays, grilles and plates. a The baking sheet spray head clicks into position.
Features Selecting Extra Clean Zone Note: Consumption will increase if you operate your appliance with the Extra Clean Zone switched on. 1. Pull out the top basket. 2. Set the slider to ON or OFF. aus 2. Pull the tab on the Extra Clean Zone up and forwards . 3. Set the slider to ON. 4. Clean under running water. 5. Place the Extra Clean Zone in the top basket and lock in place . 3. Push in the top basket.
aus Before using for the first time Appliance height 81.5 cm with cutlery drawer Setting 1 max. ø 2 max. ø 3 max. ø Top basket 16 cm 18.5 cm 21 cm Before using for the first time Before using for the first time Configure the settings for initial startup. Bottom basket 31 cm 27.5 cm 25 cm Tip: You can change this setting and other "Basic settings" → Page 36 at any time again.
Detergent 2. Add rinse aid up to the max mark. aus 5. To save the settings, press for 3 seconds. Switching the rinse aid system off max 3. If rinse aid spills out, remove it from the tub. Spilled rinse aid can cause excessive frothing during the wash cycle. 4. Close the lid of the dispenser for rinse aid. a The lid clicks into position. Setting the amount of rinse aid If there are streaks or water marks on tableware, change the amount of rinse aid. 1. Press . 2.
aus Detergent starch and remove protein. Oxygenbased bleaching agents are generally used to remove coloured stains, e.g. tea or ketchup. Note: Follow the manufacturer's instructions for each detergent. Detergent Tabs Powder detergent Liquid detergent 30 Description Tabs are suitable for all cleaning functions and do not need to be measured out. With shorter "Programmes" → Page 20 tabs sometimes do not dissolve entirely and leave residues of detergent. This may impair the cleaning effect.
Detergent aus Unsuitable detergents Adding detergent Do not use detergent which could cause damage to the appliance or present a risk to health. 1. To open the detergent dispenser, Detergent Description Hand washing-up Hand washing-up liquid liquid can cause increased frothing and damage the appliance. Detergent conChlorine residue on tabletaining chlorine ware may present a risk to health. press the locking latch. 2. Add the detergent to the dry deter- gent dispenser.
aus Tableware 3. Close the lid of the detergent dis- penser. Damage to glass and tableware Avoid damage to glass and tableware. a The lid clicks into position. a The detergent dispenser will open automatically at the optimum time during the programme. Powder or liquid detergent will spread around the washing tank and dissolve there. Tablets will fall into the tablet collecting tray and dissolve in the right dosage.
Tableware Cause The water temperature of the programme is too high. Recommendation Select a programme with lower temperatures. After the programme has ended, take glassware and cutlery out of the appliance without delay. Arrange tableware Arrange the tableware correctly to optimise the dishwashing result and prevent damage to both the appliance and tableware. Tips ¡ Using the appliance allows you to save energy and water compared to washing-up by hand.
aus Basic operation Removing tableware WARNING Risk of injury! Hot tableware can cause burns to the skin. When hot, tableware is sensitive to shock, may crack and can result in injury. ▶ When the programme has ended, do not empty the appliance until the tableware has cooled down for a while. 1. To prevent water dripping on the tableware, unload it starting at the bottom and working up. 2. Check the washing tank and accessories for soiling and clean if necessary.
Basic operation 3. Press . a This activates time preselection. Tip: To deactivate timer programming, press or repeatedly until "00h:00m" appears in the display. Starting the programme ▶ Press . a The programme has ended when the display shows "00h:00m". Notes ¡ If you want to add more tableware while the appliance is running, do not use the tablet collecting tray as a handle for the top basket. You might touch the partially dissolved tablet.
aus Basic settings Basic settings Basic settings You can configure the appliance to meet your needs. Basic settings Overview of basic settings The basic settings depend on the features of your appliance. Basic setting Rinse aid dispensing Display text r:05 1 Selection r:00 - r:06 Sensor setting SE:00 1 SE:00 - SE:02 Extra Dry d:00 1 d:00 - d:01 Hot water A:00 1 A:00 - A:01 1 36 Factory setting (may vary according to model) Description Set the amount of rinse aid to be dispensed.
Basic settings aus Basic setting Start programme Display text SP:00 1 Selection SP:00 - SP:01 Tone volume SL:02 1 SL:00 -SL:03 Button volume bL:02 1 bL:00 - bL:03 Wi-Fi Cn:00 1 Cn:00 - Cn:01 Remote Start rc:011 rc:00 - rc:02 Factory setting rE: Start with Y:ES Confirm with 1 Description Set a default programme for when the appliance is switched on.
aus Home Connect You can change several settings. 5. To save the settings, press for 3 seconds. Home Connect Home Connect This appliance is network-capable. Connect your appliance to a mobile device to control its functions via the Home Connect app. The Home Connect services are not available in every country. The availability of the Home Connect function depends on the availability of Home Connect services in your country. You can find information about this at: www.home-connect.com.
Home Connect aus Home Connect settings Remote Diagnostics Adapt Home Connect to your needs. You can find the Home Connect settings in the basic settings for your appliance. Which settings the display shows will depend on whether Home Connect has been set up and whether the appliance is connected to your home network.
aus Cleaning and servicing This initial registration prepares the Home Connect functions for use and is only required when you want to use the Home Connect functions for the first time. Note: Please note that the Home Connect functions can only be utilised with the Home Connect app. Information on data protection can be retrieved in the Home Connect app. 2. Add detergent to the detergent dis- penser. 3. Select the programme with the highest temperature. 4. "Start the programme without tableware.
Cleaning and servicing Phase 2 Removal of Food remnants and deposits Detergent Machine cleaner To ensure optimum cleaning performance, the programme doses the detergents independently of each another during the relevant cleaning phase. Correct placement of the detergents is necessary here. Run Machine Care without tableware if the indicator for Machine Care lights up on the control panel or if advised to do so by the display. The indicator will go out after you have run Machine Care.
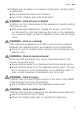
aus 3 Cleaning and servicing 4. Press the locking catches Coarse filter Cleaning filters Soiling in the dishwashing water may block the filters. 1. After each wash check the filters for residue. 2. Turn the coarse filter anticlockwise and remove the filter system . ‒ Check that no foreign objects fall into the sump. together and lift the coarse filter out . 2 1 2 5. Clean the filter elements under run- 1 3. Pull down the micro filter to re- move. 42 ning water.
Cleaning and servicing aus Cleaning spray arms Limescale and soiling in the dishwashing water may block the nozzles and bearings on the spray arms. Clean the spray arms regularly. 1. Unscrew the upper spray arm and pull down to remove . 1 2 2. Pull up the lower spray arm to re- move. 3. Check the outlet nozzles on the spray arms for blockages under running water and remove any foreign bodies. 4. Insert the lower spray arm. a The spray arm clicks into position. 5.
aus Troubleshooting Troubleshooting Troubleshooting You can rectify minor faults on your appliance yourself. Read the troubleshooting information before contacting after-sales service. This will avoid unnecessary costs. Troubleshooting WARNING Risk of electric shock! Improper repairs are dangerous. ▶ Repairs to the appliance should only be carried out by trained specialist staff. ▶ Only use genuine spare parts when repairing the appliance.
Troubleshooting Fault E:32-00 will light up alternately or indicator for water supply lights up. Cause Water tap is jammed or furred up. aus Troubleshooting ▶ Turn on the water tap. The flow rate must be at least 10 l/ min when the water supply is open. The filters in the water con- 1. Switch off the appliance. nection of the supply or 2. Pull out the mains plug. AquaStop hose are blocked. 3. Turn off the water tap. 4. Unscrew the water connection. 5. Remove the filter from the supply hose 6.
aus Troubleshooting Fault E:61-02 will light up alternately. Cause Cover of the wastewater pump is loose Troubleshooting ▶ Secure the cover of the "Wastewater pump " → Page 55 so it clicks into position. E:90-01 will light up alternately. Mains voltage is too low. This is not a fault on the appliance. 1. Contact an electrician. 2. Have the mains voltage and electrical installation checked by an electrician. A different error code apA technical fault is present. pears in the display window.
Troubleshooting Fault Tableware is not dry. aus Cause Troubleshooting Water collects in recesses of ▶ Position tableware at an angle the tableware or cutlery. where possible. The combined detergent used has a poor drying performance. 1. Use rinse aid to improve drying per- formance. 2. Use a different combined detergent with a better drying performance. Extra Dry not activated to im- ▶ Activate Extra Dry. prove drying performance. Tableware removed too 1. Wait until the programme ends.
aus Troubleshooting Fault Remnants of food on tableware. Cause Tableware is placed too close together or basket is overfilled. Troubleshooting 1. Arrange tableware with sufficient space in between. The spray jets must reach the surfaces of the tableware. 2. Avoid points of contact. Spray arm rotation is blocked. ▶ Arrange tableware so that it does Spray arm nozzles are blocked. Filters are soiled. ▶ Clean the "Spray arms" → Page 43. Filters are inserted incorrectly and/or not engaged. 1.
Troubleshooting Fault Detergent residue in the appliance Water marks on plastic parts. Cause Tabs are used in the quick or short programme. Dissolving time of the tab is not attained. Washing effect and dissolving performance are reduced after a prolonged storage time or detergent is very lumpy. Due to laws of physics droplet formation on plastic surfaces is unavoidable. After drying water marks are visible. aus Troubleshooting ▶ Select a more intensive Programme or use Powder detergent.
aus Troubleshooting Fault Coloured coatings (blue, yellow, brown) that are difficult or impossible to remove are present inside the appliance or on stainless steel tableware. Cause Troubleshooting The formation of films is due ▶ Clean the appliance. to substances contained in You can remove deposits with vegetables (cabbage, celery, "Mechanical cleaning" → Page 40 potatoes, noodles, etc.) or or a machine cleaning product. It tap water (manganese).
Troubleshooting Fault Removable streaks are present on glasses, glassware with a metallic appearance and cutlery. Irreversible clouding of glassware. Cause Tableware has been precleaned too intensely. The sensors chose a weaker programme. Stubborn soiling cannot be entirely removed. Glasses are not dishwasherproof, only suitable for dishwashers. aus Troubleshooting ▶ Only remove large remnants of food and do not prerinse tableware. ▶ Adjust the sensitivity of the sensors.
aus Troubleshooting Home Connect problem Fault Connection to home network is not established. Cause WLAN on router is not active. Troubleshooting ▶ Check the wireless network connection of your router. WLAN display is flashing. Connection to home network is not available. ▶ Activate the wireless network con- Home Connect set incorrectly. ▶ Please consult the documents sup- Technical fault is present. ▶ Please consult the information Home Connect cannot be implemented correctly.
Troubleshooting Fault Appliance does not start. aus Cause The mains fuse has tripped. Troubleshooting ▶ Check the relevant fuse. Mains cable is not inserted. 1. Check whether the socket works. 2. Check whether the mains cable is properly inserted in the socket and on the rear of the appliance. Programme starts automatically. Appliance stops during the programme or cuts out. Appliance door is not closed ▶ Close the appliance door. properly.
aus Troubleshooting Noise Fault Cause Troubleshooting Filling valves making knock- Caused by the domestic in- ▶ Can only be remedied in the doing noises. stallation. No appliance fault mestic installation. present. Does not affect functioning of the appliance. Knocking or rattling noise. Spray arm is striking table- ▶ Arrange tableware so that the spray ware. arms do not strike tableware. With a small load the water jets directly strike against the tub. ▶ Distribute the tableware evenly.
Transportation, storage and disposal Clean wastewater pump 8. Insert the pump cover down Large remnants of food or foreign bodies can block the waste water pump. As soon as the rinsing water no longer drains properly, the waste water pump must be cleaned. WARNING Risk of injury! Sharp and pointed objects or fragments of glass may block the waste water pump and cause injury. ▶ Remove any foreign bodies carefully. 1. Disconnect the appliance from the power supply. 2.
aus Customer Service Protect appliance from frost Disposing of old appliance If there is a risk of frost where the appliance will be standing, e.g. in a holiday home, empty the appliance completely. ▶ "Empty the appliance." → Page 56 Valuable raw materials can be reused by recycling. Transporting the appliance To avoid damage to the appliance, empty it before transporting.
Technical specifications aus With any warranty claims, we will make sure that your appliance is repaired by trained after-sales technicians using genuine spare parts, including after the manufacturer's warranty has expired. Detailed information on the warranty period and terms of warranty in your country is available from our aftersales service, your retailer or on our website. If you contact Customer Service, you will require the product number (ENr.
aus Technical specifications Information regarding Free and Open Source Software This product includes software components that are licensed by the copyright holders as free software or open source software. The applicable licence information is stored on your home appliance. You can also access the applicable licence information via your Home Connect App: "Profile -> Legal information -> Licence Information".
Thank you for buying a Bosch Home Appliance! Register your new device on MyBosch now and profit directly from: • • • • • Expert tips & tricks for your appliance Warranty extension options Discounts for accessories & spare-parts Digital manual and all appliance data at hand Easy access to Bosch Home Appliances Service Free and easy registration – also on mobile phones: www.bosch-home.com/welcome Looking for help? You'll find it here.