
Operation Manual
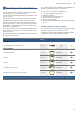
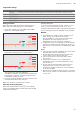
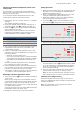
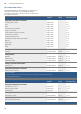
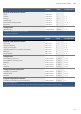
Table Of Contents
- [en] Instruction manual
- Table of contents
- [en] Instruction manual
- ( Important safety information 5
- ] Causes of damage 6
- 7 Environmental protection 7
- f Induction cooking 7
- * Getting to know your appliance 9
- 1 Operating the appliance 11
- | Flex Zone 14
- u Move function 15
- } FlexPlus Zone 16
- O Time-setting options 17
- v PowerBoost function 18
- x ShortBoost function 19
- z Keep warm function 19
- s Transferring settings 20
- Ü Cooking assist functions 21
- A Childproof lock 32
- k Wipe protection 33
- b Automatic safety cut-out 33
- Q Basic settings 34
- [ Energy consumption indicator 36
- t Cookware check 36
- D Cleaning 37
- { Frequently Asked Questions (FAQ) 38
- 3 Trouble shooting 39
- 4 Customer service 40
- E Test dishes 41
- 8 Intended use
- ( Important safety information
- ] Causes of damage
- 7 Environmental protection
- f Induction cooking
- * Getting to know your appliance
- 1 Operating the appliance
- | Flex Zone
- u Move function
- } FlexPlus Zone
- O Time-setting options
- v PowerBoost function
- x ShortBoost function
- z Keep warm function
- s Transferring settings
- Ü Cooking assist functions
- Cooking assist functions
- Cooking assistant function types
- Suitable cookware
- Sensors and special accessories
- Functions and heat settings
- Temperature settings
- Temperature ranges and settings
- Cooking functions
- Temperature setting
- Temperature range
- Suitable for
- Tips for cooking with the cooking functions
- Notes
- Setting the boiling point
- Height
- Setting ™…
- Note:
- Connecting the wireless temperature sensor to the control panel
- Status
- Resetting the wireless temperature sensor
- Setting procedure
- 1. Attach the temperature sensor to the saucepan; see the section on ~ "Preparing and maintaining the wireless temperature sensor"
- 2. Place a saucepan filled with sufficient liquid on the required hotplate and always put the lid on.
- 3. Select the hotplate on which you have placed the saucepan with the temperature sensor.
- 4. Touch the å symbol on the temperature sensor. The indicator å will light up in the control panel.
- 5. Select the right temperature setting from the table.
- 6. Once the signal has sounded, take the lid off and add the food. Keep the lid on during cooking.
- Note:
- Switching off cooking functions
- Note:
- Recommended dishes
- Meat
- Cooking assistance functions
- Temperature setting
- Total cooking time from signal (mins)
- Fish
- Cooking assistance functions
- Temperature setting
- Total cooking time from signal (mins)
- Egg-based dishes
- Cooking assistance functions
- Temperature setting
- Total cooking time from signal (mins)
- Vegetables and pulses
- Cooking assistance functions
- Temperature setting
- Total cooking time from signal (mins)
- Potatoes
- Cooking assistance functions
- Temperature setting
- Total cooking time from signal (mins)
- Pasta and cereals
- Cooking assistance functions
- Temperature setting
- Total cooking time from signal (mins)
- Soups
- Cooking assistance functions
- Temperature setting
- Total cooking time from signal (mins)
- Sauces
- Cooking assistance functions
- Temperature setting
- Total cooking time from signal (mins)
- Desserts
- Cooking assistance functions
- Temperature setting
- Total cooking time from signal (mins)
- Frozen products
- Cooking assistance functions
- Temperature setting
- Total cooking time from signal (mins)
- Further
- cooking assistance functions
- Temperature setting
- Total cooking time from signal (mins)
- Preparing and maintaining the wireless temperature sensor
- Preparing and maintaining the wireless temperature sensor
- Adhering the silicone patch
- 1. The adhesion point on the saucepan must be free of grease. Clean the saucepan, dry it thoroughly and wipe the adhesion point with a degreasing agent such as spirit.
- 2. Remove the protective film from the silicone patch. Adhere the silicone patch to the saucepan in the correct place using the the enclosed template as a guide.
- 3. Press the silicone patch down, including its inside surface.
- Notes
- Using the wireless temperature sensor
- Notes
- Cleaning
- Changing the battery
- Note:
- Declaration of Conformity
- A Childproof lock
- k Wipe protection
- b Automatic safety cut-out
- Q Basic settings
- [ Energy consumption indicator
- t Cookware check
- Cookware check
- 1. With the cookware still cold, fill it with approx. 200 ml of water and place it on the centre of the hotplate with the diameter that most closely matches that of the base of the cookware.
- 2. Go to the basic settings and select the ™‚ƒ setting.
- 3. Touch the settings range. A will flash on the hotplate display.
- Result
- Notes
- D Cleaning
- { Frequently Asked Questions (FAQ)
- 3 Trouble shooting
- 4 Customer service
- E Test dishes
- [en] Instruction manual

Cooking assist functions en
27
Egg-based dishes Cooking assistance
functions
Temperature
setting
Total cooking time
from signal (mins)
Frying with a small amount of oil function
Crêpes* Frying sensor 5 -
Omelette* Frying sensor 2 3 - 6
Fried eggs Frying sensor 2 - 4 2 - 6
Scrambled eggs Frying sensor 2 4 - 9
Kaiserschmarrn (shredded pancake) Frying sensor 3 10 - 15
French toast Frying sensor 3 4 - 8
Cooking function
Hard-boiled eggs** Cooking functions 3/100 ºC 5 - 10
* Total time for each portion. Fry one after the other.
** Add the food straight away.
Vegetables and pulses Cooking assistance
functions
Temperature
setting
Total cooking time
from signal (mins)
Frying with a small amount of oil function
Garlic, onions Frying sensor 1 - 2 2 - 10
Courgettes, aubergines Frying sensor 3 4 - 12
Peppers, green asparagus Frying sensor 3 4 - 15
Vegetables sautéed in oil, e.g. courgettes, green peppers Frying sensor 1 10 - 20
Mushrooms Frying sensor 4 10 - 15
Glazed vegetables Frying sensor 3 6 - 10
Cooking function
Fresh vegetables, e.g. broccoli Cooking functions 3 / 100 ºC 10 - 20
Fresh vegetables, e.g. Brussels sprouts Cooking functions 3 / 100 ºC 30 - 40
Chickpeas* Cooking functions 3 / 100 ºC 60 - 90
Peas Cooking functions 3 / 100 ºC 15 - 20
Lentil stew* Cooking functions 3 / 100 ºC 45 - 60
Cooking in a pressure cooker function*
Vegetables, e.g. green beans Cooking functions 4 / 120 ºC 3 - 6
Chickpeas, beans Cooking functions 4 / 120 ºC 25 - 35
Lentil stew Cooking functions 4 / 120 ºC 10 - 20
Frying with a large amount of oil function
Vegetables and mushrooms, breaded or beer-battered* Cooking functions 5 / 170 ºC 4 - 8
* Add the food straight away.
** Heat the oil with the lid on. Fry one portion after the other with the lid off (the table shows the time required per portion).