
Operation Manual
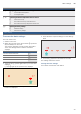
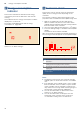
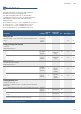
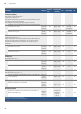
Table Of Contents
- [en] Instruction manual
- Table of contents
- [en] Instruction manual
- ( Important safety information 5
- ] Causes of damage 6
- 7 Environmental protection 7
- f Induction cooking 7
- * Getting to know your appliance 9
- 1 Operating the appliance 11
- | Flex Zone 14
- u Move function 15
- O Time-setting options 16
- v PowerBoost function 17
- x ShortBoost function 18
- z Keep warm function 18
- Ü Cooking assist functions 19
- A Childproof lock 30
- k Wipe protection 31
- b Automatic safety cut-out 31
- Q Basic settings 32
- [ Energy consumption indicator 34
- t Cookware check 34
- D Cleaning 35
- { Frequently Asked Questions (FAQ) 36
- 3 Trouble shooting 37
- 4 Customer service 38
- E Test dishes 39
- 8 Intended use
- ( Important safety information
- ] Causes of damage
- 7 Environmental protection
- f Induction cooking
- * Getting to know your appliance
- 1 Operating the appliance
- | Flex Zone
- u Move function
- O Time-setting options
- v PowerBoost function
- x ShortBoost function
- z Keep warm function
- Ü Cooking assist functions
- Cooking assist functions
- Cooking assistant function types
- Suitable cookware
- Sensors and special accessories
- Functions and heat settings
- Temperature settings
- Temperature ranges and settings
- Cooking functions
- Temperature setting
- Temperature range
- Suitable for
- Tips for cooking with the cooking functions
- Notes
- Setting the boiling point
- Height
- Setting ™…
- Note:
- Connecting the wireless temperature sensor to the control panel
- Status
- Resetting the wireless temperature sensor
- Setting procedure
- 1. Attach the temperature sensor to the saucepan; see the section on ~ "Preparing and maintaining the wireless temperature sensor"
- 2. Place a saucepan filled with sufficient liquid on the required hotplate and always put the lid on.
- 3. Select the hotplate on which you have placed the saucepan with the temperature sensor.
- 4. Touch the å symbol on the temperature sensor. The indicator å will light up in the control panel.
- 5. Select the right temperature setting from the table.
- 6. Once the signal has sounded, take the lid off and add the food. Keep the lid on during cooking.
- Note:
- Switching off cooking functions
- Note:
- Recommended dishes
- Meat
- Cooking assistance functions
- Temperature setting
- Total cooking time from signal (mins)
- Fish
- Cooking assistance functions
- Temperature setting
- Total cooking time from signal (mins)
- Egg-based dishes
- Cooking assistance functions
- Temperature setting
- Total cooking time from signal (mins)
- Vegetables and pulses
- Cooking assistance functions
- Temperature setting
- Total cooking time from signal (mins)
- Potatoes
- Cooking assistance functions
- Temperature setting
- Total cooking time from signal (mins)
- Pasta and cereals
- Cooking assistance functions
- Temperature setting
- Total cooking time from signal (mins)
- Soups
- Cooking assistance functions
- Temperature setting
- Total cooking time from signal (mins)
- Sauces
- Cooking assistance functions
- Temperature setting
- Total cooking time from signal (mins)
- Desserts
- Cooking assistance functions
- Temperature setting
- Total cooking time from signal (mins)
- Frozen products
- Cooking assistance functions
- Temperature setting
- Total cooking time from signal (mins)
- Further
- cooking assistance functions
- Temperature setting
- Total cooking time from signal (mins)
- Preparing and maintaining the wireless temperature sensor
- Preparing and maintaining the wireless temperature sensor
- Adhering the silicone patch
- 1. The adhesion point on the saucepan must be free of grease. Clean the saucepan, dry it thoroughly and wipe the adhesion point with a degreasing agent such as spirit.
- 2. Remove the protective film from the silicone patch. Adhere the silicone patch to the saucepan in the correct place using the the enclosed template as a guide.
- 3. Press the silicone patch down, including its inside surface.
- Notes
- Using the wireless temperature sensor
- Notes
- Cleaning
- Changing the battery
- Note:
- Declaration of Conformity
- A Childproof lock
- k Wipe protection
- b Automatic safety cut-out
- Q Basic settings
- [ Energy consumption indicator
- t Cookware check
- Cookware check
- 1. With the cookware still cold, fill it with approx. 200 ml of water and place it on the centre of the hotplate with the diameter that most closely matches that of the base of the cookware.
- 2. Go to the basic settings and select the ™‚ƒ setting.
- 3. Touch the settings range. A will flash on the hotplate display.
- Result
- Notes
- D Cleaning
- { Frequently Asked Questions (FAQ)
- 3 Trouble shooting
- 4 Customer service
- E Test dishes
- [en] Instruction manual

Cleaning en
35
DCleaning
Cleaning
Suitable maintenance and cleaning products can be
purchased from the after-sales service or in our e-Shop.
Hob
Cleaning
Always clean the hob after cooking. This will prevent
food deposits from becoming burned on. Only clean the
hob after the residual heat indicator has gone out.
Clean the hob with a damp dish cloth and dry it with a
cloth or towel to prevent limescale build-up.
Only use cleaning agents that are suitable for this type
of hob. Observe the manufacturer's instructions on the
product packaging.
Never use:
■ Undiluted washing-up liquid
■ Cleaning agents designed for dishwashers
■ Abrasive cleaners
■ Harsh cleaning agents, such as oven spray and
limescale remover
■ Scouring pads
■ High-pressure cleaners or steam jet cleaners
Stubborn dirt is best removed with a glass scraper,
available from retailers. Observe the manufacturer's
instructions.
You can obtain a suitable glass scraper from customer
services or through our online shop.
Using a special sponge for cleaning glass-ceramic
hobs achieves a great cleaning result.
Note: Do not use any cleaning agents while the hob is
still hot. This may mark the surface. Make sure that any
residue left by cleaning agents is removed.
Hob surround
To prevent damage to the hob surround, observe the
following instructions:
■ Only use warm soapy water
■ Wash new dish cloths thoroughly before use.
■ Do not use harsh or abrasive cleaning agents.
■ Do not use a glass scraper or sharp objects.
Wireless temperature sensor
Temperature sensor
Clean the temperature sensor with a damp cloth. Never
clean it in the dishwasher. Do not immerse it in water or
clean it under running water.
Remove the temperature sensor from the saucepan
after cooking. Store it in a clean, safe place (such as in
its packaging) away from sources of heat.
Silicone patch
Clean and dry before attaching to the temperature
sensor. Dishwasher safe.
Note: Cookware with the silicone patch must not be left
to soak for long periods in soapy water.
Temperature sensor window
The sensor window must always be clean and dry.
Proceed as follows:
■ Remove dirt and oil splatters regularly.
■ Use a soft cloth or cotton buds and window cleaner
for cleaning.
Notes
■ Do not use abrasive cleaning agents such as
scouring pads, scrubbing brushes or cream
cleaners.
■ Do not touch the sensor window with your fingers.
This may make it dirty or scratch it.
Potential marks
Limescale and water
marks
Clean the hob as soon as it has cooled down.
You can use a cleaning agent suitable for
glass-ceramic hobs.*
Sugar, rice starch or
plastic
Clean immediately. Use a glass scraper. Cau-
tion: Risk of burns.*
* Then clean with a damp dish cloth and dry with a cloth or towel.