
Operation Manual
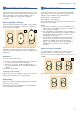
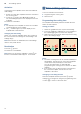
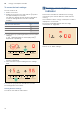
Table Of Contents
- [en] Instruction manual
- Table of contents
- [en] Instruction manual
- ( Important safety information 5
- ] Causes of damage 6
- 7 Environmental protection 7
- f Induction cooking 7
- * Getting to know your appliance 9
- 1 Operating the appliance 10
- w CombiZone function 13
- u Move function 13
- O Time-setting options 14
- v PowerBoost function 15
- A Childproof lock 16
- k Wipe protection 16
- b Automatic safety cut-out 16
- Q Basic settings 17
- [ Energy consumption indicator 18
- t Cookware check 19
- D Cleaning 19
- { Frequently Asked Questions (FAQ) 20
- 3 Trouble shooting 21
- 4 Customer service 22
- E Test dishes 23
- 8 Intended use
- ( Important safety information
- ] Causes of damage
- 7 Environmental protection
- f Induction cooking
- * Getting to know your appliance
- 1 Operating the appliance
- w CombiZone function
- u Move function
- O Time-setting options
- v PowerBoost function
- A Childproof lock
- k Wipe protection
- b Automatic safety cut-out
- Q Basic settings
- [ Energy consumption indicator
- t Cookware check
- Cookware check
- 1. With the cookware still cold, fill it with approx. 200 ml of water and place it on the centre of the hotplate with the diameter that most closely matches that of the base of the cookware.
- 2. Go to the basic settings and select the ™‚ƒ setting.
- 3. Touch the settings range. A will flash on the hotplate display.
- Result
- Notes
- D Cleaning
- { Frequently Asked Questions (FAQ)
- 3 Trouble shooting
- 4 Customer service
- E Test dishes
- [en] Instruction manual

en Time-setting options
14
Activation
Combine the two hotplates which each have different
heat settings.
1. Select one of the two hotplates which are included in
the move function.
2. Touch the ù symbol. The Ú indicator lights up.
The heat settings appear in the displays for the two
hotplates.
The function is activated.
Notes
■ The display for the hotplate on which the cookware
is placed lights up more brightly.
■ The ¬ indicator lights up on the display for the
hotplate that is still selected.
Changing the heat setting
Select one of the two hotplates which are included in
the move function and change the heat setting in the
settings range.
Note: If the function is deactivated, the heat settings
return to the preset values
Deactivation
Touch the ù symbol.
The function is deactivated.
Note: When one of the two hotplates is set to ‹, the
function is deactivated within approx. 10 seconds.
OTime-setting options
Time-setting options
Your hob has two timer functions:
■ Programming the cooking time
■ Kitchen timer
Programming the cooking time
The hotplate automatically switches off after the time
that is set has elapsed.
Setting procedure:
1. Select the hotplate and the required heat setting.
2. Touch the 0 symbol. x lights up on the display for
the hotplate.‹‹ lights up on the timer display.
3. Within the next 10 seconds, set the required cooking
time in the settings range.
After a few seconds, the time begins to elapse.
Notes
■ The same cooking time can be set automatically for
all hotplates. The set time for each of the hotplates
counts down independently from the others.
You can find information on automatically
programming the cooking time in section ~ "Basic
settings"
■ If the Combi Zone or Move function is selected for
the combined hotplate, the set time for both
hotplates is the same.
Changing or cancelling the time
Select the hotplate and then press the 0 symbol.
Change the cooking time using the programming zone
or set to ‹‹ in order to cancel the time.