
Operation Manual
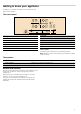
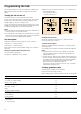
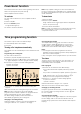
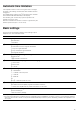
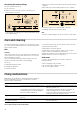
Table Of Contents
- [en] Instructions for installation and use
- Ú Table of contents[en] Instructions for installation and use
- Installation instructions
- Assembly
- Important notes
- Preparation of assembly kitchen units, figures 1/2/3/4
- Installing the appliance, figures 5/7
- Changing the intensity of the 13 / 16 Amp connection current, figure 8
- 1. Turn on the hob with the main switch. Do not place any pans on the hotplates
- 2. Within the following 60 seconds, adjust all hotplates to the desired power level according to the required connection current (see table).
- 3. Turn off all the hotplates in sequence, starting from the lower right and continuing anticlockwise.
- 4. The selected connection current is indicated in the display of the right-hand lateral hotplates.
- 5. Turn off the hob with the main switch.
- Uninstalling the appliance
- Instruction manual
- Produktinfo
- : Safety precautions
- Please read this manual carefully. Please keep the instruction and installation manual as well as the appliance certificate in a safe place for later use or for subsequent owners.
- Check the appliance after removing it from the packaging. If it has suffered any damage in transport, do not connect the appliance, contact the Technical Assistance Service and provide written notification of the damage caused, otherwise you will los...
- This appliance must be installed according to the installation instructions included.
- This appliance is intended for domestic use only. The appliance must only be used for the preparation of food and drink. The appliance must be supervised during operation. Only use this appliance indoors.
- Do not use covers. These can cause accidents, due to overheating, catching fire or materials shattering, for example.
- Do not use inappropriate child safety shields or hob guards. These can cause accidents.
- This appliance is not intended for operation with an external clock timer or a remote control.
- This appliance may be used by children over the age of 8 years old and by persons with reduced physical, sensory or mental capabilities or by persons with a lack of experience or knowledge if they are supervised or are instructed by a person responsi...
- Children must not play with, on, or around the appliance. Children must not clean the appliance or carry out general maintenance unless they are at least 8 years old and are being supervised.
- Keep children below the age of 8 years old at a safe distance from the appliance and power cable.
- We advise that you exercise caution using or standing near an induction hob while it is in operation, if you wear a pacemaker or a similar medical device. Consult your doctor or the device manufacturer concenring its conformity or any possible incomp...
- Risk of fire!
- Risk of burns!
- Risk of electric shock!
- ■ Incorrect repairs are dangerous. Repairs may only be carried out and damaged power cables replaced by one of our trained after-sales technicians. If the appliance is defective, unplug the appliance from the mains or switch off the circuit breaker...
- Risk of electric shock!
- Risk of electric shock!
- Risk of electric shock!
- Malfunction risk!
- The hob is equipped with a fan in the lower section. If there is a drawer under the hob it should not be used to store small objects or paper, since they could damage the fan or interfere with the cooling if they are sucked into it.
- There should be a minimum of 2 cm between the contents of the drawer and fan intake.
- Risk of injury!
- ■ When cooking in a bain marie, the hob and cooking container could shatter due to overheating. The cooking container in the bain marie must not directly touch the bottom of the water-filled pot. Only use heat-resistant cookware.
- Risk of injury!
- Elements that may damage the appliance
- Energy-saving advice
- Cookware
- The hotplates
- Residual heat indicator
- Set the hotplate
- Cooking guidelines table
- Childproof lock
- To deactivate
- 1. Select a hotplate.
- 2. Press the symbol boostG.
- Note
- Time programming function
- Turning off a hotplate automatically
- Time programming function
- Note
- The timer
- Hob frame

14
Powerboost function
The Powerboost function can be used to heat large amounts of
water more quickly than the power level
Š.
All the hotplates have this function.
To activate
The hob must be switched on, but no hotplate should be
working.
1. Select a hotplate.
2. Press the boostG symbol.
The
› indicator lights up
The function should be activated.
Note: If any hotplate is switched on when the Powerboost
function is working,
› and Š will flash on the hotplate display;
the power level
Š will then be set Š. The Powerboost function
will be deactivated.
To deactivate
1. Select a hotplate.
2. Press the symbol boostG.
The
› indicator will no longer appear and the hotplate will
return to the power level
Š.
The function will be deactivated.
Note: In certain circumstances, the Powerboost function may
turn off automatically in order to protect the electronic
components inside the hob.
Time programming function
This function may be used in two different ways:
■ to automatically switch off a hotplate.
■ as a timer.
Turning off a hotplate automatically
The hotplate turns off automatically once the selected time has
elapsed.
Programming the cooking time.
The hob must be switched on:
1. Select the required hotplate and power level.
2. Press the 0 symbol. The Ú indicator on the hotplate lights
up.
‹‹ is displayed on the time program function display.
3. Press the + or - symbol. The basic setting appears:
+ symbol: 30 minutes.
- symbol: 10 minutes.
4. Press the + or - symbol until the required cooking time
appears.
After a few seconds, the cooking time begins to count down.
Note: The same cooking time can be automatically
programmed for the all the hotplates. The programmed time
passes independently for each of the hotplates.
The Basic settings chapter provides information on
automatically programming the cooking time.
Changing or cancelling the time
Select the hotplate . Press the
0 symbol and change the
cooking time with the + or - symbols, or set to
‹‹.
Once the time has elapsed
The hotplate switches off. A beep sounds and in the time
program function display
‹‹ appears for 10 seconds.
The
Ú indicator on the hotplate lights up. Pressing the 0
symbol turns off the indicators and stops the beeping.
Notes
■ If cooking times have been programmed for various
hotplates, the time programming function always displays the
time for the selected hotplate.
■ Any cooking time can be programmed for up to 99 minutes.
The timer
The timer can be set for periods of up to 99 minutes. It is
independent of the other settings. This function does not
automatically switch off a hotplate.
How to program
1. The timer can be selected in two different ways:
■ If you have selected the hotplate: press the 0 symbol
twice.
■ If you have not selected the hotplate: press the 0 symbol.
The
Ú indicator next to the U symbol lights up. ‹‹ is
displayed on the time program function display.
2. Press the + or - symbol. The basic setting appears.
+ symbol: 10 minutes.
- symbol: 5 minutes.
3. Set the desired time using the + or - symbols.
After a few seconds, the time will start to elapse.
Changing or cancelling the time
Press the
0 symbol various times until the Ú indicator next to
the
U symbol lights up. Change the time or set to ‹‹ with
the + or - symbols.
Once the time has elapsed
A warning signal sounds.
‹‹ is displayed on the time program
function display. After 10 seconds the indicators turn off.
Pressing the
0 symbol turns off the indicators and stops the
beeping.