3FHJTU FS ZPVS OFX EF WJDF PO .
en Table of contents [en]I nst r uct i on manual Fr e st andi ng co ker 8 Intended use . . . . . . . . . . . . . . . . . . . . . . . . . . . . . 4 ( Important safety information . . . . . . . . . . . . . . . 5 D Cleaning . . . . . . . . . . . . . . . . . . . . . . . . . . . . . . . 19 Halogen lamp. . . . . . . . . . . . . . . . . . . . . . . . . . . . . . . . 6 Cleaning agents . . . . . . . . . . . . . . . . . . . . . . . . . . . . .19 Surfaces in the cooking compartment . . . . . . . . . . . .
en Intended use 8Intended use Read these instructions carefully. Only then will you be able to operate your appliance safely and correctly. Retain the instruction manual and installation instructions for future use or for subsequent owners. The images shown in these instructions are for guidance only. Appliance category: Category 1 Check the appliance for damage after unpacking it. Do not connect the appliance if it has been damaged in transport.
Important safety information (Important safety information I mpor t ant saf et y i nf or mat i on :Warning – Risk of fire! A draught is created when the appliance door is opened. Greaseproof paper may come into contact with the heating element and catch fire. Do not place greaseproof paper loosely over accessories during preheating. Always weight down the greaseproof paper with a dish or a baking tin. Only cover the surface required with greaseproof paper.
en Important safety information : Warning – Risk of scalding! The accessible parts become hot during operation. Never touch the hot parts. Keep children at a safe distance. Risk of scalding! ■ When you open the appliance door, hot steam can escape. Steam may not be visible, depending on its temperature. When opening, do not stand too close to the appliance. Open the appliance door carefully. Keep children away. Risk of scalding! ■ Water in a hot cooking compartment may create hot steam.
Causes of damage ]Causes of damage Causes of damge ■ Hob Caution! ■ Only use the burners when cookware has been placed on top. Do not heat up empty pots or pans. The saucepan base will be damaged. ■ Only use pots and pans with an even base. ■ Place the pot or pan centrally over the burner. This will optimise transfer of the heat from the burner flame to the pot or ban base. The handle does not become damaged, and greater energy savings are guaranteed.
en Environmental protection 7Environmental protection ■ Open the appliance door as infrequently as possible when the appliance is in use. Your new appliance is particularly energy-efficient. Here you can find tips on how to save even more energy when using the appliance, and how to dispose of your appliance properly. Envi r onment al pr ot ect i on Saving energy ■ ■ Only preheat the appliance if this is specified in the recipe or in the tables in the operating instructions.
Installation and connection 5Installation and connection Do not install the appliance behind a decorative door or the door of a kitchen unit, as this may cause the appliance to overheat.
en Installation and connection For the after-sales service Caution! ■ The appliance must be connected in accordance with the data on the rating plate. ■ Only connect the appliance to an electrical connection that meets the applicable provisions. The socket must be easily accessible so that you can disconnect the appliance from the electricity supply if necessary. ■ Please ensure the availability of a multi-pin disconnecting system. ■ Never use extension cables or multiple plugs.
Getting to know your appliance *Getting to know your appliance en Note: Depending on the appliance model, individual details and colours may differ. In this section, we will explain the indicators and controls. You will also find out about the various functions of your appliance. Get i ng t o know your ap l i ance General information The design depends on the respective appliance model. Cooking area Here is an overview of the control panel. The design depends on the respective appliance model.
en Getting to know your appliance Control panel Details may vary depending on the appliance model. Types of heating and functions Use the function selector to set the types of heating and other functions. Type of heating < 3D hot air 6 Gentle hot air $ $ ( Pizza setting 7 Circulated air grilling % Top/bottom heating Bottom heating Grill, large area -------- To make sure you always use the right type of heating to cook your food, we have explained the differences and applications below.
Accessories Temperature display When the appliance is heating, the indicator lamp above the temperature selector is lit. It goes out during pauses in the heating. When you are preheating the appliance, the optimal time to place your food in the cooking compartment is when the indicator lamp first goes out. Note: Due to thermal inertia, the temperature displayed may be slightly different to the actual temperature inside the oven.
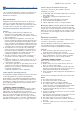
en Accessories Notes ■ Hold the baking tray securely at the sides with both hands and slide it into the shelf supports, keeping it parallel. Do not move the baking tray from side to side as you slide it in, otherwise it will not go in easily and the enamelled surfaces may be damaged. ■ Make sure that you always insert the accessories into the cooking compartment the right way round. ■ Always insert the accessories fully into the cooking compartment so that they do not touch the appliance door.
Before using for the first time KBefore using for the first time en Cleaning the accessories Clean the accessories thoroughly using soapy water and a dish cloth or soft brush. Before you can use your new appliance, you must make some settings. You must also clean the cooking compartment and accessories.
en Cooking pans ÅCooking pans Co ki ng pans Burner Power Minimum Maximum [kW] cookware cookware Electric diameter diameter hotplate* Electric 1 kW 14.5 cm 14.5 cm hotplate* Wok burner* 3.5 kW 24 cm 28 cm High-output 3 kW 24 cm 28 cm burner* Standard1.7 kW 18 cm 24 cm output burner Economy 1 kW 12 cm 18 cm burner * Optional Available for some appliances. Depending on the appliance model.
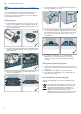
Gas burners ÄGas burners This chapter explains how to set a hotplate. The table shows heat settings and cooking times for various meals. Gas bur ner s Advance cleaning of burner cup and cap Clean the burner cap (1) and cup (2) with water and washing-up liquid. Dry the individual parts carefully. Place the burner cup and cap back on the burner shell (5). Ensure that the igniter (3) and flame safety pin (4) are not damaged. The nozzle (6) must be dry and clean.
en Operating the appliance Example Melting Warming Heating and keeping warm Steaming* Braising* Boiling* Food Chocolate, butter, margarine Stock, tinned vegetables Soups Hotplate Economy burner Cooking mode Small flame Standard-output burner Economy burner Small flame Small flame Fish Potatoes and miscellaneous vegetables, meat Rice, vegetables, meat dishes (with sauces) Pancakes, potatoes, schnitzel, fish fingers Standard-output burner Standard-output burner Between large and small flame Between
Cleaning Rapid heating With Rapid heating, you can shorten the heat-up time. Then, for best results, use: ■ < 3D hot air ■ % Top/bottom heating Only use Rapid heating when a temperature of over 100 °C has been selected. To achieve an even cooking result, do not place your food into the cooking compartment until Rapid heating is complete. 1. Set the function selector to F. 2. Use the temperature selector to set the temperature. The oven will start heating after a few seconds.
en Cleaning Zone Upper glass cover* (depending on appliance model) Cleaning agent Glass cleaner: Clean with a soft cloth. You can remove the upper glass cover for cleaning. To find out how to do this, please refer to the section Upper glass cover. Rotary knobs Hot soapy water: Do not remove. Clean with a dish cloth and dry with a soft cloth. Hob surround Hot soapy water: Do not clean with a glass scraper, lemon juice or vinegar. Gas hob and pan sup- Hot soapy water. ports* Use very little water.
Cleaning Zone Accessories Cleaning agent Hot soapy water: Soak and then clean with a dish cloth or a brush. Aluminium baking tray*: (depending on appliance model) Dry with a soft cloth. Do not clean in the dishwasher. Never use oven cleaner. To prevent scratches, never touch the metal surfaces with a knife or a similar sharp object. Harsh cleaning products, scratchy sponges and rough cleaning cloths are not suitable. Otherwise, you may scratch the surface.
en Rails Keeping the appliance clean Always keep the appliance clean and remove dirt immediately so that stubborn deposits of dirt do not build up. : Warning – Risk of fire! Loose food remnants, fat and meat juices may catch fire. Before using the appliance, remove the worst of the food remnants from the cooking compartment, heating elements and accessories. Tips ■ Clean the cooking compartment after each use. This will ensure that dirt cannot be baked on.
Appliance door qAppliance door With good care and cleaning, your appliance will retain its appearance and remain fully functional for a long time to come. This will tell you how to remove the appliance door and clean it. Ap l i ance do r Detaching and attaching the oven door For cleaning purposes and to remove the door panels, you can detach the oven door. The oven door hinges each have a locking lever. When the locking levers are closed (figure A), the oven door is secured in place.
en Trouble shooting 4. Lift the panel up and pull it out (fig. C). & 3Trouble shooting If a fault occurs, there is often a simple explanation. Before calling the after-sales service, please refer to the fault table and attempt to correct the fault yourself. Tr oubl e sho t i ng Malfunction table Clean the panels with glass cleaner and a soft cloth. If your meal is not successful, please refer to section . We have tested the recipe for you in our cooking studio.
Customer service en Replacing the bulb in the top of the cooking compartment 4Customer service If the cooking compartment light bulb fails, it must be replaced. Heat-resistant, 25 watt, 230 V halogen bulbs are available from the after-sales service or specialist retailers. When handling the halogen bulb, use a dry cloth. This will increase the service life of the bulb. Only use these bulbs. Our after-sales service is there for you if your appliance needs to be repaired.
en Tested for you in our cooking studio JTested for you in our cooking studio Here, you can find a selection of dishes and the ideal settings for them. We will show you which type of heating and temperature are best suited to your dish. You will get information on suitable cooking accessories and the height at which they should be placed in the oven. You will also get tips about cookware and preparation methods.
Tested for you in our cooking studio compartment and the operating modes of your appliance. Ensure that you always use suitable accessories and that they are placed in the oven the right way around. ~ "Accessories" on page 13 Greaseproof paper Only use greaseproof paper that is suitable for the selected temperature. Always cut greaseproof paper to size. Cakes and pastries Your appliance offers you a range of heating types for the preparation of cakes and small baked items.
en Tested for you in our cooking studio Dish Accessories/cookware Shelf position Heating function Temperature in °C Yeast cake with moist topping Universal pan 3 160-180 Yeast cake with moist topping, 2 levels Universal pan + baking tray 3+1 150-170 40-65 Plaited loaf, savarin Universal pan 2 160-170 35-40 Swiss roll Universal pan 2 170-190* 15-20 Strudel, sweet Universal pan 2 190-210 55-65 Strudel, frozen Universal pan 3 % < % % % $ Cooking time in mins 30-50 180-200 3
Tested for you in our cooking studio en Dish Accessories/cookware Shelf position Heating function Step Bread, 1500 g (in a loaf tin or free-form) Universal pan or loaf tin 2 - Flatbread Universal pan 3 - 240-250 25-30 Bread rolls, sweet, fresh Universal pan 3 - 170-180* 20-30 Bread rolls, sweet, fresh, 2 levels Universal pan + baking tray 3+1 - 160-180* 15-25 Bread rolls, fresh Universal pan 3 - 200-220 20-30 Toast with topping, 4 slices Wire rack 3 - 200-220 15-20 To
en Tested for you in our cooking studio The baked item is too dark in a tin or Place the baking tray in the middle of the accessory, not directly against the back wall. loaf tin. The baked item is too dark in colour Select a lower temperature next time and extend the baking time if necessary. overall. The baked item is unevenly browned. Select a slightly lower temperature. Protruding greaseproof paper can affect the air circulation. Always cut greaseproof paper to size.
Tested for you in our cooking studio Uncovered cookware To cook poultry, meat and fish, it is best to use a deep roasting tin. Place the tin onto the wire rack. If you do not have any suitable cookware, use the universal pan. Covered cookware When cooking with covered cookware, the cooking compartment remains considerably cleaner. Ensure that the lid fits well and closes properly. Place the cookware onto the wire rack. Poultry, meat and fish can also become crispy in a covered roasting dish.
en Tested for you in our cooking studio Poultry Dish Accessories/cookware Wire rack Shelf position Heating function 2 7 Temperature in Cooking time °C in mins 200-220 60-70 Chicken, 1.
Tested for you in our cooking studio en Tips on roasting and braising The cooking compartment becomes very dirty. The roast is too dark and the crackling is burned in places, and/or the roast is too dry. The crackling is too thin. The roast looks good but the juices are burnt. The roast looks good but the juices are too clear and watery. The meat gets burned during braising. Prepare your food in an enclosed roasting dish with higher temperature or use the grill tray.
en Tested for you in our cooking studio Acrylamide in foodstuffs Acrylamide is mainly produced in grain and potato products prepared at high temperatures, such as potato crisps, chips, sliced bread, bread rolls, bread or fine baked goods (biscuits, gingerbread, spiced biscuit). Tips for keeping acrylamide to a minimum General ■ Keep cooking times as short as possible. ■ Cook food until it is golden brown, but not too dark. ■ Large, thick pieces of food contain less acrylamide.
Tested for you in our cooking studio Preserving For preserving, the jars and rubber seals must be clean and intact. If possible, use jars of the same size. The information in the table is for round, one-litre jars. 4. Seal the jars with the clips. Place no more than six jars in the cooking compartment. Settings Caution! Do not use jars that are larger or taller than this. The lids could crack. 1. Insert the universal pan at level 2. Arrange the Only use fruit and vegetables in good condition.
en Tested for you in our cooking studio Prove dough Your yeast dough will prove considerably more quickly using this heating function than at room temperature and will not dry out. Do not start the appliance if the cooking compartment is not completely cool. Always allow yeast dough to prove twice.Use the settings indicated in the settings tables for the first and second proving stages (dough fermentation stage and final fermentation stage).
Tested for you in our cooking studio Test dishes These tables have been produced for test institutes to facilitate appliance testing. As per EN 60350-1. 1 2 Baking Items that are placed in the oven on baking trays or in baking tins/dishes at the same time will not necessarily be ready at the same time.
6
6
5IBOL ZPV GPS CVZJOH B #PTDI )PNF "QQMJBODF 3FHJTUFS ZPVS OFX EFWJDF PO .