Free standing cooker HSB738357A en Instruction manual
en Table of contents no i t cur t sen I 8 Intended use . . . . . . . . . . . . . . . . . . . . . . . . . . . . . 4 ( Important safety information . . . . . . . . . . . . . . . 4 p Rails. . . . . . . . . . . . . . . . . . . . . . . . . . . . . . . . . . . 21 General information . . . . . . . . . . . . . . . . . . . . . . . . . . . 5 q Appliance door . . . . . . . . . . . . . . . . . . . . . . . . . . 22 ] Causes of damage . . . . . . . . . . . . . . . . . . . . . . . . 7 Hob . . . . . . . . . . . . . .
en Intended use 8Intended use Read these instructions carefully. Only then will you be able to operate your appliance safely and correctly. Retain the instruction manual and installation instructions for future use or for subsequent owners. Check the appliance for damage after unpacking it. Do not connect the appliance if it has been damaged in transport. Only a licensed professional may connect appliances without plugs. Damage caused by incorrect connection is not covered under warranty.
Important safety information General information : Warning – Risk of fire! A draught is created when the appliance door is opened. Greaseproof paper may come into contact with the heating element and catch fire. Do not place greaseproof paper loosely over accessories during preheating. Always weight down the greaseproof paper with a dish or a baking tin. Only cover the surface required with greaseproof paper. Greaseproof paper must not protrude over the accessories.
en Important safety information : Warning – Risk of injury! : Warning – Risk of electric shock! ■ ■ Scratched glass in the appliance door may develop into a crack. Do not use a glass scraper, sharp or abrasive cleaning aids or detergents. Risk of injury!repairs are dangerous. Repairs ■ Incorrect may only be carried out, and damaged power and gas lines replaced, by an aftersales engineer trained by us. If the appliance is faulty, unplug the mains plug or switch off the fuse in the fuse box.
Causes of damage ]Causes of damage Hob egam d f o sesuaC Caution! ■ Only use the burners when cookware has been placed on top. Do not heat up empty pots or pans. The saucepan base will be damaged. ■ Clear up spills immediately. Use deep pots for dishes with a lot of liquid. This will prevent the food from boiling over. ■ Do not use roasting dishes if they must be heated using two burners. This will cause heat accumulation. The appliance could be damaged.
en Environmental protection 7Environmental protection Your new appliance is particularly energy-efficient. Here you can find tips on how to save even more energy when using the appliance, and how to dispose of your appliance properly. no i t ce t orp l a t nemnor i vnE Saving energy with your oven ■ ■ ■ ■ ■ Only preheat the oven if this is specified in the recipe or in the operating instruction tables. Use dark, black lacquered or enamelled baking tins. They absorb the heat particularly well.
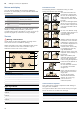
Getting to know your appliance *Getting to know your appliance en Use this section to familiarise yourself with your new appliance. You will find information about the control panel and hob, as well as the oven, types of heating and accessories. Depending on the appliance model, individual details may differ.
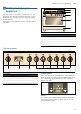
en Getting to know your appliance Buttons and display You can use the buttons to set various additional functions. On the display, you can read the values that you have set. Button 0 Time-setting options D Childproof lock A Minus @ Plus Use Selects the timer U, cooking time r, end time p and clock 0. Locks and unlocks oven functions. Decreases the set values. Increases the set values.
Getting to know your appliance The oven In order to operate the oven, you require two operating knobs: The function selector and the temperature selector. Control knob for oven Function selector Use the function selector to set the type of heating. Type of heating < Convection Use For baking and cooking on one or more levels. The fan distributes the heat from the ring heating element in the back panel evenly around the cooking compartment. # Eco For energy-optimised cooking of selected dishes.
en Accessories _Accessories Your appliance is accompanied by a range of accessories. Here, you can find an overview of the accessories included and information on how to use them correctly. se i r os ec A Accessories Description Baking and roasting shelf For ovenware, cake tins, joints, grilled items, frozen meals. Enamel baking tray For tray bakes and small baked products. Universal pan For moist cakes, pastries, frozen meals and large roasts.
Accessories en Locking function Special accessories The accessories can be pulled out approximately halfway until they lock in place. The locking function prevents the accessories from tilting when they are pulled out. The accessories must be inserted into the cooking compartment correctly for the tilt protection to work properly. When inserting the wire rack, ensure that the lug ‚ is at the rear and is facing downwards.
en Before using for the first time KBefore using for the first time In this section, you can find out what you must do before using your oven or hob to prepare food for the first time. Read the following section beforehand. ~ "Important safety information" on page 4 Remove the appliance packaging and dispose of it appropriately. emi t t s r i f eh t ro f gn i su ero f eB Setting the clock After the appliance has been connected, the 0 symbol and four zeros flash in the display. Set the clock. 1.
Operating the appliance 1Operating the appliance You have already learnt about the controls and how they work. Now we will explain how to set your appliance. You will learn about what happens when you switch the appliance on and off, and how to select the operating mode. ecna i l p a eh t gn i t arepO Oven Operating the oven Switching on the oven Note: Always keep the appliance door closed when it is in operation. 1. Turn the function selector to the desired operating mode. Hob 2.
en Operating the appliance Inserting the rotary spit Removing the rotary spit : Warning – Risk of burns! : Warning – Risk of burns! 1. Insert the rotary spit frame into the threaded bushes 1. Opening the appliance door 2. Slowly pull the universal pan until it is halfway out of Never touch the hot surfaces of the cooking compartment or the heating elements. Children must be kept at a safe distance from the appliance at all times. Open the appliance door carefully. Hot steam may escape.
Time-setting options OTime-setting options Your oven has various time-setting options. You can use the 0 button to call up the menu and switch between the individual functions. As long as the symbols are lit, you can implement settings. The [ ] brackets show you which time-setting function you have currently selected. You can use the @ orA button to directly change a time-setting function that has already been set, if its time symbol is in brackets.
en Time-setting options End time You can change the time at which you wish your dish to be ready. The oven starts automatically and finishes at the desired time. You can, for example, put your dish in the cooking compartment in the morning and set the cooking time so that it is ready at lunch time. Ensure that food is not left in the cooking compartment for too long as it may spoil.
Childproof lock AChildproof lock The oven has a childproof lock to prevent children from switching it on by accident. The oven does not react to any settings. You can still set the clock and the timer when the childproof lock is activated. If the type of heating and temperature or grill setting are set, the childproof lock interrupts the heater element.
en Cleaning agent : Warning – Risk of burns! The appliance becomes very hot. Never touch the interior surfaces of the cooking compartment or the heating elements. Always allow the appliance to cool down. Keep children at a safe distance. Area Appliance exterior Cleaning Hot soapy water: Clean with a dish cloth and then dry with a soft cloth. Do not use glass cleaner or a glass scraper. Stainless steel Hot soapy water: front Clean with a dish cloth and then dry with a soft cloth.
Rails Caution! Do not use oven cleaner on self-cleaning surfaces. This will damage the surfaces. If oven cleaner does get onto these surfaces, dab it off immediately using water and a sponge cloth. Do not rub the surface and do not use abrasive cleaning aids. Keeping the appliance clean Always keep the appliance clean and remove dirt immediately so that stubborn deposits of dirt do not build up. Tips ■ Clean the cooking compartment after each use. This will ensure that dirt cannot be baked on.
en Appliance door 6. Remove the middle panel. qAppliance door With good care and cleaning, your appliance will retain its appearance and remain fully functional for a long time to come. This will tell you how to clean the appliance door. r o d e c na i l p A Removing and installing the door panels To facilitate cleaning, you can remove the glass panels from the oven door. Removing the door panels 1. Open the oven door fully. 2. Lock both hinges on the left and right using the locking pin.
Appliance door Removing and fitting the appliance door If the oven is very heavily soiled, the oven door can be removed for easier cleaning. Normally, however, this is not necessary. Removing the appliance door 1. Open the oven door fully. 2. Lock both hinges on the left and right using the locking pin (a). Note: The locking pins must be fully inserted into the holes in the hinges. 3. Grip the oven door on either side with both hands and close the oven door by approx. 30° (b).
en Trouble shooting 3Trouble shooting : Warning – Risk of injury! Incorrect repairs may cause serious hazards. Repairs to the appliance must only be carried out by a qualified technician. If repairs are required, contact the aftersales service. Fault table Fault The appliance does not work. Possible cause The circuit breaker is faulty Zeros flash in the display. The oven light has failed. Power cut Power cut Faulty oven light The gas burner does not ignite. The oven does not heat up.
Customer service en 4Customer service Our after-sales service is there for you if your appliance needs to be repaired. We will always find an appropriate solution, also in order to avoid after-sales personnel having to make unnecessary visits. When calling us, please give the product number (E no.) and the production number (FD no.) so that we can provide you with the correct advice. The rating plate and the relevant numbers can be found on the inside of the storage compartment flap.
en Tested for you in our cooking studio JTested for you in our cooking studio Here, you can find a selection of dishes and the ideal settings for them. We will show you which type of heating and temperature are best suited to your dish. You will get information on suitable cooking accessories and the height at which they should be placed in the oven. You will also get tips about cookware and preparation methods.
6
3PCFSU #PTDI )BVTHFSÉUF (NC) $BSM 8FSZ 4USBF .ßODIFO (&3.