3FHJTU FS \RXU QHZ GH YLFH RQ 0\%RV FK QRZ DQG JHW IUH H EHQH ILWV CPTDI IPNF XFMDP DPN NF Free standing cooker HLS79R350A [en] Instruction manual Free standing cooker
en Table of contents [en]I nst r uct i on manual Fr e st andi ng co ker 8 Intended use . . . . . . . . . . . . . . . . . . . . . . . . . . . . . 4 ( Important safety information . . . . . . . . . . . . . . . 5 Halogen lamp. . . . . . . . . . . . . . . . . . . . . . . . . . . . . . . . 6 Cleaning function . . . . . . . . . . . . . . . . . . . . . . . . . . . . . 6 ] Causes of damage . . . . . . . . . . . . . . . . . . . . . . . . 7 Hob . . . . . . . . . . . . . . . . . . . . . . . . . . . . . . . . . . .
en Intended use D Cleaning . . . . . . . . . . . . . . . . . . . . . . . . . . . . . . . 33 Cleaning agents . . . . . . . . . . . . . . . . . . . . . . . . . . . . . 33 Keeping the appliance clean . . . . . . . . . . . . . . . . . . . 35 . Cleaning function. . . . . . . . . . . . . . . . . . . . . . . . 35 Before running the cleaning function . . . . . . . . . . . . . 36 Setting the cleaning function . . . . . . . . . . . . . . . . . . . 36 After running the cleaning function. . . . . . . . . . . . . . .
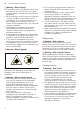
Important safety information the device manufacturer concerning its conformity or any possible incompatibilities, Always slide accessories into the cooking compartment the right way round. ~ "Accessories" on page 16 (Important safety information I mpor t ant saf et y i nf or mat i on :Warning – Risk of fire! Combustible items stored in the cooking compartment may catch fire. Never store combustible items in the cooking compartment. Never open the appliance door if there is smoke inside.
en Important safety information : Warning – Risk of injury! Scratched glass in the appliance door may develop into a crack. Do not use a glass scraper, sharp or abrasive cleaning aids or detergents. Risk of injury! ■ When cooking in a bain marie, the hob and cooking container could shatter due to overheating. The cooking container in the bain marie must not directly touch the bottom of the water-filled pot. Only use heatresistant cookware.
Causes of damage : Warning – Risk of serious harm to health! The appliance becomes very hot when the cleaning function is in progress. The non-stick coating on baking trays and tins is destroyed and noxious gases are released. Never clean non-stick baking trays or baking tins using the cleaning function. In general, you must not use the cleaning function for cleaning accessories.
en Environmental protection Damage to the oven Damage to the plinth drawer Caution! ■ Accessories, foil, greaseproof paper or ovenware on the cooking compartment floor: do not place accessories on the cooking compartment floor. Do not cover the cooking compartment floor with any sort of foil or greaseproof paper. Do not place ovenware on the cooking compartment floor if a temperature of over 50 ºC has been set. This will cause heat to accumulate.
Environmental protection ■ Open the appliance door as infrequently as possible when the appliance is in use. Energy-saving advice ■ ■ ■ ■ ■ ■ It is best to bake several cakes one after the other. The cooking compartment stays warm. This reduces the baking time for the second cake. You can place two cake tins next to each other in the cooking compartment. en ■ Always use the correct lid for each pan. Cooking without a lid uses a lot more energy.
en Induction cooking fInduction cooking I nduc t i on c o k i ng Advantages of induction cooking Induction cooking is very different from traditional cooking methods, as heat builds up directly in the item of cookware. This offers numerous advantages: ■ ■ ■ ■ Saves time when boiling and frying. Saves energy. Easier to care for and clean. Spilled food does not burn on as quickly. Heat control and safety – the hob increases or decreases the heat supply as soon as the user changes the setting.
Installation and connection 5Installation and connection Do not install the appliance behind a decorative door or the door of a kitchen unit, as this may cause the appliance to overheat. I n s t a l a t i on a n d c o n e c t i o n Electrical connection Only licensed specialists may connect the appliance.It is important that you comply with the requirements of your electricity supplier. Any damage arising from the appliance being connected incorrectly will invalidate the warranty.
en Getting to know your appliance Wall fixing To prevent the cooker from tipping over, you must fix it to the wall using the enclosed bracket. Please observe the installation instructions for fixing the oven to the wall. Measures to be noted during transport Secure all mobile parts in and on the appliance using an adhesive tape that can be removed without leaving any traces. Push all accessories (e.g.
Getting to know your appliance en The control panel Indicators Controls # ø Main switch 0 1Ç2Ç...8Ç9 Settings area > D ú ù á 0 Locking the control panel for cleaning Selecting a hotplate Childproof lock Combi zone function PowerBoost function Setting the cooking time Timer Time display Touching a symbol activates the associated function. PowerBoost functions Notes ■ Always keep the control panel clean and dry. Moisture reduces its effectiveness.
en Getting to know your appliance Control panel Details may vary depending on the appliance model. Control knobs The control knobs can be pushed in and remain pressed down when they are in the "out" position. Press down on the control knob again to release it back up. B G Interior lighting Switch the interior lighting on or off. Rapid heating D Childproof lock Start or cancel Rapid heating for the cooking compartment. Lock and unlock the oven functions on the control panel.
Getting to know your appliance en Note: For each heating function, the appliance specifies a default temperature or level. You can accept this value or change it in the appropriate area. Other functions Your new oven has yet more functions; see below for a brief description of these. Function % Programmes q Pyrolytic self-cleaning -------- Use For many types of food, the appliance has preprogrammed setting values that you can use.
Accessories en _Accessories Your appliance is accompanied by a range of accessories. Here, you can find an overview of the accessories included and information on how to use them correctly. Ac es or i es Accessories can be pulled out approximately halfway without tipping. When sliding accessories into the cooking compartment, ensure that the kink in the side rail is at the back. Only then will they lock in place.
Before using for the first time Optional accessories You can buy optional accessories from our after-sales service, from specialist retailers or online. You will find a comprehensive range of products for your appliance in our brochures and online. Their availability and whether it is possible to order them online varies from country to country. See your sales brochures for more details. Note: Not all optional accessories are suitable for every appliance.
en Operating the appliance 1Operating the appliance This chapter explains how to set a hotplate. The table shows heat settings and cooking times for various meals. Oper at i ng t he ap l i ance Switching the hob on and off The main switch is used to switch the hob on and off. To switch on: Touch the # symbol. An audible signal sounds. The indicator next to the main switch and the hotplate indicators ‹ light up. The hob is ready to use. The heat setting is set.
Operating the appliance en Cooking table The table shows which heat setting is suitable for each type of food. The cooking time may vary depending on the type, weight, thickness and quality of the food. Heat setting Cooking time (mins) Melting Chocolate coating Butter, honey, gelatine 1 - 1. 1-2 - Heating and keeping warm Stew, e.g. lentil stew Milk* Heating sausages in water* 1. - 2 1. - 2.
en Operating the appliance Roasting/frying with little oil* Escalope, plain or breaded Escalope, frozen Chop, plain or breaded** Steak (3 cm thick) Poultry breast (2 cm thick)** Poultry breast, frozen** Rissoles (3 cm thick)** Hamburgers (2 cm thick)** Fish and fish fillet, plain Fish and fish fillet, breaded Fish, breaded and frozen, e.g. fish fingers Scampi, prawns Sautéeing fresh vegetables and mushrooms Stir-fry, vegetables, meat cut in Asian-style strips Frozen dishes, e.g.
CombiZone function en wCombiZone function uMove function Using this function, the two left hotplates, which are the same size, can be linked together. When doing this, the same heat setting is set for both hotplates. This is especially suitable for cooking with elongated cookware. You can use this function to link the two left hotplates, which are the same size, and select a different heat setting for each hotplate.
en Time-setting options Activation Combine the two hotplates which each have different heat settings. OTime-setting options Ti me- set i ng opt i ons 1. Select one of the two hotplates which are included in the move function. 2. Touch the ù symbol. The Ú indicator lights up. The heat settings appear in the displays for the two hotplates. The function is activated. Notes ■ The display for the hotplate on which the cookware is placed lights up more brightly.
PowerBoost function Notes To set a cooking time of under 10 minutes, always touch 0 before you select the required value. ■ If a cooking time was programmed for several hotplates, the time information for the selected hotplate is shown in the timer display. ■ Select the relevant hotplate to call up the remaining cooking time. ■ You can set a cooking time of up to ŠŠ minutes. ■ The kitchen timer You can use the kitchen timer to set a time of up to 99 minutes.
en Childproof lock AChildproof lock You can use the childproof lock to prevent children from switching on the hob. Chi l dpr o f l ock Activating and deactivating the childproof lock The hob must be switched off. To activate: Touch the D symbol for approx. 4 seconds. The D symbol lights up for 10 seconds. The hob is locked. To deactivate: Touch the D symbol for approx. 4 seconds. The lock is released.
Basic settings en QBasic settings The appliance has various basic settings. These basic settings can be altered to suit your individual requirements. Indicator/ Function symbol Basi c set i ngs ™‚ Childproof lock ‹ ‚ ƒ ™ƒ Signal tones ‹ ‚ ƒ „ ™„ Confirmation and fault signals are switched off. Only the fault signal is switched on. Only the confirmation signal is switched on. All signal tones are switched on.* Display energy consumption ‹ ‚ ™† Manual*. Automatic. Function deactivated.
Basic settings en ™ƒ„ Automatic management with power limitation ‹ ‚ ™‹ Deactivated: Shows the power limitation according to the power management function.* Activated: Does not show the power limitation of the power management function. Restore to standard settings ‹ ‚ Individual settings.* Restore factory settings. *Factory setting **The hob's maximum power output is shown on the rating plate. The settings have been saved.
Energy consumption indicator [Energy consumption indicator This function indicates the total amount of energy consumed by this hob the last time it was used for cooking. Once switched off, the energy consumption in kWh is displayed for 10 seconds. The picture shows an example with an energy consumption of ‚.‹‰ kWh. Ener gy consumpt i on i ndi cat or en tCookware check This function can be used to check the speed and quality of the cooking process depending on the cookware.
en Power manager hPower manager You can use the power manager to set the total power of the hob. The hob is preset at the factory. Its maximum performance is specified on the rating plate. You can use the power manager to change the value in accordance with the requirements for the relevant electrical installation. In order not to exceed this set value, the hob automatically distributes the power available between the cooking zones that are switched on.
Time-setting options OTime-setting options Ti me- set i ng opt i ons 3. Use the en A or @ button to set the cooking time. Your appliance has different time-setting options. Time-setting option Use y Cooking time Once the set cooking time has elapsed, the appliance will automatically stop heating. Enter a cooking time and the required end { End time time. The appliance will start up automatically so that it finishes cooking at the required time. The timer functions like an egg timer.
en Time-setting options Setting the end time Changing and cancelling You can delay the time at which cooking is due to finish. You can, for example, put your food in the cooking compartment in the morning and set the cooking time so that it is ready at lunch time. You can use the A or @ button to change the end time. After a few seconds, the change will be applied. The end time cannot be changed once the cooking time has already started to count down.
Childproof lock Checking time-setting options If time-setting options have been set, the corresponding symbols are lit up on the display. The symbol for which the time is currently being displayed will be indicated. To check the values for the different time-setting options, touch the v button repeatedly until the required symbol is indicated. Setting the time Once the appliance has been connected to the mains or following a power failure, the clock will flash on the display. Set the time.
en Sabbath mode Changing the basic settings The function selector must be set to the "Off" position. 1. Press and hold the v button for approximately 4 seconds. The first basic setting will appear on the display, e.g. ™‹‚ ‚. 2. Turn the temperature selector to change the setting as required. 3. Use the @ button to navigate to the next basic setting. 4.
Cleaning DCleaning With good care and cleaning, your appliance will retain its appearance and remain fully functioning for a long time to come. We will explain here how you should correctly care for and clean your appliance. Cl eani ng Cleaning agents Damage to the various different surfaces caused by using the wrong cleaning agent can be avoided by observing the following instructions.
en Cleaning Area Glass hob* (Depending on the appliance model) Cleaning products Care: Protective/care products for glass Cleaning: Cleaning agents for glass. Follow the cleaning instructions on the packaging. Area Rack :Glass scraper for heavy soiling: Remove the protective cover and clean using the blade only. Caution, the blade is very sharp. Risk of injury. Cover the blade again after cleaning. Replace damaged blades immediately. Glass panel Glass cleaner: Clean with a soft cloth.
Cleaning function Keeping the appliance clean Always keep the appliance clean and remove dirt immediately so that stubborn deposits of dirt do not build up. : Warning – Risk of fire! Loose food remnants, fat and meat juices may catch fire. Before using the appliance, remove the worst of the food remnants from the cooking compartment, heating elements and accessories. Tips Clean the cooking compartment after each use. This will ensure that dirt cannot be baked on.
en Cleaning function Before running the cleaning function Make sure that the cooking compartment is empty. Remove any accessories, cookware or shelf rails from the cooking compartment. Please see the relevant section for information on how to remove the rails. ~ "Rails" on page 37 Clean the appliance door and along the edges of the cooking compartment in the area around the seal. Do not scrub or remove the seal.
Rails en qAppliance door pRails With good care and cleaning, your appliance will retain its appearance and remain fully functional for a long time to come. This will tell you how to remove the shelves and clean them. With good care and cleaning, your appliance will retain its appearance and remain fully functional for a long time to come. This will tell you how to remove the appliance door and clean it.
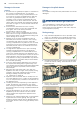
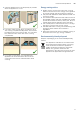
en Appliance door Attaching the door Reattach the oven door in the reverse sequence to removal. $ % 1. When attaching the oven door, ensure that both hinges are inserted straight into the opening (figure A). 2. The notch on the hinge must engage on both sides (figure B). $ % 4. Unscrew the retaining clips on the right and left. Lift the panel and remove the clips from the panel (fig. C). 5. Remove the seal from the bottom of the panel (fig. D). Pull the seal and remove it up and out.
Appliance door en Installation During installation, make sure that the lettering "right above" is upside down at the bottom left of both panels. 1. Insert the lower panel at an angle towards the back (fig. A). 2. Slide in the middle panel (fig. B). $ % 3. Stick the retaining clips onto the right and left-hand side of the panel, aligning them so that the retaining carriers are over the screw holes, and then screw into place (fig. C). 4. Hook the seal in to the bottom of the panel again (fig. D).
en Frequently Asked Questions (FAQ) Do not use the oven again until the panels have been correctly installed. {Frequently Asked Questions (FAQ) Fr equent l y Asked Quest i ons ( FAQ) Using the appliance Why can't I switch on the hob and why is the childproof lock symbol lit? The childproof lock is activated.
Trouble shooting en Cleaning How do I clean the hob? Using a special glass-ceramic cleaning agent produces the best results. We advise against using harsh or abrasive cleaning agents, dishwater detergent (concentrated) or scouring pads. You can find more information on cleaning and caring for your hob in the section on ~ "Cleaning" 3Trouble shooting If a fault occurs, there is often a simple explanation.
en Trouble shooting Rectifying faults yourself Error messages on the display You can often easily rectify technical faults with the appliance yourself. If a dish does not turn out exactly as you wanted, you can find useful cooking tips and instructions at the end of this instruction manual. ~ "Tested for you in our cooking studio" on page 47 If an error message with "“" appears on the display, e.g. “‹†-„ƒ, touch the v button. This will reset the error message. Reset the time, if necessary.
Customer service Replacing the bulb in the oven ceiling light en 4Customer service If the bulb in the oven light fails, it must be replaced. Heat-resistant, 25 watt, 230 V halogen bulbs are available from the after-sales service or specialist retailers. When handling the halogen bulb, use a dry cloth. This will increase the service life of the bulb. Only use these bulbs. Our after-sales service is there for you if your appliance needs to be repaired.
en Programmes clay or plastic, and cookware with plastic handles, is not suitable. Size of the cookware: The roast should cover around two thirds of the cookware base.This will ensure that you get good meat juices. The distance between the meat and the lid should be at least 3 cm. The meat may expand as it roasts. PProgrammes You can prepare food very easily using the various programmes. Simply select a programme and the appliance will apply the optimal settings for you.
Programmes Programme Food Cookware Add liquid Shelf posi- Set weight tion 3 Total weight 2 Total weight Baked potatoes, whole Unpeeled, starchy Universal pan potatoes Stew, with vegetables Vegetarian Deep roasting dish with lid No 10 Stew, with meat As per recipe 2 11 Goulash As per recipe 2 12 Fish, whole 13 Chicken, not stuffed 14 Chicken pieces 15 Turkey breast Whole, seasoned Roasting dish with glass lid 16 Duck, unstuffed 17 Goose, unstuffed 18 Pot-roasted beef 19 Sirloin
en Programmes Programme 25 Joint of veal, lean 26 Leg of roe venison 27 Rabbit, whole 28 Shoulder of pork 29 Joint of pork, with crackling 30 Fillet of pork Food Cookware Shelf posi- Set weight tion E.g.
Tested for you in our cooking studio JTested for you in our cooking studio Here, you can find a selection of dishes and the ideal settings for them. We will show you which type of heating and temperature are best suited to your dish. You will get information on suitable cooking accessories and the height at which they should be placed in the oven. You will also get tips about cookware and preparation methods.
en Tested for you in our cooking studio Accessories Only use original accessories supplied with your appliance. These have been tailored to the cooking compartment and the operating modes of your appliance. Ensure that you always use suitable accessories and that they are placed in the oven the right way around. ~ "Accessories" on page 16 Greaseproof paper Only use greaseproof paper that is suitable for the selected temperature. Always cut greaseproof paper to size.
Tested for you in our cooking studio en Dish Accessories/cookware Shelf position Heating function Temperature in °C Yeast cake with dry topping, 2 levels Universal pan + baking tray 3+1 150-170 Yeast cake with moist topping Universal pan 3 160-180 30-50 Yeast cake with moist topping, 2 levels Universal pan + baking tray 3+1 150-170 40-65 Plaited loaf, savarin Universal pan 2 160-170 35-40 Swiss roll Universal pan 2 170-190* 15-20 Strudel, sweet Universal pan 2 190-210 55-6
en Tested for you in our cooking studio Bread and rolls Dish Accessories/cookware Shelf position Heating function Step Bread, 750 g (in a loaf tin or free-form) Universal pan or loaf tin 2 - Bread, 1000 g (in a loaf tin or free-form) Universal pan or loaf tin 2 - 200-220 35-50 Bread, 1500 g (in a loaf tin or free-form) Universal pan or loaf tin 2 - 180-200 60-70 Flatbread Universal pan 3 - 240-250 25-30 Bread rolls, sweet, fresh Universal pan 3 - 170-180* 20-30 Bread rolls
Tested for you in our cooking studio The baked item is too light on top, and too dark underneath. The baked item is too dark on top, and too light underneath. The baked item is too dark in a tin or loaf tin. The baked item is too dark in colour overall. The baked item is unevenly browned. You were baking on several levels. The items on the top baking tray are darker than those on the lower baking tray. The baked item looks good, but is not cooked properly in the middle.
en Tested for you in our cooking studio Shiny roasting dishes made from stainless steel or aluminium reflect heat like a mirror and are therefore not particularly suitable. The poultry, meat and fish cooks slower and does not brown so well. Use a higher temperature and/or a longer cooking time. Observe the manufacturer's instructions for your roasting cookware. Uncovered cookware To cook poultry, meat and fish, it is best to use a deep roasting tin. Place the tin onto the wire rack.
Tested for you in our cooking studio Fish Fish cooked whole does not have to be turned. Place the whole fish into the cooking compartment in swimming position with the dorsal fin facing upwards. Placing half a potato or a small oven-proof container in the stomach cavity of the fish will provide stability. en You can tell when the fish is cooked because the dorsal fin can be removed easily. When stewing, add two to three tablespoons of liquid and a little lemon juice or vinegar into the cookware.
en Tested for you in our cooking studio Tips on roasting and braising The cooking compartment becomes very dirty. The roast is too dark and the crackling is burned in places, and/or the roast is too dry. The crackling is too thin. The roast looks good but the juices are burnt. The roast looks good but the juices are too clear and watery. The meat gets burned during braising. Prepare your food in an enclosed roasting dish with higher temperature or use the grill tray.
Tested for you in our cooking studio Acrylamide in foodstuffs Acrylamide is mainly produced in grain and potato products prepared at high temperatures, such as potato en crisps, chips, sliced bread, bread rolls, bread or fine baked goods (biscuits, gingerbread, spiced biscuit). Tips for keeping acrylamide to a minimum General ■ Keep cooking times as short as possible. ■ Cook food until it is golden brown, but not too dark. ■ Large, thick pieces of food contain less acrylamide.
en Tested for you in our cooking studio Dish Accessories/cookware Shelf position Heating function Searing time Temperain min ture in °C Veal medallions, 4 cm thick Cookware, uncovered 2 4 80* Saddle of lamb, boneless, 200 g each Cookware, uncovered 2 4 85* 30-70 Leg of lamb, boned, 1 kg, tied Cookware, uncovered 2 ; ; ; Cooking time in min 50-70 6-8 95* 100-160 * Preheat Tips for slow cooking Slow-cooking duck breast.
Tested for you in our cooking studio Preserving Fruit After approx. 40 to 50 minutes, small bubbles begin to form at short intervals. Switch off the oven. Fruit in one-litre jars Apples, redcurrants, strawberries Cherries, apricots, peaches, gooseberries Apple purée, pears, plums After 25 to 35 minutes of residual heat, remove the preserving jars from the cooking compartment.
en Tested for you in our cooking studio Defrosting For defrosting frozen fruit, vegetables and baked items. Poultry, meat and fish should ideally be defrosted in the refrigerator. Not suitable for cream cakes or cream gateaux. Use the following shelf positions when defrosting: ■ 1 wire rack: Position 2 ■ 2 wire racks: Positions 3 + 1 Tip: Food that has been frozen flat or in portions defrosts more quickly than food items frozen in a block.
Tested for you in our cooking studio en Grilling Also slide in the universal pan. The liquid will be caught and the cooking compartment stays cleaner.
5IBOL ZPV GPS CVZJOH B #PTDI )PNF "QQMJBODF 5HJLVWHU \RXU QHZ GHYLFH RQ 0\%RVFK QRZ DQG SURILW GLUHFWO\ IURP t &YQFSU UJQT USJDLT GPS ZPVS BQQMJBODF t 8BSSBOUZ FYUFOTJPO PQUJPOT t %JTDPVOUT GPS BDDFTTPSJFT TQBSF QBSUT t %JHJUBM NBOVBM BOE BMM BQQMJBODF EBUB BU IBOE t &BTZ BDDFTT UP #PTDI )PNF "QQMJBODFT 4FSWJDF )UHH DQG HDV\ UHJLVWUDWLRQ ² DOVR RQ PRELOH SKRQHV XXX CPTDI IPNF DPN XFMDPNF -PPLJOH GPS IFMQ :PV}MM GJOE JU IFSF ([SHUW DGYLFH IRU \RXU %RVFK KRPH DSSOLDQFHV QHHG KHOS ZLWK SUREOHPV RU