
Installation Guide


21
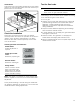
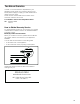
Install Grates
First position the outer grates, followed by the the central
grate. If you only have two grates, the order in which you
position them is not relevant.
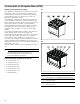
Check the Installation
Place each correct-sized burner cap in its seated,
notched position and check the operation of the electric
igniters. Check the flame characteristics. The flame
should be blue with a minimal yellow tip on the outer
cone of the flames.
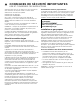
Checking the flame characteristics
Note: If the flame is completely or mostly yellow, verify
that the regulator is set for the correct fuel. Retest after
adjustment.
Some yellow streaking is normal during the initial start-
up. Allow the appliance to operate for 4–5 minutes and
reevaluate before making adjustments.
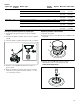
Test for Gas Leaks
9 WARNING
RISK OF FIRE
Never check for gas leaks with a flame.
Leak testing is to be conducted by the installer according
to the instructions given in this section.
1.
Turn on gas.
2.
Apply a non-corrosive leak detection fluid. Include all
joints and fittings between the shutoff valve and the
appliance. Include gas fittings and joints in the
appliance if connections may have been disturbed
during installation.
3.
Inspect for leaks. Bubbles appearing around fittings
and connections indicate a leak.
4.
If a leak appears, turn off supply line gas shutoff valve
and tighten connections.
5.
Retest for leaks. Turn gas back on at supply line
shutoff valve and reapply leak detection fluid.
6.
When no bubbles appear, test is complete. Wipe off all
detection fluid residue.
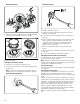
Yellow flames:
Further adjustment is
required.
Yellow tips on outer
cones:
Normal for propane gas
Soft blue flames:
Normal for natural gas
Orange flames:
Can be normal if certain
types of humidifiers are
used in the home. Flames
should return to blue with-
out the humidifier running.