
Installation Guide


12
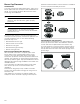
3.
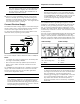
Close the oven door until it catches on the hinge stop
levers, locking the hinges at the correct angle for door
removal. The door can be removed when it is pulled
up from the open position by about 8 inches
(203 mm). This takes the tension off the spring-loaded
hinges so that the door can be easily lifted out.
9 CAUTION
RISK OF PINCHING
Closing the door by 8" (203 mm) takes the
pressure off the spring. If this is not done, the
door can still be removed but the latch will now
slam shut and will pinch or cut your hand.
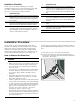
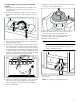
4.
The door is heavy. Use both hands to firmly grip it by
the sides. Do not grip the door by the handle. Keeping
the angle of the door the same, lift the door straight up
approximately 3/4" (19 mm) to unhook the hinges
from the slots, and then pull it out towards you until the
hinges are clear of the oven housing.
5.
Place the door in a convenient and stable location for
cleaning.
6.
Refit the door in the reverse order in which it was
removed.
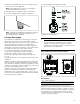
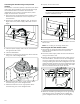
Fitting the Rear Vent Trim
1.
The rear vent trim is nested in the styrofoam
packaging. Remove the packaging and the protective
film from the rear vent trim.
2.
Place the rear vent trim into the holes intended for this
purpose using the dowel pins.
3.
Insert and tighten the enclosed screws from below.
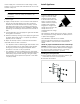
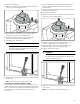
Fitting the Adjustable Feet
1.
Remove all parts that are not permanently fixed,
especially the pan supports and burners.
2.
Remove the accessories from the oven.
9 CAUTION
Protect the floor.
3.
Tilt the appliance and put it to the floor on the
backside.
9 CAUTION
Do not use the door handle or projecting control
panel for carrying.
´