
Installation Guide


11
Installation Checklist
Please refer to the pages following for complete
installation instructions. Use this checklist to verify that
you have completed each step of the installation
process. This can help you avoid mistakes.
Installation Procedure
Installati on Procedure
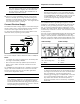
An air curtain or other overhead range hood, which
operates by blowing a downward airflow onto a range,
shall not be used in conjunction with the gas range
unless the hood and range have been designed and
tested in accordance with ANSI Z21.1and listed by an
independent testing laboratory for combination use.
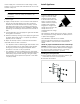
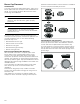
How to Remove the Oven Door
9 WARNING
▯ Make sure the oven is cool and the power to the
oven has been turned off before removing the
door. Failure to do so could result in electrical
shock or burns.
▯ The oven door is heavy and parts of it are fragile.
Use both hands to remove the oven door. The
door front is glass. Handle carefully to avoid
breaking.
▯ Grasp only the side of the oven door. Do not
grasp the handle as it may swing in your hand
and cause damage or injury.
▯ Failure to grasp the oven door firmly and properly
could result in personal injury or product damage.
▯ To avoid injury from the hinge bracket snapping
closed, make sure that both levers are securely in
place before removing the door. Also, do not
force the door open or closed – this could
damage the hinge or result in injury.
▯ Do not place the removed door down on sharp or
pointed objects as this could break the glass. Lay
on a flat, smooth surface, positioned so that the
door cannot fall over.
To avoid injury or damage, make sure that you read the
above WARNING before attempting to remove the oven
door.
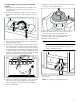
1.
Open the oven door to its fully open position.
2.
Lock the two hinges on the left and right using the
locking pin. The locking pins must be fully inserted into
the holes in the hinges.
è
Installation step
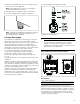
Before installing the range, be sure to verify the
cabinet dimensions are correct for your unit and
that the required electrical and gas connections
are present.
Before installing the range, make sure that any
opening in the wall behind the appliance and in
the floor under the appliance shall be sealed.
Refer to the installation manual for content
regarding Safety, Cabinet Dimensions, Remov-
ing Packaging, Electrical Installation, Gas Con-
nection, and Customer Service.
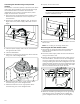
Removing the oven door prior to installation
reduces the unit weight and makes the range
easier to move. Additionally, the removal of the
oven door provides access to handholds for lift-
ing.
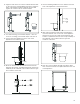
Fitting the adjustable feet.
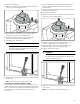
Move the range (2people needed) into place in
front of the installation opening, leaving the bot-
tom packaging on the unit to avoid damaging
flooring.
Plug the range into a properly configured recep-
tacle.
Protect the flooring from damage, then slide the
unit all the way into place, making sure to route
the power cord correctly.
Reinstall the oven door.
è
Installation step