
Operation Manual
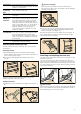
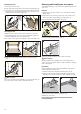
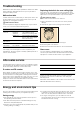
Table Of Contents
- en Instruction manual
- Table of contentsen Instruction manual
- : Important safety information
- Read these instructions carefully. Only then will you be able to operate your appliance safely and correctly. Retain the instruction manual and installation instructions for future use or for subsequent owners.
- This appliance is only intended to be fully fitted in a kitchen. Observe the special installation instructions.
- Check the appliance for damage after unpacking it. Do not connect the appliance if it has been damaged in transport.
- Only a licensed professional may connect appliances without plugs. Damage caused by incorrect connection is not covered under warranty.
- This appliance is intended for domestic use only. The appliance must only be used for the preparation of food and drink. The appliance must be supervised during operation. Only use this appliance indoors.
- This appliance is intended for use up to a maximum height of 2000 metres above sea level.
- This appliance may be used by children over the age of 8 years old and by persons with reduced physical, sensory or mental capabilities or by persons with a lack of experience or knowledge if they are supervised or are instructed by a person responsi...
- Children must not play with, on, or around the appliance. Children must not clean the appliance or carry out general maintenance unless they are at least 8 years old and are being supervised.
- Keep children below the age of 8 years old at a safe distance from the appliance and power cable.
- Always slide accessories into the cooking compartment correctly. See "Description of accessories in the instruction manual.
- Mechanical abrasion on baking trays can cause some of the aluminium to be removed, and acidic, alkaline and salty foods can cause the aluminium to dissolve, for example due to fruit acid or baked goods dipped in a lye solution. Do not place food dire...
- Risk of fire!
- Risk of burns!
- Risk of scalding!
- Risk of injury!
- Risk of electric shock!
- ■ Incorrect repairs are dangerous. Repairs may only be carried out by one of our trained after-sales engineers. If the appliance is faulty, unplug the mains plug or switch off the fuse in the fuse box. Contact the after-sales service.
- Risk of electric shock and serious injury!
- Risk of electric shock!
- Risk of electric shock!
- Risk of electric shock!
- Causes of damage
- : Important safety information
- Your new oven
- Your accessories
- Before using the oven for the first time
- Setting the oven
- Types of heating and temperature
- The oven should switch off automatically
- 1. Use the function selector to select the required type of heating.
- 2. Use the temperature selector to set the temperature or the grill setting.
- 3. Press the 0 clock button. The x Cooking time symbol flashes.
- 4. Use the + or - button to set the cooking time. Default value for + button = 30 minutes Default value for - button = 10 minutes
- The cooking time has elapsed
- Changing the setting
- Cancelling the setting
- Setting the cooking time if the clock is hidden
- The oven should switch on and off automatically
- 1. Use the function selector to select the required type of heating.
- 2. Use the temperature selector to set the temperature or the grill setting.
- 3. Press the 0 clock button. The x Cooking time symbol flashes.
- 4. Use the + or - button to set the cooking time.
- 5. Press the 0 Clock button repeatedly until the yEnd time symbol flashes. You can see in the display when the meal will be ready.
- 6. Use the + button to set a later end time. The setting is adopted after a few seconds. The display shows the end time until the oven starts operating.
- The cooking time has elapsed
- Note
- Setting the clock
- Setting the timer
- Childproof lock
- Care and cleaning
- Notes
- Cleaning agents
- Detaching and refitting the rails
- Detaching and attaching the oven door
- Removing and installing the door panels
- Removal
- 1. Detach the oven door and lay it on a cloth with the handle facing down.
- 2. Pull off the cover at the top of the oven door. Press in the tabs on the left and right using your fingers (fig. A).
- 3. Lift the top panel up and pull it out (fig. B).
- 4. Lift the panel up and pull it out (fig. C).
- : Risk of injury!
- Installation
- Removal
- Troubleshooting
- After-sales service
- Energy and environment tips
- Tested for you in our cooking studio
- Notes
- Cakes and pastries
- Baking tips
- Meat, poultry, fish
- Tips for roasting and grilling
- Bakes, gratins, toast with toppings
- Preprepared products
- Special dishes
- 1. Bring 1 litre of milk (3.5% fat) to the boil, let it cool to 40 °C.
- 2. Add 150 g yoghurt (from the refrigerator) to the milk and stir well.
- 3. Pour into small sealable jars and cover with cling film.
- 4. Place the jars on a wire rack and slide in at level 1.
- 5. Set the baking temperature to 50 °C and continue as indicated.
- 1. Prepare the yeast dough as usual, place it in a heat-resistant ceramic dish and cover with a lid.
- 2. Preheat the oven as indicated.
- 3. Close the oven door and allow the yeast dough to prove in the oven.
- Defrosting
- Drying
- Preserving
- Acrylamide in foodstuffs
- Test dishes

16
Baking tips
Meat, poultry, fish
Ovenware
You may use any heatresistant ovenware. The universal pan is
suitable for large roasts.
Glass ovenware is the most suitable. Ensure that the lid of the
roasting dish fits well and closes properly.
Add a little more liquid when using enamelled roasting dishes.
With roasting dishes made of stainless steel, browning is not so
intense and the meat may be somewhat less well cooked.
Increase the cooking times.
Information in the tables:
Ovenware without a lid = open
Ovenware with a lid = closed
Always place the ovenware in the centre of the wire rack.
Place hot glass ovenware on a dry mat after cooking. The glass
could crack if placed on a cold or wet surface.
Roasting
Add in a little liquid if the meat is lean. Cover the base of the
ovenware with approx. ½ cm of liquid.
Add liquid generously for pot roasts. Cover the base of the
ovenware with approx. 1 - 2 cm of liquid.
The amount of liquid depends on the type of meat and the
material the ovenware is made of. If preparing meat in an
enamelled roasting dish, it will need a little more liquid than if
cooked in glass ovenware.
Roasting dishes made from stainless steel are not ideal. The
meat cooks more slowly and browns less fully. Use a higher
temperature and/or a longer cooking time.
Tips for grilling
Always grill with the oven door closed.
Heat the grill for approximately 3 minutes before placing the
food to be grilled on the wire rack.
Place the food to be grilled directly on the wire rack. If you are
grilling a single piece, the best results are achieved by placing
it in the centre of the wire rack. The universal pan should also
be inserted at level 1. The meat juices are collected in the pan,
keeping the oven cleaner.
Do not insert the baking tray or universal pan at level 4. They
may become deformed at high temperatures and damage the
cooking compartment when they are removed.
If possible, grill items should be of equal thickness. This will
allow them to brown evenly and remain succulent and juicy.
Only add salt to steaks once they have been grilled.
Turn grilled items after
Z of the specified time.
The grill element switches on and off intermittently. This is
normal. The grill setting determines how frequently this occurs.
Meat
Turn pieces of meat halfway through the cooking time.
When the roast is ready, turn off the oven and allow it to rest for
an additional 10 minutes. This allows better distribution of the
meat juices.
After cooking, wrap sirloin in aluminium foil and leave it to rest
for 10 minutes in the oven.
You wish to bake according to your own
recipe.
Use similar items in the baking tables as a guide.
How to tell whether sponge cake is
baked through:
Approx. 10 minutes before the end of the baking time stated in the recipe, insert a cock-
tail stick into the cake at its deepest point. If the cocktail stick comes out clean, the cake
is ready.
The cake collapses. Use less fluid next time or set the oven temperature 10 degrees lower. Observe the
specified mixing times in the recipe.
The cake has risen in the middle but is
lower around the edge.
Do not grease the edge of the springform cake tin. After baking, loosen the cake care-
fully with a knife.
The cake goes too dark on top. Place the cake lower in the oven and bake at a lower temperature for slightly longer.
The cake is too dry. Make tiny holes in the finished cake using a cocktail stick. Then drizzle fruit juice or an
alcoholic drink over it. Next time, set the temperature 10 degrees higher and reduce the
baking time.
The bread or cake (e.g. cheesecake)
looks good, but is soggy on the inside
(sticky, with streaks of water).
Use slightly less fluid next time and bake for slightly longer at a lower temperature. For
cakes with a moist topping, bake the base first. Cover the base with almonds or bread-
crumbs first and then apply the topping. Take care to follow recipes and baking times.
The pastries are not evenly browned. Select a slightly lower temperature to ensure that the cake is baked more evenly. Bake
delicate pastries on one level using
% Top/bottom heating. Protruding greaseproof
paper can affect the air circulation. For this reason, always trim greaseproof paper to fit
the baking tray.
The bottom of a fruit cake is too light. Place the cake one level lower the next time.
The fruit juice overflows. Next time, use the deeper universal pan (if available).
The pieces of dough are sticking
together when the yeast rolls are baked.
There must be a distance of about 2 cm between the bread rolls. This gives enough
space for the bread rolls to expand and bake evenly on all sides.
You want to bake on two levels:
Always use
2 Hot air to bake on more than one level. Dishes that are put in the oven at
the same time do not have to be ready at the same time.
Condensation forms when you bake
moist cakes.
Steam can form during baking, which escapes via the door. The steam may settle and
form water droplets on the control panel or on the fronts of adjacent units. This is a natu-
ral process.