Oven HBG676E.
en Table of contents no i t c u r t s n I ] ne [ 8 Intended use . . . . . . . . . . . . . . . . . . . . . . . . . . . . . 5 ( Important safety information . . . . . . . . . . . . . . . 5 General information Halogen lamp. . . . . Meat thermometer . Cleaning function . . . . . . . . . . . . . . . . . . . . . . . . . . . . . . . . . . . . . . . . . . . . . . . . . . . . . . . . . . . . . . . . . . . . . . . . . . . . . . . . . . . . . . . . . . . . . . . . . . . . . . . . . . .5 .
en J Tested for you in our cooking studio . . . . . . . . 31 Do not use silicone moulds . . . . . . . Cakes and small baked items . . . . . Bread and rolls. . . . . . . . . . . . . . . . . Pizza, quiche and savoury cakes . . . Bakes and soufflés. . . . . . . . . . . . . . Poultry . . . . . . . . . . . . . . . . . . . . . . . Meat . . . . . . . . . . . . . . . . . . . . . . . . . Fish . . . . . . . . . . . . . . . . . . . . . . . . . Vegetables and side dishes . . . . . . . Yogurt . . . . . . . . . . . . .
Intended use 8Intended use Read these instructions carefully. Only then will you be able to operate your appliance safely and correctly. Retain the instruction manual and installation instructions for future use or for subsequent owners. This appliance is only intended to be fully fitted in a kitchen. Observe the special installation instructions. Check the appliance for damage after unpacking it. Do not connect the appliance if it has been damaged in transport.
en Important safety information : Warning – Risk of injury! Meat thermometer ■ : Warning – Risk of electric shock! Scratched glass in the appliance door may develop into a crack. Do not use a glass scraper, sharp or abrasive cleaning aids or detergents. Risk of injury! ■ The hinges on the appliance door move when opening and closing the door, and you may be trapped. Keep your hands away from the hinges. The insulation of an incompatible meat thermometer may be damaged.
Causes of damage ]Causes of damage General information egam d f o sesuaC Caution! ■ Accessories, foil, greaseproof paper or ovenware on the cooking compartment floor: do not place accessories on the cooking compartment floor. Do not cover the cooking compartment floor with any sort of foil or greaseproof paper. Do not place ovenware on the cooking compartment floor if a temperature of over 50 ºC has been set. This will cause heat to accumulate.
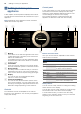
en Getting to know your appliance Control panel *Getting to know your appliance In the control panel, you can use the various buttons, touch fields, touch-screen displays and the rotary selector to set the different appliance functions. The current settings are shown on the display. The overview shows the control panel when the appliance is switched on with the menu display. In this chapter, we will explain the displays and controls. You will also find out about the various functions of your appliance.
Getting to know your appliance Display The display is structured so that the information can be read at a glance in any situation. The value that you can currently set is highlighted and displayed in white text. The value in the background is displayed in grey. Highlighted The highlighted value can be changed directly without first being selected. After starting an operation, either the temperature or the level is always highlighted.
en Getting to know your appliance Types of heating To enable you to find the correct type of heating for your dish, we have explained the differences and scopes of application here. The symbols for each type of heating help you to remember them. Heating type 4D hot air < Temperature 30-275 °C When cooking at very high temperatures, the appliance lowers the temperature slightly after an extended period. Use For baking and roasting on one or more levels.
Accessories Further information In most cases, the appliance provides notes and further information on the action just carried out. Touch the ° field. The note is shown in the display for a few seconds. Use the rotary selector to scroll to the end of longer notes. Some notes are displayed automatically, for example as confirmation, or to provide an instruction or warning. Cooking compartment functions _Accessories Your appliance is accompanied by a range of accessories.
en Accessories Notes ■ Ensure that you always insert the accessories into the cooking compartment the right way round. ■ Always insert the accessories fully into the cooking compartment so that they do not touch the appliance door. Locking function The accessories can be pulled out approximately halfway until they lock in place. The locking function prevents the accessories from tilting when they are pulled out.
Before using for the first time Bread-baking stone For home-made bread, bread rolls and pizzas that require a crispy base. The baking stone must be preheated to the recommended temperature. Glass roasting dish (5.1 litres) For stews and bakes. Particularly suitable for the "Meals" operating mode. Glass tray For large roasts, moist cakes and bakes. Glass tray For bakes, vegetable dishes and baked goods.
en Operating the appliance Switch off the appliance after the indicated cooking time using the ÿ On/Off button. After the cooking compartment has cooled down, clean the smooth surfaces with soapy water and a dish cloth. Cleaning the accessories Clean the accessories thoroughly using soapy water and a dish cloth or soft brush. 1Operating the appliance You have already learnt about the controls and how they work. Now we will explain how to set your appliance.
Operating the appliance en Selecting an operating mode Once the appliance is switched on, the default operating mode is displayed. If you would like to select a different operating mode, you can do so using the menu. You can find detailed descriptions of the individual operating modes in the corresponding sections. The following always applies: 1. Touch the appropriate text field. The function is highlighted. 2. Turn the rotary selector to change the highlighted selection. 3.
en Time-setting options 4. Press the l Start/Stop button to start. OTime-setting options The cooking time counts down. Your appliance has different time-setting options. sno i t po gn i t es -emi T Time-setting option Use q Cooking time After the set cooking time has elapsed, the appliance ends the operation automatically. r End Enter a cooking time and the required end time. The appliance starts automatically so that the operation ends at the required time.
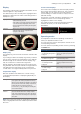
Time-setting options 3. Before starting the operation, touch the "End" text field. The projected end time is highlighted white in the display. 4. Set a later end time using the rotary selector. 7\SH RI KHDWLQJ ' KRW DLU +RW DLU HFR 7HPSHUDWXUH 7RS ERWWRP KHDWLQJ & 7\SH RI KHDWLQJ +RW DLU HFR 7RS ERWWRP KHDWLQJ &RRNLQJ WLPH &RRNLQJ WLPH P V & 7\SHV RI KHDWLQJ (QG P V (QG (QG 5DSLG SUHKHDWLQJ *ULOO ODUJH DUHD RII 5. Press the l Start/Stop button to start.
en Meat thermometer @Meat thermometer The meat thermometer makes accurate cooking possible. It measures the temperature inside the food. As soon as the set temperature is reached, the appliance switches off automatically. re t emo reh t t aeM Heating types Not all heating types are suitable for operation with the meat thermometer. If you have inserted the meat thermometer into the cooking compartment, the following heating types are available. < % .
Meat thermometer en Setting the core temperature Core temperatures of different foods The meat thermometer must be inserted into the socket on the left-hand side of the cooking compartment. Do not use frozen food. The figures in the table are given as a guide. They depend on the quality and composition of the food. You can find comprehensive information on the heating mode and temperature at the end of the instruction manual. ~ "Tested for you in our cooking studio" on page 31 1.
en Childproof lock AChildproof lock Your appliance is equipped with a childproof lock so that children cannot switch it on accidentally or change any settings. The control panel is locked and no settings can be made. The appliance can only be switched off using the ÿ On/Off button. kco l f o rpd l i hC Activating and deactivating You can activate and deactivate the childproof lock when the appliance is switched on or off. In each case, press the D field for approx. 4 seconds.
Sabbath mode Clock display Off Digital* Analogue Lighting Off during operation On during operation* Childproof lock Button lock only* Door lock and button lock Operation after switching Main menu on Types of heating* Assist Night-time darkening Switched off* Switched on Brand logo Display* Do not display Fan run-on time Recommended* Minimum Pull-out system Not retrofitted* (for rails and single pullout system) Retrofitted (for double and triple pull-out systems) Sabbath mode Switched on Switched off* * Fac
en Cleaning agent DCleaning agent With good care and cleaning, your appliance will retain its appearance and remain fully functioning for a long time to come. We will explain here how you should correctly care for and clean your appliance. Door panels t nega gn i nae l C Door handle Suitable cleaning agents To ensure that the different surfaces are not damaged by using the wrong cleaning agent, observe the information in the table.
Cleaning function Notes ■ Slight differences in colour on the front of the appliance are caused by the use of different materials, such as glass, plastic and metal. ■ Shadows on the door panels, which look like streaks, are caused by reflections made by the interior lighting. ■ Enamel is baked on at very high temperatures.This can cause some slight colour variation. This is normal and does not affect operation. The edges of thin trays cannot be completely enamelled. As a result, these edges can be rough.
en Cleaning function : Warning – Risk of fire! ■ Risk of fire! ■ Loose food residues, grease and meat juices may catch fire during the cleaning function. Before starting the cleaning function, remove coarse dirt from the cooking compartment and from the accessories. The appliance will become very hot on the outside during the cleaning function. Never hang combustible objects, e.g. tea towels, on the door handle. Do not place anything against the front of the appliance.
Rails en 2. Then insert the rail into the front socket „, until the pRails rail also rests against the cooking compartment wall here, and press it downwards … (figure "). With good care and cleaning, your appliance will retain its appearance and remain fully functional for a long time to come. This will tell you how to remove the shelves and clean them. 1 s l i aR 2 D Detaching and refitting the rails : Warning – Risk of burns! F E The rails become very hot. Never touch the hot rails.
Appliance door en Removing the appliance door Removing the door cover 1. Open the appliance door fully. 2. Fold open the two locking levers on the left and right (figure !). 3. Close the appliance door as far as the limit stop ‚. The stainless steel inlay in the door cover may become discoloured. To carry out thorough cleaning, you can remove the cover. With both hands, grip the door on the left- and righthand side ƒ, and pull it out upwards (figure "). 1I 2 1. Open the appliance door slightly. 2.
Appliance door 4. Loosen and remove the screws on the left and right of the appliance door (figure #). 5. Before closing the door again, trap a tea towel which has been folded several times in the door (figure $). Pull out the front panel upwards and lay it on a flat surface with the door handle facing downwards. en 3. Insert the front panel at the bottom into the retainers (figure #). 4. Close the front panel until both upper hooks are opposite the opening (figure $). 6.
en Trouble shooting 3Trouble shooting If a fault occurs, there is often a simple explanation. Before calling the after-sales service, please refer to the fault table and attempt to correct the fault yourself. gn i t o h s e l buo r T Fault The appliance does not work. "Sprache Deutsch" appears on the display. The time does not appear when the appliance is switched off. The appliance door cannot be opened. The appliance door cannot be opened; the n symbol lights up on the display.
Customer service Replacing the bulb in the top of the cooking compartment If the cooking compartment light bulb fails, it must be replaced. Heat-resistant, 40 watt, 230 V halogen bulbs are available from the after-sales service or specialist retailers. When handling the halogen bulb, use a dry cloth. This will increase the service life of the bulb. Only use these bulbs. : Warning – Risk of electric shock! When replacing the cooking compartment bulb, the bulb socket contacts are live.
en Dishes PDishes You can use the "Assist" operating mode to prepare a wide variety of food. The appliance selects the optimal settings for you. s eh s i D Information on the settings ■ ■ ■ ■ ■ ■ The cooking result depends on the quality of the food and the size and type of cookware. For an optimal cooking result, use food that is in good condition and chilled meat only. For frozen food, use food straight out of the freezer only.
Tested for you in our cooking studio Continue cooking After the cooking time has ended, you can leave some dishes to continue cooking if you are not satisfied with the cooking result. A query appears on the display, which asks if you want to continue cooking. If you want to continue cooking, touch the "Extend cooking time" text field. A cooking time is suggested, which can be changed. Press the l Start/Stop button to start. Note: You can extend the cooking time as often as required.
en Tested for you in our cooking studio Baking on two levels: ■ Universal pan: Level 3 Baking tray: Level 1 ■ Baking tins/dishes on the wire rack First wire rack: Level 3 Second wire rack: Level 1 Baking on three levels: Baking tray: Level 5 Universal pan: Level 3 Baking tray: Level 1 ■ Baking on four levels: 4 wire racks with greaseproof paper First wire rack: Level 5 Second wire rack: Level 3 Third wire rack: Level 2 Fourth wire rack: Level 1 ■ By preparing several dishes at the same time, you can m
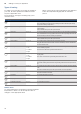
Tested for you in our cooking studio en Dish Accessories/cookware Shelf posi- Type of tion heating Temperature in °C Sponge base, 2 eggs Sponge flan, 3 eggs Sponge flan, 6 eggs Flan base tin Springform cake tin, diameter 26 cm Springform cake tin, diameter 28 cm 3 2 2 % < < 150-170* 160-170* 150-170* Cooking time in mins.
en Tested for you in our cooking studio Dish Accessories/cookware Shelf posi- Type of tion heating Temperature in °C Meringue Meringue, 2 levels Macaroons Macaroons, 2 levels Macaroons, 3 levels * Preheat Baking tray Baking tray + universal pan Baking tray Baking tray + universal pan Baking trays + universal pan 3 1+3 3 1+3 5+3+1 80-90* 80-90* 90-110 90-110 90-110 < < < < < Cooking time in mins.
Tested for you in our cooking studio en Baking on two levels Use 4D hot air. Baked items that are placed into the oven on trays or in baking tins/dishes at the same time will not necessarily be ready at the same time. ■ Universal pan: Level 3 Baking tray: Level 1 ■ Baking tins/dishes on the wire rack First wire rack: Level 3 Second wire rack: Level 1 Recommended setting values In the table, you can find the ideal heating type for various kinds of bread and bread roll.
en Tested for you in our cooking studio Dish Accessories Shelf posi- Type of tion heating Temperature in °C Grill Cooking setting time in mins.
Tested for you in our cooking studio Recommended setting values In the table, you can find the ideal heating type for various dishes. The temperature and baking time depend on the consistency and amount of the dough. Setting ranges are indicated for this reason. Try using the lower values at first. A lower temperature results in more even browning. You can use a higher setting next time if necessary. Note: Baking times can not be reduced by using higher temperatures.
en Tested for you in our cooking studio By preparing several dishes at the same time, you can make energy savings of up to 45 per cent. Position baking tins/dishes next to one another in the cooking compartment. Settings ranges are indicated for this reason. Try using the lower values at first. A lower temperature results in more even browning. You can increase the temperature next time if necessary.
Tested for you in our cooking studio Covered cookware When cooking with covered cookware, the cooking compartment remains considerably cleaner. Ensure that the lid fits well and closes properly. Place the cookware onto the wire rack. Very hot steam may escape when opening the lid after cooking. Lift the lid at the rear, so that the hot steam can escape away from you. Poultry can also become crispy in a covered roasting dish. To do so, use a roasting dish with a glass lid and set a higher temperature.
en Tested for you in our cooking studio Dish Accessories/cookware Shelf posi- Type of tion heating Temperature in °C Grill Cooking setting time in mins. Duck & goose Duck, 2 kg Duck breast, 300 g each Goose, 3 kg Goose legs, 350 g each Wire rack Wire rack Wire rack Wire rack 1 3 2 2 7 7 7 7 180-200 230-250 160-180 210-230 - 90-110 17-20 120-150 40-50 Wire rack Cookware, covered Wire rack 2 2 2 7 % 7 180-200 240-260 180-200 - 70-90 80-100 80-100 Turkey Small turkey, 2.
Tested for you in our cooking studio Grilling Keep the appliance door closed when using the grill. Never grill with the appliance door open. Slide the universal pan into the oven at the indicated shelf position with the wire rack attached. Dripping fat will be collected. Ensure that the wire rack is positioned correctly on the universal pan. ~ "Accessories" on page 11 Note: When grilling very fatty items, do not slide the universal pan in directly under the wire rack, but rather at level 2.
en Tested for you in our cooking studio Dish Accessories/cookware Shelf posi- Type of tion heating Temperature in °C Grill Cooking setting time in mins. Veal Joint of veal, 1.5 kg Knuckle of veal, 1.
Tested for you in our cooking studio Roasting and stewing in cookware Only use cookware which is suitable for use in an oven. Check whether the cookware fits in the cooking compartment. Glass cookware is most suitable. Place hot glass cookware onto a dry mat after cooking. If the surface is damp or cold, the glass may crack. Shiny roasting dishes made from stainless steel or aluminium reflect heat like a mirror and are therefore not particularly suitable. The fish cooks more slowly and browns less.
Tested for you in our cooking studio en Vegetables and side dishes Here, you can find information for preparing grilled vegetables, potatoes and frozen potato products. Remove unused accessories from the cooking compartment. This will allow you to achieve ideal cooking results and save energy. Shelf positions Use the indicated shelf positions. Cooking on one level Adhere to the specifications in the table. Cooking on two levels Use 4D hot air.
Tested for you in our cooking studio Save energy with Eco heating types When cooking food, you can save energy using the energy-efficient heating types "Hotair Eco" and "Top/ bottom heating Eco". Place the food into the empty cooking compartment before it has heated up. Otherwise, energy optimisation will not have any effect. Always keep the appliance door closed when cooking. Remove unused accessories from the cooking compartment. This will allow you to achieve ideal cooking results and save energy.
en Tested for you in our cooking studio Dish Accessories/cookware Shelf posi- Type of tion heating Temperature in °C Biscuits Piped cookies Small yeast cakes Baking tray Baking tray Baking tray 3 3 3 . . # 140-160 140-150 160-180 Cooking time in mins. 15-30 25-35 25-35 Bread & bread rolls Multigrain bread, 1.
Tested for you in our cooking studio Cookware Use shallow cookware, e.g. a glass/porcelain serving dish. Place the cookware into the cooking compartment to preheat it. Always place the uncovered cookware onto the wire rack at level 2. You can find additional information in the tips on slow cooking attached to the settings table. Your appliance features the heating type "Slow cook". Only start operation when the cooking compartment has fully cooled down. Allow the cooking compartment to warm up for approx.
en Tested for you in our cooking studio Drying With 4D hot air, you can dry foods with outstanding results. With this type of preserving, flavourings are concentrated by the dehydration. Only use unblemished fruit, vegetables and herbs and wash them thoroughly. Line the wire rack with greaseproof paper or parchment paper. Drain the excess water from the fruit and dry it. If necessary, cut it into equal chunks or thin slices. Place unpeeled fruit onto the dish with the sliced surfaces facing upwards.
Tested for you in our cooking studio Vegetables After a short while, small bubbles will form at short intervals. As soon as all preserving jars are bubbling, reduce the temperature to 120 °C and allow the jars to continue to bubble in the closed cooking compartment as indicated in the table. After this time has elapsed, switch off the appliance and make use of the residual heat for several minutes as indicated in the table.
en Tested for you in our cooking studio Defrosting The defrost heating type is suitable for defrosting frozen fruit, vegetables and baked items. Poultry, meat and fish should ideally be defrosted in the refrigerator. Use the following shelf positions when defrosting: ■ 1 wire rack: Level 2 ■ 2 wire racks: Level 3+1 Recommended setting values The times in the table are average values. They are dependent on the quality, freezing temperature (-18 °C) and composition of the food. Time ranges are indicated.
Tested for you in our cooking studio Test dishes These tables have been produced for test institutes to facilitate the inspection of the appliance. In accordance with EN 60350-1:2013 and IEC 60350-1:2011. Baking Baked items that are placed into the oven on trays or in baking tins/dishes at the same time will not necessarily be ready at the same time.
en Tested for you in our cooking studio Grilling Also slide in the universal pan. The liquid will be caught and the cooking compartment stays cleaner. Dish Grilling Toasting bread* Beefburgers, x 12** * Do not preheat ** Turn after 2/3 of the total time 52 Type of heating used: ■ ( Grill, large area Accessories Shelf posi- Type of tion heating Grill Cooking setting time in mins.
6
6
3PCFSU #PTDI )BVTHFSÉUF (NC) $BSM 8FSZ 4USBF .