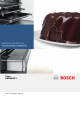
Oven HBG634B.
en Table of contents no i t c u r t s n I ] ne [ 8 Intended use . . . . . . . . . . . . . . . . . . . . . . . . . . . . . 4 ( Important safety information . . . . . . . . . . . . . . . 4 General information . . . . . . . . . . . . . . . . . . . . . . . . . . . 4 Halogen lamp. . . . . . . . . . . . . . . . . . . . . . . . . . . . . . . . 5 ] Causes of damage . . . . . . . . . . . . . . . . . . . . . . . . 6 General information . . . . . . . . . . . . . . . . . . . . . . . . . . .
en Intended use 8Intended use Read these instructions carefully. Only then will you be able to operate your appliance safely and correctly. Retain the instruction manual and installation instructions for future use or for subsequent owners. This appliance is only intended to be fully fitted in a kitchen. Observe the special installation instructions. Check the appliance for damage after unpacking it. Do not connect the appliance if it has been damaged in transport.
Important safety information : Warning – Risk of scalding! The accessible parts become hot during operation. Never touch the hot parts. Keep children at a safe distance. Risk of scalding! ■ When you open the appliance door, hot steam can escape. Steam may not be visible, depending on its temperature. When opening, do not stand too close to the appliance. Open the appliance door carefully. Keep children away. Risk of scalding! ■ Water in a hot cooking compartment may create hot steam.
en Causes of damage ]Causes of damage General information egam d f o sesuaC Caution! ■ Accessories, foil, greaseproof paper or ovenware on the cooking compartment floor: do not place accessories on the cooking compartment floor. Do not cover the cooking compartment floor with any sort of foil or greaseproof paper. Do not place ovenware on the cooking compartment floor if a temperature of over 50 ºC has been set. This will cause heat to accumulate.
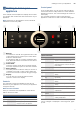
Getting to know your appliance en Control panel *Getting to know your appliance In the control panel, you can use the various buttons, touch fields and the rotary selector to set the different appliance functions. The current settings are shown on the display. The overview shows the control panel when the appliance is switched on with a selected heating type. In this chapter, we will explain the displays and controls. You will also find out about the various functions of your appliance.
en Getting to know your appliance Rotary selector You can use the rotary selector to change the adjustment values shown on the display. In most selection lists, such as the temperature, you have to turn the rotary selector back the other way if you reach the minimum or maximum value. However, for the heating types for example, the first selection follows the last. Display The display is structured so that the information can be read at a glance in any situation.
Getting to know your appliance en 7 Hot air grilling 30-300 °C For roasting poultry, whole fish and larger pieces of meat. The grill element and the fan switch on and off alternately. The fan circulates the hot air around the food. For grilling flat items for grilling, such as steaks and sausages, for making toast, and for cooking au gratin. The whole area below the grill element becomes hot.
en Accessories _Accessories Your appliance is accompanied by a range of accessories. Here, you can find an overview of the accessories included and information on how to use them correctly. se i r os ec A Accessories included Your appliance is equipped with the following accessories: Locking function The accessories can be pulled out approximately halfway until they lock in place. The locking function prevents the accessories from tilting when they are pulled out.
Accessories Optional accessories You can buy optional accessories from the after-sales service, from specialist retailers or online. *You will find a comprehensive range of products for your appliance in our brochures and online. Both availability and whether it is possible to order online differ between countries. Please see your sales brochures for more details. When purchasing, please always quote the exact order number of the optional accessory.
en Before using for the first time KBefore using for the first time Switch off the appliance after the indicated cooking time using the ÿ On/Off button. After the cooking compartment has cooled down, clean the smooth surfaces with soapy water and a dish cloth. Before you can use your new appliance, you must make some settings. You must also clean the cooking compartment and accessories. Cleaning the accessories Clean the accessories thoroughly using soapy water and a dish cloth or soft brush.
Operating the appliance 1Operating the appliance en Example in the picture: Hot air grilling 7 at 195 °C. 1. Set the type of heating using the rotary selector. You have already learnt about the controls and how they work. Now we will explain how to set your appliance. You will learn about what happens when you switch the appliance on and off, and how to select the operating mode.
en Time-setting options Directly selecting types of heating You can select certain types of heating directly using the touch fields. This makes the appliance even easier and faster to set. The types of heating that can be set directly are: ■ < 4D hot air ■ % Top/bottom heating ■ . Hot air eco ■ ( Grill, large area Applying settings 1. Touch the field with the required type of heating. The temperature is immediately highlighted white. 2. Set the temperature or grill setting using the rotary selector.
Time-setting options 4. Press the l Start/Stop button to start. 3. Before starting, touch the s field again once. The cooking time counts down on the display. _ 7H[W P 7H[W a & V The end time is highlighted white in the display. 4. Set a later end time using the rotary selector. VWDUW _ 7H[W 7\SHV RI KHDWLQJ 7H[W VWRS &RRNLQJ WLPH ¿ (QG The appliance begins to heat up. Once the cooking time has elapsed, an audible signal sounds. The appliance stops heating.
en Childproof lock Setting the timer The timer runs alongside other settings. You can set it at any time, even if the appliance is switched off. It has its own audible signal so that you can tell whether it is the timer or a cooking time which has elapsed. Adjusting settings The timer duration always starts at zero minutes. The higher the value, the greater the time steps when setting the timer. The maximum setting is 24 hours. 1. Touch the t field. The symbol lights up red.
Basic settings QBasic settings There are various settings available to you in order to help use your appliance effectively and simply. You can change these settings as required. sgn i t es c i saB Changing the basic settings The appliance must be switched off. 1. Touch the ° field for approx. 3 seconds. Notes on the process appear on the display. 2. Press the s field to confirm the notes. The first setting "language" appears on the display. 3.
en Sabbath mode FSabbath mode With the Sabbath mode, a cooking time of up to 74 hours can be set. You can keep the food in the cooking compartment warm without having to switch the oven on or off. edom h t ab aS DCleaning agent With good care and cleaning, your appliance will retain its appearance and remain fully functioning for a long time to come. We will explain here how you should correctly care for and clean your appliance.
Cleaning agent Door panels Door handle Hot soapy water: Clean with a dish cloth and then dry with a soft cloth. Do not use a glass scraper or a stainless steel scouring pad. Hot soapy water: Clean with a dish cloth and then dry with a soft cloth. If descaler comes into contact with the door handle, wipe it off immediately. Otherwise, any stains will not be able to be removed.
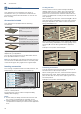
en Rails pRails With good care and cleaning, your appliance will retain its appearance and remain fully functional for a long time to come. This will tell you how to remove the shelves and clean them. s l i aR Detaching and refitting the rails : Warning – Risk of burns! The rails become very hot. Never touch the hot rails. Always allow the appliance to cool down. Keep children away from the appliance. Attaching the rails The rails only fit on the right or the left side.
Appliance door qAppliance door With good care and cleaning, your appliance will retain its appearance and remain fully functional for a long time to come. This will tell you how to remove the appliance door and clean it. r o d e c na i l p A Removing and fitting the appliance door For cleaning purposes and to remove the door panels, you can detach the appliance door. The appliance door hinges each have a locking lever. When the locking levers are closed (figure !), the appliance door is secured in place.
Appliance door en Note: Clean the stainless steel inlay in the cover with stainless steel cleaner. Clean the rest of the door cover with soapy water and a soft cloth. 4. Open the appliance door again slightly. Put the cover back in place and press on it until it clicks audibly into place (figure #). : Warning – Risk of injury! ■ Risk of injury! ■ Scratched glass in the appliance door may develop into a crack. Do not use a glass scraper, sharp or abrasive cleaning aids or detergents.
Trouble shooting 3Trouble shooting If a fault occurs, there is often a simple explanation. Before calling the after-sales service, please refer to the fault table and attempt to correct the fault yourself. gn i t o h s e l buo r T Fault The appliance does not work. "Sprache Deutsch" appears on the display. The time does not appear when the appliance is switched off. The appliance does not heat up; the m symbol lights up on the display.
Customer service en Replacing the bulb in the top of the cooking compartment If the cooking compartment light bulb fails, it must be replaced. Heat-resistant, 40 watt, 230 V halogen bulbs are available from the after-sales service or specialist retailers. When handling the halogen bulb, use a dry cloth. This will increase the service life of the bulb. Only use these bulbs. : Warning – Risk of electric shock! When replacing the cooking compartment bulb, the bulb socket contacts are live.
Tested for you in our cooking studio JTested for you in our cooking studio Baking on three levels: ■ Baking tray: Level 5 Universal pan: Level 3 Baking tray: Level 1 Here, you can find a selection of dishes and the ideal settings for them. We will show you which type of heating and temperature are best suited to your dish. You will get information on suitable cooking accessories and the height at which they should be placed in the oven. You will also get tips about cookware and preparation methods.
en Tested for you in our cooking studio If you wish to follow one of your own recipes when baking, you should use a similar baked item in the table as a reference. You can find additional information in the tips on baking attached to the settings table. Remove unused accessories from the cooking compartment. This will achieve the best possible cooking results and energy savings of up to 20 per cent.
Tested for you in our cooking studio en Dish Accessories/cookware Shelf posi- Type of tion heating Temperature in °C Muffins Muffins, 2 levels Small yeast cakes Small yeast cakes, 2 levels Puff pastry Puff pastry, 2 levels Puff pastry, 3 levels Puff pastry, flat, 4 levels Choux pastry Choux pastry, 2 levels Danish pastry Muffin tray Muffin tray Baking tray Baking tray + universal pan Baking tray Baking tray + universal pan Baking trays + universal pan 4 wire racks Baking tray Baking tray + universal
en Tested for you in our cooking studio The cake is unevenly browned. You were baking on several levels. The items on the top baking tray are darker than those on the lower baking tray. The cake looks good, but is not cooked properly in the middle. The cake cannot be turned out of the dish when it is turned upside down. Select a slightly lower temperature. Protruding greaseproof paper can affect the air circulation. Always cut greaseproof paper to size.
Tested for you in our cooking studio If you wish to follow one of your own recipes when baking, you should use a similar baked item in the table as a reference. Remove unused accessories from the cooking compartment. This will achieve the best possible cooking results and energy savings of up to 20 per cent.
en Tested for you in our cooking studio Baking on several levels Use 4D hot air. Baked items that are placed into the oven on trays or in baking tins/dishes at the same time will not necessarily be ready at the same time.
Tested for you in our cooking studio Dish Accessories Mini pizzas Mini pizzas, diameter 7 cm, 4 levels Savoury cakes & quiches Savoury cakes in a tin Quiche Tarte flambée Pierogi Empanada de atún Börek * Preheat en Universal pan 4 wire racks Shelf position 3 5+3+2+1 Type of heating $ < Temperature in °C 180-200 180-200* Cooking time in mins.
en Tested for you in our cooking studio Bakes & soufflés Accessories/cookware Ovenproof dish Ovenproof dish Shelf position 2 3+1 Type of heating $ < Temperature in °C 160-190 150-170 Cooking time in mins. 50-70 60-80 Potato gratin, raw ingredients, 4 cm deep Potato gratin, raw ingredients, 4 cm deep, 2 levels Soufflé Soufflé Ovenproof dish Individual moulds 2 3 < < 170-190 190-210 35-45 25-30 Poultry Your appliance offers you a range of heating types for preparing poultry.
Tested for you in our cooking studio Note: Only use greaseproof paper that is suitable for the selected temperature. Always cut greaseproof paper to size. Tips ■ For duck or goose, pierce the skin on the underside of the wings. This allows the fat to run out. ■ If using duck breast, score the skin. Do not turn duck breasts. ■ When you turn poultry, ensure that the breast side or the skin side is underneath at first.
en Tested for you in our cooking studio Only use cookware which is suitable for use in an oven. Check whether the cookware fits in the cooking compartment. Glass cookware is most suitable. Place hot glass cookware onto a dry mat after cooking. If the surface is damp or cold, the glass may crack. Add in a little liquid for roasting if the meat is lean. A covering of approx. ^ cm depth should be applied to the base of any glass cookware.
Tested for you in our cooking studio Types of heating used: ■ % Top/bottom heating ■ ■ Dish en 7 Circulated air grilling ( Grill, large area Accessories/cookware Shelf posi- Type of tion heating Temperature in °C Grill Cooking setting time in mins.
en Tested for you in our cooking studio Fish Your appliance offers you a range of heating types for preparing fish. You can find the ideal settings for many dishes in the settings tables. The whole fish does not have to be turned. Place the whole fish into the cooking compartment in swimming position with the dorsal fin facing upwards. Placing half a potato or a small oven-proof container in the stomach cavity of the fish will provide stability.
Tested for you in our cooking studio Types of heating used: ■ % Top/bottom heating ■ ■ en 7 Circulated air grilling ( Grill, large area Dish Accessories/cookware Shelf posi- Type of tion heating Temperature in °C Grill Cooking setting time in mins. Fish Fish, grilled, whole 300 g, e.g. trout Fish, grilled, whole 1.5 kg, e.g.
Tested for you in our cooking studio en Dish Accessories Shelf posi- Type of tion heating Temperature in °C Grill Cooking setting time in mins.
Tested for you in our cooking studio Note: Baking times can not be reduced by using higher temperatures. Cakes or baked items would only be cooked on the outside, but would not be cooked completely in the middle. en Types of heating used: ■ . Hotair Eco ■ # Top/bottom heating Eco Dish Accessories/cookware Shelf posi- Type of tion heating Temperature in °C Cooking time in mins.
en Tested for you in our cooking studio Acrylamide in foodstuffs Acrylamide is mainly produced in grain and potato products prepared at high temperatures, such as potato crisps, chips, sliced bread, bread rolls, bread or fine baked goods (biscuits, gingerbread, spiced biscuit). Tips for keeping acrylamide to a minimum General ■ Keep cooking times as short as possible. ■ Cook food until it is golden brown, but not too dark. ■ Large, thick pieces of food contain less acrylamide.
Tested for you in our cooking studio Dish en Cookware Shelf posi- Type of tion heating Searing time Temperain mins. ture in °C Cooking time in mins. Cookware, uncovered 2 . 8-10 80* 180-240 Cookware, uncovered Cookware, uncovered Cookware, uncovered 2 2 2 . . . 4-6 6-8 5-7 80* 80* 80* 180-240 210-270 30-60 Cookware, uncovered Cookware, uncovered Cookware, uncovered Cookware, uncovered 2 2 2 2 . . . .
en Tested for you in our cooking studio with clamps. Place the jars into the universal pan so that they do not touch each other. Pour 500 ml hot water (approx. 80 °C) into the universal pan. Use the settings indicated in the table. Preserving You can preserve fruit and vegetables using your appliance. : Warning – Risk of injury! Ending the preserving process Fruit After a short while, small bubbles will form at short intervals. Switch off the appliance once all preserving jars are bubbling.
Tested for you in our cooking studio Dough fermentation Use the settings indicated in the table and heat up the appliance. Position the dough bowl on the wire rack. Do not open the appliance door during the proving process, as moisture will escape. Cover the dough. Final fermentation Place your baked item into the oven at the shelf position indicated in the table. If you want to preheat the oven, the final fermentation takes place outside the appliance in a warm place.
en Tested for you in our cooking studio Test dishes These tables have been produced for test institutes to facilitate the inspection of the appliance. In accordance with EN 60350-1:2013 and IEC 60350-1:2011. Baking Baked items that are placed into the oven on trays or in baking tins/dishes at the same time will not necessarily be ready at the same time.
Tested for you in our cooking studio Grilling Also slide in the universal pan. The liquid will be caught and the cooking compartment stays cleaner. Dish Grilling Toasting bread* Beefburgers, x 12** * Do not preheat ** Turn after 2/3 of the total time en Type of heating used: ■ ( Grill, large area Accessories Shelf posi- Type of tion heating Grill Cooking setting time in mins.
6
3PCFSU #PTDI )BVTHFSÉUF (NC) $BSM 8FSZ 4USBF .