
Use And Care Manual


11
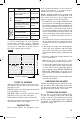
Applications Grit
Wood
For preliminary sand-
ing of rough wood, un-
planed boards.
Coarse 40, 60
For mid-stage sanding
and smoothing of small
irregularities.
Medium 80,
100, 120
For finish and fine sand-
ing speed and sanding
sheet (sandpaper).
Fine 180, 240,
320, 400
Paint/enamels
and primers,
and llers
For removing paint. Coarse 40, 60
For sanding primer.
Medium 80,
100, 120
For final sanding of
primers between coats.
Fine 180, 240,
320
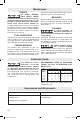
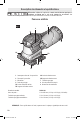
Sanding sheets can be purchased pre-sized
or can be conveniently cut from large-size
commercially available sheets (standard
size: 9” x 11-1/16” or 228 x 280 mm). Cut into
four pieces of equal size as shown (Fig. 11).
Choose the proper grit for the job.
START OF SANDING
With the workpiece firmly secured, first place
the sander’s pad on the work surface, then
switch the tool on.
DO NOT start the tool and bring it up to speed
before applying to the work
DO NOT apply excessive pressure when
switch the tool on (or at any other time)
Either method will likely create swirl marks.
Applying excessive pressure upon start-up will
also shorten the life of the switch
SANDING TIPS
Bosch orbital sanders are designed to pro-
duce exceptional finishes on wood surfaces,
speed stock removal, or to remove lacquer,
varnish, and other coated finishes.
Orbital sanding provides fast, smooth final
finishes. And this model can sand flush on all
three sides of the tool to get in tight places
typical of cabinets, desks and shelving.
• This sander’s even weight distribution and
the prevention of sanding sheet slippage by
the clamping system virtually eliminate any
benefit from pressing on the sander. Exces-
sive pressure to the sander may result in
an uneven sanding job and premature grit
wear. Constant and excessive pressure can
cause overheating and possible damage to
the motor, as well as premature wear out of
the pad.
• It’s usually best to work in strokes that paral-
lel the grain, using some lateral motion so
the main strokes are overlapped as much
as 75%.
• If the surface is rough, start sanding with a
coarse grit, then medium, and then finish
with a fine or extra-fine grit. This procedure
will vary with different types of materials and
work.
• Continue to sand with each grit until the sur-
face looks uniform.
• When going from one grit size to a finer
size, do not skip more than two grit sizes.
• To remove the greatest amount of stock, use
a coarse grit and move the sander steadily
over the entire surface against the grain as
well as with the grain. DO NOT REMAIN IN
ONE SPOT TOO LONG. It may remove too
much material and uneven sanding will re-
sult.
• Sanding with the grain of the wood gives the
smoothest final finish.
REMOVING THE SANDER
Remove the sander from the work before turn-
ing the switch “OFF”. Operating in this man-
ner will prolong switch and motor life and will
greatly increase the quality of your work.
STORING THE SANDER
Do not store tool with PSA sanding sheets
on pad, as sanding creates heat, which will
cause an adhesive bond between the sheet
and the pad to harden when sheet and pad
cool down. (See REMOVING PSA SANDING
SHEETS on page 9.)
9" (228mm)
11-1/16" (280mm)
CUT HERE
CUT HERE
Fig. 11
2610051953.indd 11 8/16/18 11:18 AM