
Installation Manual

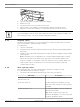

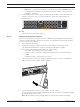

Table Of Contents
- Table of contents
- 1 Safety
- 2 Before you begin
- 3 System overview
- 4 Installation
- 5 Connection
- 6 Turning on/off AC power
- 7 Configuring the storage system
- 8 Maintenance
- Blank Page
- Blank Page
- Blank Page

32 en | Maintenance DSA E-Series (E2800 12-bay)
2018.02 | V1 | DOC Installaton manual Bosch Sicherheitssysteme GmbH
8 Maintenance
8.1 Replacing a drive in a 12-bay unit
The Recovery Guru in SANtricity System Manager monitors the drives in the unit and can notify
you of an impending drive failure or an actual drive failure. When a drive has failed, its amber
Attention LED is on. You can hot-swap a failed drive while the unit is receiving I/O operations.
Before you begin
– You have a replacement drive that is supported by Bosch for the controller unit or
expansion unit.
– You have an ESD wristband, or you have taken other antistatic precautions.
About this procedure
Use this procedure to replace a drive in the following controller units or expansion units:
Type Number of drives Type of drives
12-bay controller unit 12 3.5-inch SAS drives (or 2.5-inch SAS drives in
carriers)
12-bay expansion unit 12
Drive numbering in a 12-bay controller unit or a 12-bay expansion unit
1
5
9
2
6
10
3
7
11
4
8
0
Rules for handling drives
The drives are fragile. Improper drive handling is a leading cause of drive failure. Follow these
rules to avoid damaging the drives in your unit:
– Prevent electrostatic discharge (ESD)
– Keep the drive in the ESD bag until you are ready to install it.
– Do not insert a metal tool or knife into the ESD bag. Open the ESD bag by hand or
cut the top off with a pair of scissors.
– Keep the ESD bag and any packing materials in case you must return a drive later.
– Always wear an ESD wrist strap grounded to an unpainted surface on your storage
enclosure chassis. If a wrist strap is unavailable, touch an unpainted surface on your
storage enclosure chassis before handling the drive.
– Handle drives carefully
– Always use two hands when removing, installing, or carrying a drive.
– Never force a drive into a unit. Use gentle, firm pressure to completely engage the
drive latch.
– Place drives on cushioned surfaces, and never stack drives on top of each other.
– Do not bump drives against other surfaces.
– Before removing a drive, unlatch the handle and wait 30seconds for the drive to spin
down.
– Always use approved packaging when shipping drives.
– Avoid magnetic fields
– Keep drives away from magnetic devices. Magnetic fields can destroy all data on the
drive and cause irreparable damage to the drive circuitry.
To replace a drive observe the instructions in the following chapters:
1. Preparing to replace a drive, page 33