Compact oven CBG635B.
en Table of contents no i t c u r t s n I ] ne [ 8 Intended use . . . . . . . . . . . . . . . . . . . . . . . . . . . . . 4 ( Important safety information . . . . . . . . . . . . . . . 4 General information . . . . . . . . . . . . . . . . . . . . . . . . . . . 4 Halogen lamp. . . . . . . . . . . . . . . . . . . . . . . . . . . . . . . . 5 ] Causes of damage . . . . . . . . . . . . . . . . . . . . . . . . 5 General information . . . . . . . . . . . . . . . . . . . . . . . . . . .
en Intended use 8Intended use Read these instructions carefully. Only then will you be able to operate your appliance safely and correctly. Retain the instruction manual and installation instructions for future use or for subsequent owners. This appliance is only intended to be fully fitted in a kitchen. Observe the special installation instructions. Check the appliance for damage after unpacking it. Do not connect the appliance if it has been damaged in transport.
Causes of damage : Warning – Risk of injury! Scratched glass in the appliance door may develop into a crack. Do not use a glass scraper, sharp or abrasive cleaning aids or detergents. Risk of injury! ■ The hinges on the appliance door move when opening and closing the door, and you may be trapped. Keep your hands away from the hinges. ■ : Warning – Risk of electric shock! Incorrect repairs are dangerous.
en Environmental protection 7Environmental protection Your new appliance is particularly energy-efficient. Here you can find tips on how to save even more energy when using the appliance, and how to dispose of your appliance properly. no i t ce t orp l a t nemnor i vnE Saving energy ■ ■ ■ ■ ■ Only preheat the appliance if this is specified in the recipe or in the tables in the operating instructions. Use dark, black lacquered or enamelled baking tins. They absorb heat particularly well.
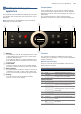
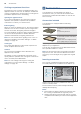
Getting to know your appliance en Control panel *Getting to know your appliance In the control panel, you can use the various buttons, touch fields and the rotary selector to set the different appliance functions. The current settings are shown on the display. The overview shows the control panel when the appliance is switched on with a selected heating type. In this chapter, we will explain the displays and controls. You will also find out about the various functions of your appliance.
en Getting to know your appliance ! Heating types } Temperature % AutoCook a Weight s Time-setting options Rapid heating F Selects the "heating types" operating mode Selects the temperature in the cooking compartment Selects the operating mode for dishes with cooking programmes Selects the weight for the operating mode for dishes Select time-setting options Starts or cancels Rapid heating for the cooking compartment -------- The touch field, which has a value on the display that can be change
Getting to know your appliance en Types of heating To enable you to find the correct type of heating for your dish, we have explained the differences and scopes of application here. The symbols for each type of heating help you to remember them. Heating type 4D hot air < Temperature 30-275 °C When cooking at very high temperatures, the appliance lowers the temperature slightly after an extended period. Use For baking and roasting on one or more levels.
en Accessories Cooking compartment functions The functions in the cooking compartment make your appliance easier to use. This, for example, enables the cooking compartment to be well lit and a cooling fan to prevent the appliance from overheating. Opening the appliance door If you open the appliance door during an on-going operation, the operation is paused. The operation continues to run when you close the door. Interior lighting When you open the appliance door, the interior lighting switches on.
Accessories Locking function The accessories can be pulled out approximately halfway until they lock in place. The locking function prevents the accessories from tilting when they are pulled out. The accessories must be inserted into the cooking compartment correctly for the tilt protection to work properly. When inserting the wire rack, ensure that lug ‚ is at the rear and is facing downwards. The open side must be facing the appliance door and the outer rail must be facing downwards ¾.
en Before using for the first time Glass roasting dish (5.1 litres) For stews and bakes. Particularly suitable for the "Meals" operating mode. HEZ915001 Glass tray HEZ864000 For large roasts, moist cakes and bakes. Pull-out system, 1 level HEZ638108 The pull-out rails at level 1 allow you to pull the accessories out further without them tipping. Decorative trims HEZ660060 For concealing the lower shelf of the unit and the base of the appliance.
Operating the appliance After the cooking compartment has cooled down, clean the smooth surfaces with soapy water and a dish cloth. Cleaning the accessories Clean the accessories thoroughly using soapy water and a dish cloth or soft brush. en 1Operating the appliance You have already learnt about the controls and how they work. Now we will explain how to set your appliance. You will learn about what happens when you switch the appliance on and off, and how to select the operating mode.
en Operating the appliance Selecting an operating mode 4. Press the l Start/Stop button to start. The time on the display shows how long the operation has already been running. Once the appliance is switched on, the default operating mode is displayed. You can start this setting immediately using the l Start/Stop button. If you want to select a different operating mode, you can find detailed descriptions of these modes in the relevant chapters. The following always applies: 1.
Time-setting options Rapid heating With Rapid heating, you can shorten the heat-up time for some heating types. en OTime-setting options Your appliance has different time-setting options. sno i t po gn i t es -emi T Heating types suitable for Rapid heating are: ■ < 4D hot air ■ % Top/bottom heating To ensure an even cooking result, do not place your food in the cooking compartment until Rapid heating is complete.
en Time-setting options 4. Press the l Start/Stop button to start. 4. Set a later end time using the rotary selector. The cooking time counts down on the display. _ 7H[W P 7H[W a & V VWDUW &RRNLQJ WLPH ¿ (QG VWRS The appliance begins to heat up. Once the cooking time has elapsed, an audible signal sounds. The appliance stops heating. The cooking time 00 m 00 s is shown on the display.
Childproof lock Setting the timer The timer runs alongside other settings. You can set it at any time, even if the appliance is switched off. It has its own audible signal so that you can tell whether it is the timer or a cooking time which has elapsed. Adjusting settings The timer duration always starts at zero minutes. The higher the value, the greater the time steps when setting the timer. The maximum setting is 24 hours. 1. Touch the t field. The symbol lights up red.
en Basic settings QBasic settings Brand logo There are various settings available to you in order to help use your appliance effectively and simply. You can change these settings as required. Fan run-on time sgn i t es c i saB Pull-out system Changing the basic settings The appliance must be switched off. Sabbath mode 1. Touch the ° field for approx. 3 seconds. Notes on the process appear on the display. 2. Press the s field to confirm the notes.
Sabbath mode FSabbath mode With the Sabbath mode, a cooking time of up to 74 hours can be set. You can keep the food in the cooking compartment warm without having to switch the oven on or off. edom h t ab aS en DCleaning agent With good care and cleaning, your appliance will retain its appearance and remain fully functioning for a long time to come. We will explain here how you should correctly care for and clean your appliance.
en Cleaning agent Door panels Door handle Hot soapy water: Clean with a dish cloth and then dry with a soft cloth. Do not use a glass scraper or a stainless steel scouring pad. Hot soapy water: Clean with a dish cloth and then dry with a soft cloth. If descaler comes into contact with the door handle, wipe it off immediately. Otherwise, any stains will not be able to be removed.
Rails pRails With good care and cleaning, your appliance will retain its appearance and remain fully functional for a long time to come. This will tell you how to remove the shelves and clean them. s l i aR Detaching and refitting the rails : Warning – Risk of burns! The rails become very hot. Never touch the hot rails. Always allow the appliance to cool down. Keep children away from the appliance. en Attaching the rails The rails only fit on the right or the left side.
Appliance door en qAppliance door With good care and cleaning, your appliance will retain its appearance and remain fully functional for a long time to come. This will tell you how to remove the appliance door and clean it. r o d e c na i l p A Removing and fitting the appliance door For cleaning purposes and to remove the door panels, you can detach the appliance door. The appliance door hinges each have a locking lever.
Appliance door Note: Clean the stainless steel inlay in the cover with stainless steel cleaner. Clean the rest of the door cover with soapy water and a soft cloth. 4. Open the appliance door again slightly. Put the cover back in place and press on it until it clicks audibly into place (figure #). Clean the panels with glass cleaner and a soft cloth. : Warning – Risk of injury! ■ Risk of injury! ■ en Scratched glass in the appliance door may develop into a crack.
en Trouble shooting 3Trouble shooting If a fault occurs, there is often a simple explanation. Before calling the after-sales service, please refer to the fault table and attempt to correct the fault yourself. gn i t o h s e l buo r T Fault The appliance does not work. "Sprache Deutsch" appears on the display. The time does not appear when the appliance is switched off. The appliance does not heat up; the m symbol lights up on the display.
Customer service Replacing the bulb in the top of the cooking compartment If the cooking compartment light bulb fails, it must be replaced. Heat-resistant, 25 watt, 230 V halogen bulbs are available from the after-sales service or specialist retailers. When handling the halogen bulb, use a dry cloth. This will increase the service life of the bulb. Only use these bulbs. : Warning – Risk of electric shock! When replacing the cooking compartment bulb, the bulb socket contacts are live.
en Dishes PDishes With the “AutoCook” operating mode, you can cook a wide range of dishes. The appliance selects most settings for you automatically. s eh s i D Information about the programs ■ ■ ■ ■ ■ The cooking result depends on the quality of the food and the type of cookware. For an optimal cooking result, use food that is in good condition and chilled meat only. The appliance chooses the optimal heating mode and the time and temperature setting for you.
Tested for you in our cooking studio en JTested for you in our cooking studio By preparing several dishes at the same time, you can make energy savings of up to 45 per cent. Position baking tins/dishes next to one another or offset and vertically stacked in the cooking compartment. Here, you can find a selection of dishes and the ideal settings for them. We will show you which type of heating and temperature are best suited to your dish.
en Tested for you in our cooking studio Dish Cakes in tins Sponge cake, simple Sponge cake, delicate Fruit flan made from sponge mixture, delicate Sponge flan base Fruit tart or cheesecake with shortcrust pastry base Swiss flan Tart Bundt yeast cake Yeast cake in springform cake tin Sponge base, 2 eggs Sponge flan, 3 eggs Sponge flan, 6 eggs Cakes on baking trays Sponge cake with topping Sponge cake, 2 levels Shortcrust tart with dry topping Shortcrust tart with dry topping, 2 levels Shortcrust tart with
Tested for you in our cooking studio Dish Accessories/cookware Biscuits Whirls** Baking tray Whirls** Baking tray Whirls, 2 levels** Universal pan + baking tray Biscuits Baking tray Biscuits, 2 levels Universal pan + baking tray Meringue Baking tray Meringue, 2 levels Universal pan + baking tray Macaroons Baking tray Macaroons, 2 levels Universal pan + baking tray * Preheat ** Preheat for 5 mins.
en Tested for you in our cooking studio Bread and rolls Your appliance offers you a range of heating types for baking bread and rolls. You can find the ideal settings for many dishes in the settings tables. Also refer to the notes in the section on allowing dough to rise. Only use original accessories supplied with your appliance. These have been tailored to the cooking compartment and the operating modes of your appliance. Shelf positions Use the indicated shelf positions.
Tested for you in our cooking studio en Dish Accessories Shelf posi- Type of tion heating Temperature in °C Grill Cooking setting time in mins. Bread White bread, 750 g Universal pan or cake tin 1 < Multigrain bread, 1.
en Tested for you in our cooking studio Baking tins Dark- coloured metal baking tins are most suitable. Tinplate baking tins, ceramic dishes and glass dishes extend baking time and mean that the baked item will not brown evenly. Greaseproof paper Only use greaseproof paper that is suitable for the selected temperature. Always cut greaseproof paper to size. Frozen products Do not use frozen products that are heavily frosted. Remove any ice on the food. Some frozen products may be unevenly pre-baked.
Tested for you in our cooking studio Bakes and soufflés Your appliance offers a range of heating types for preparing bakes and soufflés. You can find the ideal settings for many dishes in the settings tables. Only use original accessories supplied with your appliance. These have been tailored to the cooking compartment and the operating modes of your appliance. Shelf positions Always use the indicated shelf positions. You can prepare dishes on one level using a baking tin/ dish or the universal pan.
en Tested for you in our cooking studio Roasting in cookware Only use cookware which is suitable for use in an oven. Check whether the cookware fits in the cooking compartment. Glass cookware is most suitable. Place hot glass cookware onto a dry mat after cooking. If the surface is damp or cold, the glass may crack. Shiny roasting dishes made from stainless steel or aluminium reflect heat like a mirror and are therefore not particularly suitable. The poultry cooks slower and does not brown so well.
Tested for you in our cooking studio en Dish Accessories/cookware Shelf posi- Type of tion heating Temperature in °C Chicken breast fillet, 150 g each (grilling: preheat oven for 5 mins.) Small chicken portions, 250 g each Chicken goujons, nuggets, frozen Poulard, 1.5 kg Wire rack 3 ( - Grill Cooking setting time in mins.
en Tested for you in our cooking studio Very hot steam may escape when opening the lid after cooking. Lift the lid at the rear, so that the hot steam can escape away from you. If necessary, braise the meat first by searing it. Add water, wine, vinegar or a similar liquid to the braising liquid. A covering approx. 1-2 cm deep should be applied to the base of the cookware. The steam evaporates in the cookware when roasting. Carefully pour in more liquid if required.
Tested for you in our cooking studio en Dish Accessories/cookware Shelf posi- Type of tion heating Temperature in °C Pork steaks, 2 cm thick Pork medallions, 3 cm thick Wire rack Wire rack 3 3 ( ( - Grill Cooking setting time in mins. 2 16-20 3* 8-12 Beef Fillet of beef, medium, 1 kg Pot-roasted beef, 1.5 kg Sirloin, medium, 1.
en Tested for you in our cooking studio Note: When grilling very fatty items, do not slide the universal pan in directly under the wire rack, but rather at level 1. Pour up to ^ litres of water into the universal pan, depending on the size and type of the fish. Dripping liquid is caught. Less steam is generated and the cooking compartment stays cleaner. Keep the appliance door closed when using the grill. Never grill with the appliance door open.
Tested for you in our cooking studio en Dish Accessories/cookware Shelf posi- Type of tion heating Temperature in °C Grill Cooking setting time in mins.
en Tested for you in our cooking studio Dish Accessories Shelf posi- Type of tion heating Temperature in °C Croquettes Chips (turn during cooking) Chips, 2 levels (turn during cooking) Baking tray Baking tray Universal pan + baking tray 1 1 3+1 200-220 190-210 200-220 % $ < Grill Cooking setting time in mins. 15-25 20-30 30-40 1. Heat 1 litre of milk (3.5 % fat) to 90 °C on the hob Yogurt You can make your own yogurt using your appliance.
Tested for you in our cooking studio Dish Accessories Shelf posi- Type of tion heating Temperature in °C Whirls, 2 levels Small cakes Small cakes Small cakes, 2 levels Hot water sponge cake Hot water sponge cake Hot water sponge cake Universal pan + baking tray Baking tray Baking tray Universal pan + baking tray Springform cake tin, diameter 26 cm Springform cake tin, diameter 26 cm Springform cake tin, diameter 26 cm 3+1 1 1 3+1 1 1 1 < % < < % < < 140-150* 160* 150* 150* 160-170** 160-170** 150-16
en Tested for you in our cooking studio Types of heating used: ■ . Hotair Eco ■ # Top/bottom heating Eco Dish Accessories/cookware Shelf posi- Type of tion heating Temperature in °C Cooking time in mins. Cakes in tins Sponge cake in a tin Sponge flan base Sponge base, 2 eggs Sponge flan, 3 eggs Sponge flan, 6 eggs Bundt yeast cake Ring tin/cake tin Flan base tin Flan base tin Springform cake tin, diameter 26 cm Springform cake tin, diameter 28 cm "Gugelhupf" ring cake tin 1 1 1 1 1 1 . . . . .
Tested for you in our cooking studio Acrylamide in foodstuffs Acrylamide is mainly produced in grain and potato products prepared at high temperatures, such as potato en crisps, chips, sliced bread, bread rolls, bread or fine baked goods (biscuits, gingerbread, spiced biscuit). Tips for keeping acrylamide to a minimum General ■ Keep cooking times as short as possible. ■ Cook food until it is golden brown, but not too dark. ■ Large, thick pieces of food contain less acrylamide.
en Tested for you in our cooking studio Dish Cookware Shelf posi- Type of tion heating Searing time Temperain mins. ture in °C Fillet of pork, whole Pork medallions, 4 cm thick Cookware, uncovered Cookware, uncovered 1 1 . . 6-8 5-7 85* 85* Cooking time in mins. 60-90 90-120 Cookware, uncovered 1 . 8-10 85* 240-300 Cookware, uncovered Cookware, uncovered Cookware, uncovered 1 1 1 . . .
Tested for you in our cooking studio en Fruit, vegetables and herbs Accessories Shelf posi- Type of tion heating Temperature in °C Pomes (apple rings, 3 mm thick, 200 g per wire rack) Stone fruit (plums) Root vegetables (carrots), grated, blanched Sliced mushrooms Herbs, washed Wire rack 2 < 80 Cooking time in hours 4-7 Wire rack Wire rack Wire rack 1-2 wire racks 2 2 2 - < < < < 80 80 60 60 8-10 4-7 6-8 2-6 Wipe the rims of the jars, as they must be clean.
en Tested for you in our cooking studio Preserving Cookware Stone fruit, e.g. cherries, damsons 1-litre preserving jars Shelf posi- Type of tion heating 1 < Pomes, e.g. apples, strawberries 1 1-litre preserving jars Prove dough You can prove yeast dough in your appliance more quickly than at room temperature. Use the top/bottom heating type. Only start operation when the cooking compartment has fully cooled down. Always allow yeast dough to prove twice.
Tested for you in our cooking studio Defrosting The defrost heating type is suitable for defrosting frozen fruit, vegetables and baked items. Poultry, meat and fish should ideally be defrosted in the refrigerator. Use the following shelf position for defrosting: ■ Baking tray: Level 1 Recommended setting values The times in the table are average values. They are dependent on the quality, freezing temperature (-18 °C) and composition of the food. Time ranges are indicated.
3PCFSU #PTDI )BVTHFSÉUF (NC) $BSM 8FSZ 4USBF .